Volts, Amps, and Watts
|
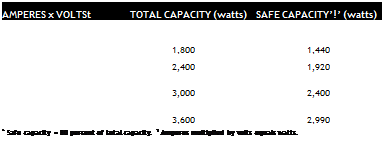
At a power plant or a substation, electricity is multiplied (charged) and given pressure (voltage); in that form, electricity is potential energy, just like a charged battery. When electricity is put to work at an outlet, electrons flow through the wires, and power is delivered as heat or light. Amperes (amp) is the measure of this current flow. The amount of energy consumed at a given point-say, at a toaster or a light bulb-is measured in watts. Volts, amperes, and watts are thus interrelated: ► Voltage: the potential to do work (electrical pressure). ► Amperes: the rate of electrical flow. ► Watts: the rate at which energy is consumed. Or, expressed as mathematical formulas: watts = voltage x amperes amperes = watts * voltage To reiterate briefly, electricity, impelled by voltage, flows from the power source. Along the way, at outlets, it encounters resistance and does work. It then returns to the power source, its voltage reduced or spent. |

![]()
 Note: If someone has unwisely oversized a breaker, you can’t use breaker size to calculate the circuit’s capacity. If you suspect oversizing, hire an electrician to remove the panel cover and determine the size of the circuit wires used. In general, lighting circuits with 14AWG wire should be protected by a 15-amp breaker. Small – appliance circuits with 12AWG wire should be protected by a 20-amp breaker. Most large 240-volt appliances require 10AWG wire, protected by a 30-amp breaker. Always check appliance nameplates for amperage ratings.
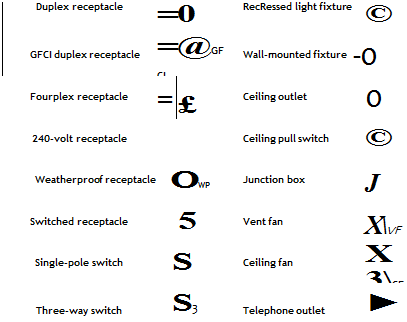
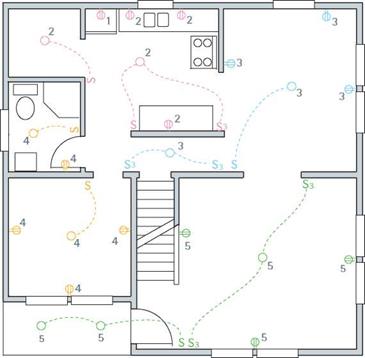
Mapping the entire system, including old and new circuits, lets you quickly match outlets, switches, and fixtures to circuits; this is especially helpful later if a circuit breaker trips (or a fuse blows). At the entrance panel, assign a number to each circuit. Then, as a helper flips breakers or removes fuses, map the outlets controlled by each circuit. To save shouting between floors, use cell phones.
All tools and materials should bear the Underwriters’ Laboratory (UL) stamp, which indicates that a component meets the safety standards of the electrical industry.
You don’t need a lot of expensive tools to wire a house successfully. All tools should have insulated handles. Avoid touching the uninsulated parts of tools when they’re near potentially hot (energized) wiring.
► Wear safety glasses for all tasks that throw up debris, such as cutting through finish materials, drilling, and notching studs. Wearing rubber gloves and using insulated tools can also save your life. But the greatest safety aid is the voltage tester shown on the facing page.
► In addition to electrical testers, you should have a continuity tester, which tests wire runs and connectors for short circuits or other wiring flaws—before a circuit is connected to power.
► A multipurpose tool is used to strip individual wires of insulation, cut wire, crimp connections, and quickly loop wire around device screws.
► Lineman’s pliers are the workhorse of an electrician’s toolbox. They can cut wire, hold wires fast as you splice them, and twist out box knockouts.
► Needle-nose (long-nose) pliers can grasp and pull wire in tight spaces. These pliers can loop wire to fit around receptacle and switch screws. But don’t use the tool for heavy twisting because that can misalign its jaws.
► Diagonal-cutting and end-cutting pliers can cut wires close in tight spaces; end cutters (sometimes called nippers) also pull out staples easily.
► Screwdrivers should always have insulated handles. Get several sizes of slot – head and Phillips-head screwdrivers, plus an offset screwdriver and a nut driver.


Leave a reply