VALLEY FLASHING
There are basically two types of valleys: open, where the valley’s flashing is exposed, and closed, where flashing is covered by shingles. Each has advantages. Open valleys clear water well, are easy to install, and work especially well beneath wood shingles, shakes, and laminated asphalt shingles, which are thicker and harder to bend than standard three-tab shingles. In woven valleys, shingles from both roof planes meet in the valley in alternating overlaps and are slower to install, but offer double-shingle protection and are favored for low-slope roofs. And there are variations, such as the closed-cut valley of the two valleys shown in "Closed Valleys,” on p. 73.
Prepare all valley types by sweeping away debris, hammering all sheathing nails flush, and
then lining the valley with underlayment. Traditionally, this lining was 30-lb. building paper.
But, as mentioned earlier, peel-and-stick WSU, though more expensive, is simpler to install and far more durable. Because it’s self- sticking, WSU doesn’t need to be nailed; moreover, it self-seals around shingle nails, preventing leaks. Though it comes in varying widths, install 36-in.-wide WSU for valleys, centering a single piece down the length of the valley and overlapping the drip-edge flashing at the bottom.
If you instead line the valley with 30-lb. building paper, run a continuous piece of 36-in.-wide paper down the valley or overlap pieces below by at least 6 in. Using tabbed roofing nails, nail down the paper, keeping nails 6 in. away from the center of the valley. The 15-lb. building paper underlayment used elsewhere on the roof will overlap the outer edges of this heavier "valley paper.”
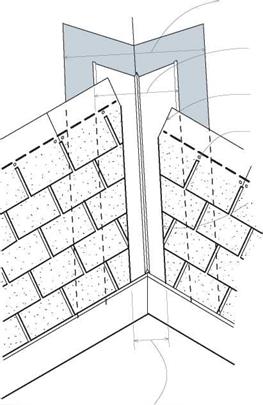
Install metal valley flashing that’s 18 in. to 24 in. wide on most slopes, so that each side of the valley is 9 in. to 12 in. wide. If the roof pitch is steep or if you live in an area that gets much
|
|


![]()


 |
Open valleys are well suited to thicker roofing materials, such as laminated asphalt shingles, wood shingles, and shakes. Because roofing cement may not be compatible with peel-and-stick WSU, use urethane caulk under shingle edges. The crimp in the valley flashing prevents crossvalley runoff from running under shingles.

rain, have a metal shop fabricate valley flashing with an inverted V-crimp down the middle. This crimp helps prevent heavy runoff from one side running across the valley and up under shingles on the other side. Overlap lower sections of flashing 8 in. to 9 in. The heavier the metal, the more durable the valley: 26-gauge is standard for prefabricated pieces, but the heavier 24-gauge is better.
Avoid driving nails through metal valley flashing. Rather, place nail shanks snugly against the edge of the flashing and drive nails till their heads touch, but don’t dent, the metal. Space nails every 12 in. to 16 in. along both edges or use clips that interlock seams along the edge. Not nailing through the metal allows it to expand and contract freely and leaves no nail holes for water to penetrate. To prevent corrosive galvanic action, use nails or clips of the same metal as the flashing.
Vent-pipe flashing (also called jack flashing) is usually an integral unit with a neoprene collar atop a metal base flange. Some pros prefer allmetal units because UV rays won’t degrade them
and their taller collars are less likely to leak on low-slope roofs.
Neoprene combos are easier to install. In both cases, shingle up to the base of the vent pipe and slide the unit down the pipe. Nail the top edge of the base, and then overlap it with shingles above. Neoprene collars slide easily over the pipes, but metal collars must be snipped and spread to receive the pipe, before being caulked with urethane to prevent leaks. For either base, don’t nail the lower (exposed) edge; instead, apply a bead of urethane caulk beneath the flange, to seal it to the shingles beneath.


Leave a reply