TESTING THE DWV SYSTEM
Once you’ve roughed out the DWV system, but before hooking up fixtures, test for leaks. Filling DWV pipes with water is a common test, which requires that you seal all fixture stub-outs and use a garden hose to fill the largest stack. (All DWV pipes are interconnected, so you need fill only one stack to fill all.) Should you see leaks, drain the system, fix the leaks, and refill. Once

 you see no leaks, allow the water to stand at least overnight or until the inspector signs off on your system.
There are several types of pipe seals. The most common and least expensive is a glue-on cap that fits inside a DWV pipe stub. Allow pipe cement to dry a day before filling pipes with water. When the test is completed, drain the system by opening a cleanout at the lowest point, and cut off the small sections of drainpipe in which caps are
|
|
glued. Where a stack is several stories high, this is the only type of cap guaranteed not to be dislodged by a weighty column of water.
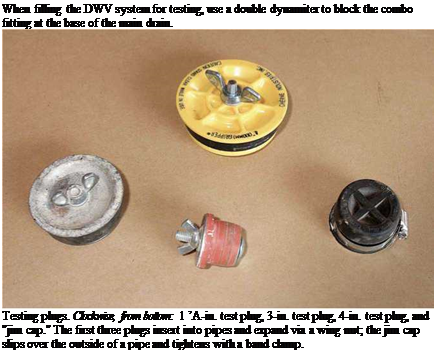
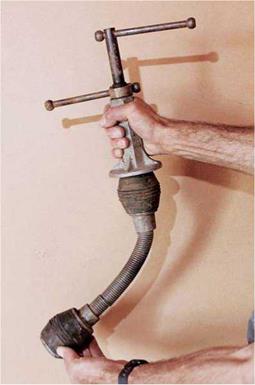
Reusable rubber caps or plugs eliminate the need for gluing. A jim cap fits over the end of a pipe and tightens with a ring clamp. Test plugs fit into pipe ends and are expanded by a wing-nut assembly. A third type, known as a doubledynamiter out West, can be rented. It is a spring – loaded device that fits into the combo at the foot of the building drain. As shown in the top photo at left, this tool has two rubber balls that can be expanded or contracted by turn screws on the shaft. Insert the balls so that the forward one lodges in drainpipe, and then expand that ball; the second ball should block the open leg of the combo. To release the water, contract the balls of the double-dynamiter in the order in which you expanded them. Loosened, the forward ball will allow the test water to run down the drain; releasing the second ball allows you to remove the tool. Label the respective turn screws so you don’t confuse them: If you release the second ball first, you may get a faceful of waste water.
If there are finish ceilings in place below new pipes and you don’t want to risk wetting them with a failed connection, use an air-pressure test in which all openings (including stacks) are sealed. Typically, an inflatable bladder attached to a gauge is inserted into a cleanout at the base of the soil stack, and air is pumped into the DWV system. If the gauge shows no pressure loss over a given period, the inspector signs off.
Water-supply pipes are easier to run than DWVs because they’re smaller and don’t need to slope. Metal supply pipes should be bonded to the house’s electrical grounding system (see p. 231).
Run supply pipes to fixtures once hot and cold trunk lines are connected. Run 24-in. trunk lines, using 12-in. pipe for branch lines serving two fixtures or fewer. Individual supply risers for toilets and lavatories are often 28 in. You save some money by using smaller-diameter pipes, but the main reason to reduce pipe diameter is to ensure adequate water pressure when several fixtures are used simultaneously. Reducing tees, such as the 22 by 12 shown in the bottom photo on p. 270, provide a 12-in. branch takeoff from a 22-in. trunk line.
Support horizontal runs of copper supply pipe at least every 6 ft., but if pipes run perpendicular to joists, plumbers usually secure the pipe every second or third joist. Support vertical runs of copper at every floor or every 10 ft., whichever is


Leave a reply