SPRAY-PAINTING BASICS
The information in this section is generally true for all spray applications. You’ll find other suggestions later in this chapter.
Wear a respirator mask with two replaceable organic-vapor filters. If you’re spray-painting exteriors, a half-face mask should be adequate. For interiors, where paint concentrations build up quickly, wear a full-face respirator mask.
Never touch a spray tip while it’s spraying:
It will inject paint into your skin (and bloodstream), which requires immediate medical attention, including removing the affected skin.
Carefully mask off everything you don’t want painted—from ceilings to windows to shrubs. To protect large expanses, use 112-in. painter’s masking tape to attach high-density plastic sheeting. To cover baseboards, windowsills, and the like, apply 12-in.-wide masking paper. Careful masking takes time, but it’s crucial to ensure crisp spray-painted edges.
Before turning on the pump, make sure the spray-gun trigger is locked, the pump’s pressure control is turned to low, and the priming lever is turned off.
Test the sprayer on an inconspicuous area first, to make sure it’s operating correctly and to familiarize yourself with its fan pattern and volume. If the pressure is correct, paint will stick when the spray tip is 12 in. from the wall. But if the paint bounces back at that distance (coating the sprayer and your gloved hand), reduce the pressure.
If the sprayer clogs often, the paint may be contaminated and need straining. Buy strainer bags at a paint store or, in a pinch, strain paint through an old pair of panty hose or nylons.
Keep the sprayer moving in long, straight strokes. Hold the spray tip 12 in. away from the surface and overlap passes 30 percent to 50 percent. To prevent uneven paint buildup, move the spray tip parallel to the surface. If the surface you’re painting has distinct edges, start spraying just before the edge and don’t release the trigger until the paint fan is past the far edge. If you must start in the middle of a wall, begin moving your arm before pulling the trigger.
Use a hose that’s long enough so you can move freely around the work site. For exterior jobs you’ll need a 100-ft. hose; for most interior jobs, a 50-ft. one. As you spray, hold a loop of the hose in your free hand to keep it out of your foot path— and away from freshly painted surfaces. Sprayer hoses come in 50-ft. lengths with couplings on both ends.
Start at the top and work down as you spray. Because a fine paint rain falls when you spray, better that it falls on unpainted surfaces—which will be painted over for a uniform finish.
Use a cardboard painting shield to keep paint overspray off adjacent surfaces you have already painted or won’t paint at all, as shown in the top photo on p. 462.
Keep spray tips clean because they are easily clogged. So when you’re done painting for the day, soak them in the appropriate vehicle (solvent for oil-based paint, hot water for latex). If the tip is really gunky, soak it in lacquer thinner.
Replace the spray tip if, after cleaning it, its spray pattern is still blotchy or the spray unit seems to be guzzling paint. Solids in the paint actually abrade the inside of the tip, enlarging it over time.
Keep filters clean and replace them often.
Using a paint-appropriate thinner, clean filters every time you change paint colors, at the end of each day, and if you’re pumping a lot of paint— say, 40 gal. by lunchtime. A 100-mesh filter is minimum; coarser filters will admit debris that can clog the tip.
The presence of lead paint in older houses is serious, but it’s probably not a dire problem if your home is well maintained and old paint is well adhered. Lead is most dangerous when it becomes airborne, especially during sanding or heat stripping, for then it can be inhaled and easily absorbed into the bloodstream. So be

methodical: Postpone any demolition or paint removal, test to see if lead paint is present, and develop a plan for dealing with it. Then wear proper safety equipment, confine lead-paint debris, and clean up thoroughly.
Lead: Some background. Lead-based paint adheres to almost any surface and weathers well, so it’s not surprising that it can be found in 90 percent of houses built before 1940. However, as lead paints health hazards became known in the 1950s, paint manufacturers began to phase it out. It was banned altogether in 1978 by the U. S. government.
Because lead is a neurological toxin, it is particularly damaging to children 6 and younger, who seem drawn to it because it’s slightly sweet. Breathing or eating it can cause mental retardation in children. In people of all ages, lead can also cause headaches, anemia, lethargy, kidney damage, high blood pressure, and other ailments.
Because of its durability, lead paint was commonly used on exteriors, glossy kitchen and bathroom walls, in closets (where a single coat would last forever), and as an enamel on interior doors, windows, stair treads, and woodwork. So each time a swollen window or sticking door was forced open, it ground lead paint into flakes and dust. Roof leaks, drainage problems, and inadequate ventilation add to the problem because excessive moisture causes the paint to degrade and detach sooner.
DEALING WITH LEAD: FIRST STEPS
If you suspect that your house has lead paint, test it to be sure. There are several options:
► To test a cut-out chip, buy an inexpensive lead-testing kit from a hardware store.
► Or order a lead-testing kit from an accredited testing lab; some of these kits test paint chips, whereas others test for dust wiped from floors; the EPA’s National Lead Information Center (NLIC) lists testing labs at www. epa. gov/lead/nlic. htm.
► Or hire a certified lead-paint inspector to survey all the painted surfaces in your house. This will cost several hundred dollars, but you’ll get a written report.
If the home has lead paint, here’s an alternative set of options:
► If the paint is intact and you don’t have small children, either leave the lead paint alone or paint over it to seal it in place.
► If you have construction experience, your renovation isn’t extensive, and you’re fastidious about cleanup, remove the affected materials yourself—or cover them with 14-in. drywall.
► Hire an experienced lead-abatement contractor. This makes sense if your renovation is extensive, there are small children at home, you can afford to hire someone, and local codes require it.
Finally, think through the project carefully even if you plan on hiring a contractor. Lead abatement will be very disruptive. During abatement, where will you live? (It’s unwise to stay in a house with airborne lead dust.) Where will you store your possessions? How will debris be contained and disposed? Start by consulting local building codes and visiting the EPA’s excellent NLIC site mentioned earlier in this section.
Although comprehensive guidance for removing lead is beyond the scope of this book, these suggestions will start you in the right direction.
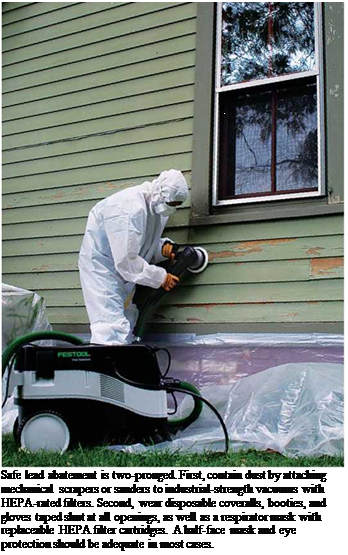
Dress for the job. Wear a half-face respirator mask with replaceable HEPA filter cartridges and snug-fitting goggles; a full-face mask with HEPA filters is also appropriate but may be hot to work
 in. Workers occasionally exposed to lead dust should wear at least an N100 disposable respirator. Disposable coveralls, gloves, and booties are also a must; tape shut neck, wrist and ankle openings. Finally, change out of lead-dust – contaminated work clothes at work because wearing them home can endanger your family.
Minimize on-site dust. Use a spray bottle to wet areas before hand-scraping or wet-sanding them. A shop vacuum with a HEPA filter can capture fine lead dust and prevent it from recirculating into the room; standard vacuum filters aren’t fine enough for the job. Stripping doors and window


Leave a reply