SHIMMING THE FRAME
Plumb the hinge jamb first, using a 6-ft. level for accuracy. Or you can hang a plumb bob from a nail in the top of the jamb, as shown in the left photo on p. 102, and measure from the plumb line. When the jamb is plumb, all measurements from the jamb to the line will be equal.
1. If jack studs (trimmer studs) on either side are square to the face of the opening, pair shims so that their tapers alternate, creating a flat surface behind the jamb. However, if jack studs are twisted, you may need to insert an odd number of shims to build up the low edge of the twisted stud. Adjust shims in and out, constantly checking for plumb and square till both the face and the edges of the hinge jamb are plumb. This takes patience. Most installers start shimming behind the top hinge.
Interior doors are commonly shimmed with three pairs of shims along each jamb: behind the two hinges and halfway between them. However, to prevent jambs from twisting should the door fly open suddenly, many carpenters also shim behind the top and bottom corners of each side jamb.
2. After checking that the frame head is level, secure the latch jamb. Margin that jamb, and tack it in place. At this stage, most carpenters rehang the door to the hinge jamb so they
can eyeball jamb clearances to the door. Mill specs vary, but there’s usually an ‘/-in. gap along the hinge jamb and Иб in. to ‘A in. of clearance along head and latch jambs.
Shim at least three points along the latch jamb; one shim point should be directly behind the strike-plate location. If the latch jamb bows into the opening, add nails or screws to draw it back toward the jack stud. Check for margin,


 square, and plumb as you go. Shim up from the bottom of the jamb as needed to create a uniform clearance along the length of the door and at the upper corner.
3. Shim the frame head, inserting a pair of shims at either corner. Caution: If you drive shims too aggressively, you’ll cause the top of the door to bind.
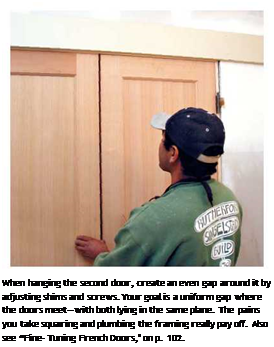
4. This is the last chance to check margins and adjust shims, if necessary. Make sure all clearances around the door are uniform. When the door is closed, it should be parallel with the latch jamb. Once you’ve checked for margin, plumb, level, and clearances all around, secure the frame. Use five pairs of 10d finish nails or trim-head screws: one pair near each hinge, one pair in the middle of the frame, and one pair at each corner. Using a pair of nails or screws at each shimming point will keep the frame from turning.
|
After planing down the hinge stile, use a small router (laminate trimmer) to mortise the hinge gains deeper. Clamp scrap to the door edge to provide a wider base for the router. You could use a chisel, but a router will get the depth exactly right. |
IF THE DOOr HITS THE LATCH JAMB
If the door hits the latch jamb, the frame head may have been cut a little short.
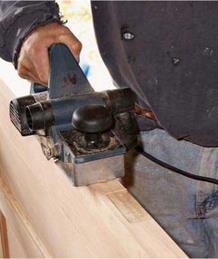
If it’s a very slight amount, you may be able to back out latch-jamb shims and hammer the latch jamb outward, using scrap wood to avoid marring it. But if the door still hits, you may need to rip down the hinge stile slightly to reduce the door’s width. Because holes for locksets are backset exactly from the edge of the door, don’t rip down the lock stile. It’s far easier to remove the hinge butts, use a power plane to trim the hinge stile, and then recut the hinge mortises an equal amount.


Score as deeply as you can (shingle butts may take several passes); then snap off the waste.
Don’t try to snap shingles that are too thick, or you may torque the jamb out from the opening. Then install the interior trim (see Chapter 17).
Installing a Basic Exterior Door
Installing a prehung exterior door builds on the information just presented, so if any step is insufficiently explained here, consult the preceding section.
ASSESSING AND PREPPING THE OPENING
Cover finish floors with heavy cardboard or particleboard when installing an exterior door, and cover the work area with tarps to contain the mess.
1. Before ordering the new door unit, measure the height and width of the RO and the thickness of the wall; check the jack studs for plumb, the header for level, and corners for square. You can install a squared door frame into an out-ofsquare opening. But to allow proper shimming, the RO must be at least 1 in. taller and wider than the frame.
2. Next determine the height of the finish floor. In most cases, prehung doors come with a combination sill-threshold already attached, which sits directly on the plywood subfloor. However, some custom exterior doors come with separate sills set flush to the subfloor, which require installing the sills before the subfloor or notching the subfloor and the framing below the subfloor to accommodate the thickness of the sill.
If you need to build up the bottom of the opening to make the new sill the same height as the finish floor, do so now.
3. The bottom of the RO should be level and weather tight. If there’s an overhang to protect the door, just line the bottom of the RO with building paper. If there’s no overhang, install a floor pan across the bottom of the RO. The pan can be as simple as a peel-and-stick flexible membrane applied to the subfloor or, if your region gets driving rains, a prefabricated metal pan (usually aluminum).
Whatever the pan material, fold its ends and back edge up so it will confine any water that gets under the sill rather than soaking the framing, subfloor, or finish floor. Overlap the pan corners and caulk them for good measure. (Make sure the caulk is compatible with the flexible membrane.) Solder or caulk the metal pan seams. Finally, the outer lip of a floor pan should


Leave a reply