SANDING FLOORS
A quick review: Shut off all pilot lights, seal off doorways, open windows for ventilation, wear a respirator mask and ear protection, start with the least aggressive sandpaper, and lower the sander drum only when the machine is moving.
Start sanding with the drum sander. Sanding with the direction of the wood grain cuts less aggressively and minimizes scratches that must be sanded out later. However, if there are high spots that need to be sanded down or if the floor is painted, sand diagonally to the wood grain on the first pass, then with the grain on all subsequent passes. (The diagonal angle should be 15° to 30° from the direction of the floorboards.) If you must sand the first pass diagonally, use the same grit on the second pass, as you sand with the grain. Because a parquet floor has grain running in various directions, sand it diagonally on the first pass, too.
When sanding with the grain, start along a wall and sand about two-thirds the length of the
![]()
 To remove a damaged board, drill holes across it so you can pry it out in splinters, using a hand chisel. Or you could cut into the damaged board by using a circular saw set to the depth of the flooring and then pry out pieces with a flat bar. To make this pocket cut, rest the heel of the saw on the floor, pull back the saw guard, and slowly lower the front of the saw sole until the turning blade engages the wood. Be careful: Holding a blade guard back is never advisable if you can avoid it, and the saw may jump when it engages the wood. Let the blade stop before you lift the saw.
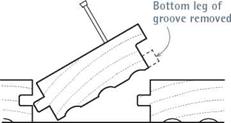
Find a replacement board that’s similar in color and grain: Try to pull a board from a nearby closet or from floor section that’s usually covered by an appliance. Hold the board next to the hole and use a utility knife to mark off the appropriate length. To make the replacement fit more easily, slightly back-bevel its lower edges on a table saw. If the stock is tongue-and-groove, use a table saw to cut off the lower leg of the groove. Apply construction adhesive to the underside of the new board, and then drive it into the opening using a piece of scrap to cushion the hammer blows. It’s not possible to nail the board through its tongue, so predrill and face-nail two 6d finish nails at either end. Use a nail set to drive the nails below the surface. Fill the holes with wood putty.
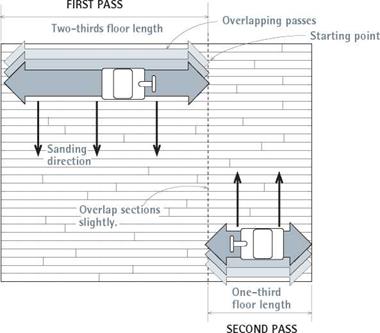 |
Start along a wall and sand about two-thirds the floor length. Sand up and back. Then raise the drum, and roll the sander over so the next pass overlaps by roughly half a drum-width. Sand till you reach the opposite wall. Then turn the sander 180° and sand the remaining third of the floor.

floor. Then, with the drum lowered and sanding, pull the machine backward over the strip just sanded. Raise the sander’s drum toward the end of each backward pass and wheel the machine over about 6 in., so the next pass will overlap the first by roughly half the width of the drum.
Again, sand down about two-thirds the length of the room, and then pull the sander backward, as shown in "Overlap Sanding Passes,” above.
Continue sanding until you have reached the opposite wall (you will have sanded two-thirds of the room by then). Turn the machine 180° and start sanding the other end of the room (the third you haven’t yet sanded). Again, sand one pass up and one back. When you reach the edge of the portion already sanded, overlap it by 1 ft. or 2 ft. before starting the next pass. In this manner you can blend the sanding of the two sections of the room.
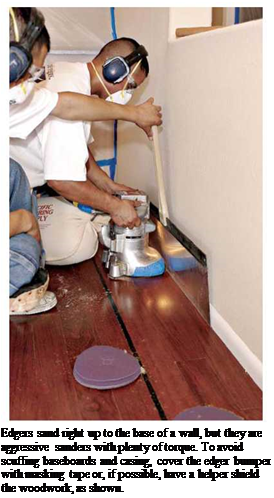
Using an edger. After completing each sanding pass with the drum sander, use the edger to sand along the perimeter of the room, as close to the base of the walls as you can get. Use the same grit sandpaper that you just used on the drum. When it’s upright, the sander disc moves in a
clockwise direction, so work from left to right, keeping the edger moving constantly to avoid scour marks. You don’t need to press down on the edger to make it work. If the edger is sanding too aggressively, switch to the next finer grit.
If it’s not sanding aggressively enough, change its sanding disks more often. Again, try to sand with the wood grain as much as possible.
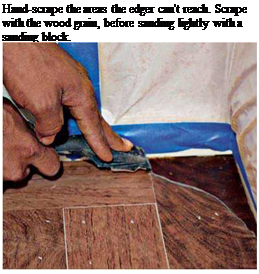
Finish up by hand. Hand scraping and sanding take care of the areas the edger can’t reach, such as in corners and under cabinet toekicks. It’s hard, tedious work, but fortunately there’s not much of it. A sharp scraper will speed the job, scraping with the grain to remove the old finish. Then use a sanding block to smooth out the semicircular edger marks. (Note: If there are a lot of edger marks, use a random- orbital sander to feather them out.) Once you’ve drum-sanded, edged, and hand-scraped the room, vacuum it well before switching to the next-finer grit


Leave a reply