SAGGING STAIRS
If the staircase has several of the ailments described in preceding sections, it may also have major troubles underneath. Investigate further. If the stairs tilt to one side, the carriage on the low side is having difficulty: That is, nails or screws holding it to the wall may be pulling out, the wood may be rotting or splitting, or the carriage may be pulling free from the stringer. Sagging on the open side of a stairway is common, for there’s no wall to bolt its carriage to. If there are large cracks or gaps at the top and bottom of the stairs, you’re seeing symptoms of a falling carriage.
To learn more, remove the finish surfaces from the underside of the staircase. But before cutting into anything, rent a Dumpster for the rubble and confine the mess by sealing off the stairwell with sheet plastic. When you cut, set your circular saw just to the depth of the finish materials so that you don’t cut into carriages. Wear goggles and use a Carborundum™ blade to cut out the surface in 2-ft. squares.
You can probably save any decorative plaster molding along the staircase by cutting parallel to it—about 1 in. from its edge, thus isolating the section of lath nailed to the underside of the outer carriage. Leaving a 1-in. strip will also make it easier to disguise the seam when you reattach the ornamental border after repairing the stairs.
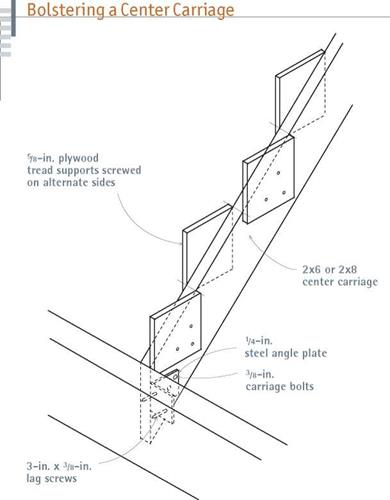
With the underside of the stairs exposed, you can see exactly what the problem is. If the carriages have pulled loose from adjacent walls, you’ll see a definite gap. Replace wood that is rotted or badly cracked, especially wood cracked across the grain. If the wood sags or is otherwise distorted, bolster it with additional lumber; it may also need to be reattached. All of these repairs are big ones. To do them right, you’ll need complete access to the substructure, from one end of the carriages to the other.
Starting at the top, remove all nosing, balusters, treads, and risers. You could theoretically bolster undersize carriages without removing all the treads, risers, and balusters, but it’s better to

 remove them. Otherwise, misaligned or distorted carriages will be held askew by all the pieces nailed to them. So remove the treads and risers, and jack up the distorted carriages to realign them. (You may want to stretch taut strings as an alignment aid.)
Number all parts as you remove them, grouping pieces according to the step number.


Leave a reply