Roughing-In DWV Pipes
In new construction, pros typically start the DWV system by connecting to the sewer lead pipe, supporting the main drain assembly every 4 ft. and at each point a fitting is added.
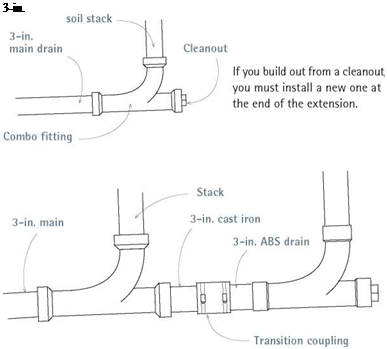
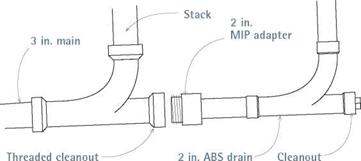
Renovation plumbing is a different matter altogether, unless an existing main is so corroded or undersize that you need to tear it out and replace it. Rather, renovation plumbing usually entails tying into an existing stack or drain in the most cost – and time-effective manner. There are three plausible scenarios: (1) cutting into a stack to add a branch drain, (2) building out from the end of the main drain where it meets the base of the soil stack, and (3) cutting into the main drain in mid-run and adding fittings for incoming branch drains.
This discussion assumes that the existing pipes are cast iron and that new DWV pipes or fittings are ABS or PVC plastic, unless otherwise noted. If you’re adding several fixtures, position
the new branch drain so that individual drains can attach to it economically—that is, using the least amount of pipe and fittings. As noted before, drainpipes must have a minimum downward slope of 14 in. per foot.
Run clear water through the drains before cutting into them. Flush the toilets several times and run water in the fixtures for several minutes. Then shut off the supply-pipe water and post signs around the house so people don’t use the fixtures while work is in progress.
If you’re adding a toilet, have a plumber calculate the increased flow, size the pipes, recommend fittings, and—perhaps—do the work. Adding a lav, sink, or tub, on the other hand, is considerably easier and less risky—mostly a matter of splicing a 1 И-in. branch drain to a 2-in. or 3-in. stack. The keys to success are clamping the stack before cutting it, inserting a tee fitting into the stack, and joining the branch drain to that fitting.
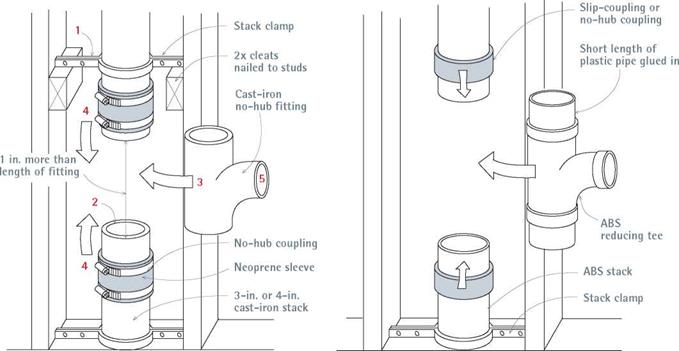
Let’s look at splicing to a cast-iron stack first. Start by holding a no-hub fitting (say, a 2 by 1И sanitary tee) next to the stack and using a grease pencil to transfer the fitting’s length to the stack—plus И in. working room on each end.
(This will leave a И-in. gap at each end, which will be filled by a lip inside the neoprene sleeve.) Install a stack clamp above and below the pro-
THE Flow
To optimize flow and minimize clogged pipes, follow these guidelines:
► DRAINAGE FITTINGS. Use a long-sweep ell (90° elbow) or a combo when making a 90° bend on horizontal runs of waste and soil pipe, and where vertical pipes empty into horizontal ones. Use a standard ell when going from horizontal to vertical. Where trap arms join vent stacks, use sanitary tees. (Long-sweep fittings are not required on turns in vent pipe; regular tees and ells may be used there.)
. Cleanouts are required where a
building main joins a lead pipe from a city sewer line or septic tank, at the base of soil stacks, and at each horizontal change of direction of 45° or more. Also, install cleanouts whenever heavy flow increases the possibility of clogging, such as in back-to-back toilets. There must be enough room around the cleanout to operate a power auger or similar equipment.
|
PIPE MATERIAL |
HORIZONTAL SUPPORTS |
VERTICAL SUPPORTS |
|
Water supply |
||
|
Copper |
6 ft. |
10 ft. |
|
CPVC |
3 ft. |
10 ft. and mid-story guide |
|
PEX |
32 in. |
Base and mid-story guide |
|
DWV |
||
|
ABS or PVC |
4 ft. and at |
|
|
branch connections |
10 ft. and mid-story guides if pipe < 2 in. |
|
|
Cast iron |
5 ft. |
Base and each story; 15 ft. |


 Splicing a Branch Drain to a Stack
|
|
|
|

Glue two short lengths of ABS pipe to a tee. Mark an equivalent length plus [2]/2 in. on both ends onto the ABS stack to indicate cutlines. (Each ABS slip-coupling has an inner lip that nearly fills the 1/2-in. space). Support and cut the stack. Finally, join the pipes by slipping the couplings in place.


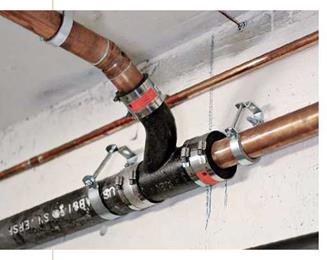
Insert the no-hub fitting, unroll the sleeves onto fitting ends, slide the banded clamps over the sleeves, orient the fitting takeoff, and tighten the clamps with a no-hub torque wrench. Finally, use a transition coupling, which is a special nohub coupling that accepts pipes of different outer diameters, to tie the new 112-in. plastic branch drain to the cast-iron no-hub coupling.
Tying into an ABS or PVC stack is essentially the same, except that you’ll use a wheeled cutter to cut the stack. And, instead of using a no-hub coupling, glue short (8-in.) lengths of pipe into the tee fitting and then use plastic slip couplings to join the 8-in. stubs to the old pipe. (The slip couplings also glue on, with an appropriate solvent-based cement.) Use a reducing tee, such as a 2 by 1h. Be sure to support the stack above and below before cutting into it.


Leave a reply