Replacing a Shallow Foundation
If you decide to replace a shallow foundation, begin by checking local building codes for foundation specs appropriate for your area. Before
![]()


beginning foundation work, be sure to review this chapter’s earlier sections on shoring and jacking. Then survey the underside of the house and the area around the foundation for pipes, ducts, and other potential obstructions. If you can reposition jacks or move shoring slightly to avoid crushing or disconnecting drains, water pipes, and the like, do so.
Remember, jacking timbers and shoring are temporary supports. Complete the job and lower the house onto foundation elements as soon as possible. Work within your means, skills, and schedule: If you can’t afford a house mover to raise the house and replace the whole foundation, do it one wall at a time.
Mudsills are almost always replaced when foundations are. With the framing exposed, it’s easy to install new pressure-treated or redwood mudsills that resist rot and insects. At the same time, replace rotted or insect-infested pony-wall studs. (If just a few studs are rotted, cut away the rot and nail a pressure-treated sister stud to each. If the bottom 1 in. or 2 in. of many studs has rotted, you might also install a thicker mudsill to make up for the amount you cut off stud bottoms.) If the siding is in good shape, remove just enough to expose the mudsills and rotten studs; the siding holds the pony-wall studs in place and keeps them from “chattering” while you cut them.
(Pony walls shown on p. 209.) You’ll also need to punch through the siding to install temporary needle beams, discussed earlier in this chapter.
|
|
|
|

|
|||||||||||||||||||||||||||||||
|
|
||||||||||||||||||||||||||||||
|
|||||||||||||||||||||||||||||||
|
|||||||||||||||||||||||||||||||
|
|||||||||||||||||||||||||||||||
|
|||||||||||||||||||||||||||||||
|
|||||||||||||||||||||||||||||||
|
|||||||||||||||||||||||||||||||
|
|||||||||||||||||||||||||||||||
|
|||||||||||||||||||||||||||||||
 |
|||||||||||||||||||||||||||||||


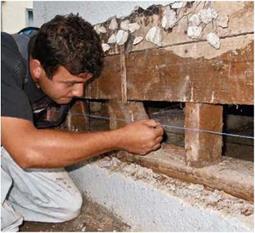
Once you’ve jacked up and shored the house framing, lay out the height of the new sill by snapping chalklines across the pony-wall studs. Use a laser level to indicate where the chalk marks should go or, if the old foundation is level, measure up from it. Although the line should be as level as possible, small variations will be accommodated when the concrete is poured up to the bottom of the mudsill.
With the siding removed, use a square to extend the cutoff marks across the face of the studs; a square cut optimizes load bearing from the stud onto the mudsill. Use a reciprocating saw to make the cuts. If the first stud chatters as you attempt to cut through it, tack furring strips to all the studs, just above the cut-line to bolster successive studs. Then remove the old mudsill and rotted stud sections. Chances are the old mudsill will not be bolted to the foundation.
The replacement sill should be foundation – grade heart redwood, pressure-treated Douglas fir, or yellow pine to resist insects and moisture and should be end-nailed upward into the solid remnants of each stud, using two 16d galvanized common nails. Use a pneumatic nailer to nail up the new mudsill; it does the job quickly. However, predrill anchor bolt holes into the new
mudsills before nailing them to stud ends. Anchor bolts will secure house framing to the foundation after you pour it.


Leave a reply