PREPPING RAW DRYWALL OR PLASTER
Newly installed drywall must be sealed before you hang wallcoverings. Otherwise, the drywall’s paper face will absorb paste, making it impossible to remove the covering at a future date without damaging the drywall face. To seal drywall, apply a coat of universal primer-sealer, which is an excellent base coat for papering and painting.
Plaster must be well cured before you apply either wallcovering or paint. Uncured plaster contains alkali that is still warm, causing the paint and paste to bubble. "Hot plaster” has a dull appearance, whereas cured plaster has a slight sheen. Curing time varies, but keeping the house warm will hasten it. Cured plaster can also be coated with universal primer-sealer.
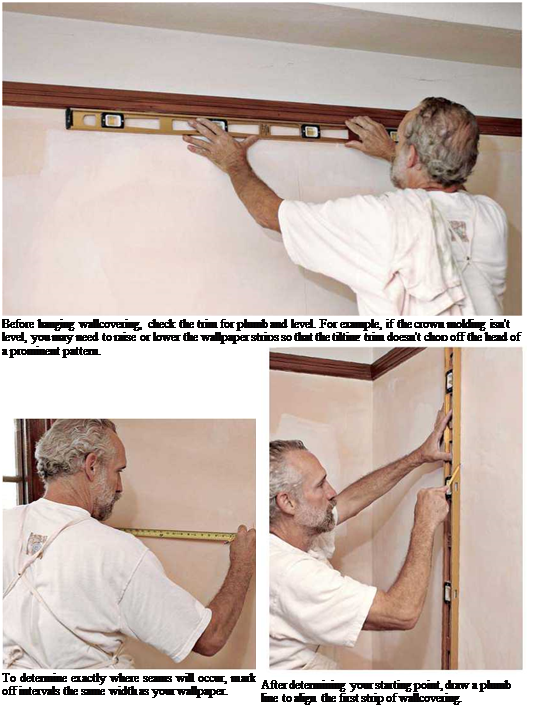
Before ordering materials, walk the room and determine if the walls are plumb and if the woodwork is plumb and level. Also, use a long, straight board or a 4-ft. spirit level to determine if the walls have mounds and dips. Use a pencil to circle irregularities so you can spot them easily later. You can hang almost any wallcovering type or pattern, but if door or window casing is markedly out of plumb, small patterns make plumb problems less noticeable than large, loud patterns.
Mold is a discoloration caused by fungi growing on organic matter such as wood, paper, or paste. Mildew is essentially the same, but usually refers to fungi on paper or cloth. Note: Without sufficient moisture and something to eat, mold (and mildew) can’t grow. Mold can grow on the paper and adhesives in drywall; but, technically, mold can’t grow on plaster because plaster is inorganic. If your plaster walls are moldy, the fungi are growing on grease, soap, dirt, or some other organic film on the plaster.
Anyhow, if your walls or ceilings are moldy, first alleviate the moisture. To determine its source, duct-tape a 1-ft.-sq. piece of aluminum foil to a wall. Leave this up for a week. Upon removal, if there’s moisture on the back of the foil, the source is behind the walls. However, if the foil front is damp, there’s excessive moisture in the living space, which you might reduce by installing ventilator fans, for starters.
If the drywall or plaster is in good condition, clean off the mold by sponging on a mild detergent solution. (Though widely recommended, diluted bleach isn’t any more effective than a household cleaner.) The sponge should be damp, not wet. Rinse with clean water, and allow the surface to dry thoroughly. Then paint on a universal primer-sealer. If you’ll be wallpapering the room, use a mildew-resistant, kitchen-and-bath adhesive.
If mold or water stains are widespread and the drywall has deteriorated, there may be mold in the walls. Remove a section of drywall to be sure. If the framing is moldy, it may need to be replaced—a big job and one worth discussing with a mold-abatement specialist, especially if family members have asthma or chronic respiratory problems (for more, see Chapter 14).
Starting and finishing points. To decide where to hang the first strip, figure out where you want to end. The last strip of wall covering almost always needs to be cut narrower to fit, disrupting the strip’s full-width pattern. Thus avoid hanging the last strip where it will be conspicuous.
A common place to begin is one side of a main doorway. There, you won’t notice a narrower strip when you enter the room. And when you leave the room, you’ll usually be looking through the doorway. The last piece is normally a small one placed over the doorway.
Another common starting point is an inconspicuous corner. To determine exactly where wallcovering seams will occur, mark off intervals the same width as your wallcovering. Go around the room, using a ruler or a wrapped roll of wallcovering as your gauge. Try to avoid trimming and pasting very narrow strips of wallcovering in corners; this usually looks terrible, and the pieces don’t adhere well. You may want to move your starting point an inch or two to avoid that inconvenience.
 |


PICTURE WINDOW
Centerline
|
|
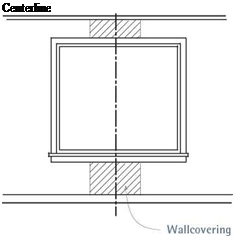
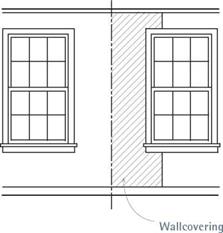
Where windows are the focal point of a room, position the wallcovering accordingly. If the window is a large picture window, center the middle of the strip on the middle of the window. If the focal point is two windows, center the edges of the two strips as shown.
However, if the pattern is conspicuous, you might start layout with a strip centered in a conspicuous part of a wall—over a mantel, over a sofa, or in the middle of a large wall. Determine such a visual center and mark off roll-widths from each side of the starting strip, until you have determined where the papering will terminate, again preferably in an inconspicuous place.
You may want to center the pattern at a window, if that’s indisputably the visual center of the room. In the case of a picture window, the middle of the strip should align with the middle of the window, as shown at left. If there are two windows, the edges of two strips should meet along a centered, plumbed line between the two windows, as shown, unless the distance between the windows is less than the width of a strip. If the distance is less, center a strip between the windows.


Leave a reply