Patching Foundation Cracks
Determine the cause of the crack and fix that first; otherwise the crack may recur. Shallow foundation cracks less than % in. wide are usually caused by normal shrinkage and needn’t be patched, unless their appearance disturbs you or they leak water. However, you should repair any cracks that go all the way through the foundation: Probe with a thin wire to see if they do.
Of the many crack-repair materials, there are three main types: cement-based, epoxy, and polyurethane foams. When working with any of these materials, wear disposable rubber gloves, eye protection, and a respirator mask with changeable filters.
Cement-based materials such as hydraulic cement are mixed with water and troweled into cracks. To ensure a good connection, first use a masonry chisel and hand sledge to enlarge the crack; angle the chisel to undercut the crack, making it wider at the back, like a rabbet joint in woodworking. Then wire-brush the crack to remove debris. Next, dampen the surfaces, fill the crack with hydraulic cement, and feather out the edges so the repaired area is flat. Work fast because most hydraulic cement sets in 10 minutes to 15 minutes and expands so quickly that it can stop the flowing water of an active leak.
Epoxies range from troweled-on pastes to injection systems that pump epoxy deep into cracks. Application details vary, but many injection systems feature surface ports, which are plastic nozzles inserted into the crack along its length. You should space ports 8 in. apart before temporarily capping them. Then seal the wall surface with epoxy gel or hydraulic cement, which acts as a dam for the epoxy liquid you’ll inject deep into the wall through the ports. Working from the bottom, uncap each surface port, insert the nozzle of the applicator, and inject epoxy till it’s visible in the port above. Cap the port just filled, and then move up the wall, port by port.
Epoxy is famously strong. The manufacturer of Simpson Crack – Pac™ claims that its injected epoxy achieves 11,000 psi compressive strength when cured for 7 days. (Foundation concrete averages 3,000 psi to 4,500 psi.)
Consequently, injected epoxy, which bonds to both sides of the crack, is a true structural repair, not just a crack filler. There are a couple of disadvantages: cost and curing time. Epoxy takes hours to harden, so it can ooze out the back of the crack, if there’s a void between the soil and the foundation wall—as there often is. If your main concern is water leaks and not structural repairs, polyurethane foam is probably a better choice.
Polyurethane foam is applied in many ways, including the surface-port injection just described for epoxies. Polyurethane sets up in minutes, so it’s unlikely to sag or run out the back of the crack. It’s largely unaffected by water, so you can inject it into a damp crack. Unlike epoxy or cement-based fillers, polyurethane is elastomeric (meaning it stays flexible), so it’s great for filling foundation cracks that expand and contract seasonally. One disadvantage is that it has little compressive strength and hence does not create a structural repair.

beams, stick with wood posts: Fir 6x6s are less likely to migrate than steel columns.
Cribbing. Cribbing refers to a framework of usually squared timber (often 6x6s) stacked perpendicular in alternate layers to create a stable platform for jacking or shoring house loads. In earthquake country, foundation contractors "shear wall” cribbing higher than 8 ft.—that is, they temporarily nail h-in. plywood to the cribbing, using duplex nails. The precaution is worth the trouble: in 1989 a California house resting on 13-ft.-high shear-walled cribbing remained standing through a 7.1 quake.
Braces and connectors. To keep posts plumb and prevent structural elements from shifting, builders use a variety of braces and connectors such as these:
► Diagonal 2×4 braces 3 ft. or 4 ft. long are usually nailed up with double-headed nails for easy removal.
► Plywood gussets are acceptable if space is limited.
► Metal connectors such as Simpson hurricane ties, post caps, and post-to-beam
connectors are widely used because they are strong and quick to install.
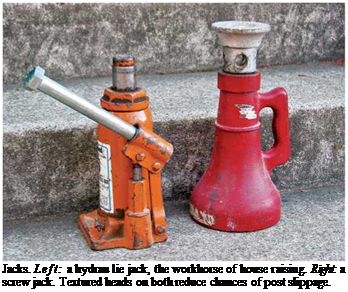
Jacks. House-raising screw jacks and hydraulic jacks are by far the most common types. For safety, all jacks must be placed on a stable jacking platform and plumbed.
Screw jacks vary from 12 in. to 20 in. (closed height), and extend another 9 in. to 15 in. Never raise the threaded shaft more than three-quarters
its total length because it would be unstable beyond that. Screw jacks are extremely stable: Of all types, they are the least likely to fail or lower unexpectedly under load. But they require a lot of muscle and at least 2 ft. of space around the jack for operation.
Hydraulic jacks are the workhorses of foundation repair and are rated according to the loads they can bear, such as 12 tons. In general, hydraulic jacks are easier to operate than screw jacks, and they fit into tighter spaces. They are lowered by turning a release valve and so can’t be lowered incrementally. Because hydraulics release all at once, many house movers use hydraulics to raise a house and screw jacks to lower it gradually.
Because the head of a hydraulic jack is relatively small, you need to place a 4-in. by 4-in. by f4-in. steel plate between it and the wood it supports so the head doesn’t sink in during jacking. Safety note: Before lowering the jack, have a helper remove the steel plate as pressure is released. Otherwise, the plate could fall and injure the jack operator. Alternatively, have the plate predrilled so you can screw or nail it to the underside of the beam.
|
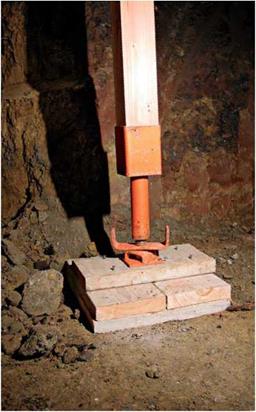
Unsafe! Although post jacks such as this are widely used as temporary shoring, they are not strong enough for house loads. Here footing blocks are also undersize, and the post is badly out of plumb. |
Unsuitable for raising a house. Postjacks employ a screw mechanism but are of flimsier construction than the compact screw jack described in the previous section. They tend to be fashioned from lightweight steel, with slender screws that could easily distort when loaded beyond their capacity. So use post jacks only for low-load, very temporary situations.


Leave a reply