Openings in Brick Walls
If you want to add a door or window to a brick wall, hire a structural engineer to see if that’s feasible. If so, hire an experienced mason to create the opening; this is not a job for a novice. If the house was built in the 1960s or later, the wall will likely be of brick veneer, which can be relatively fragile because the metal ties attaching a brick veneer to wood – or metal-stud walls tend to rust out, especially in humid or coastal areas. In extreme cases, steel studs will rust, and wood studs will rot. Thus, when opening veneer walls, masons often get more of a challenge than they bargained for.
Brick homes built before the 1960s are usually two wythes thick (with a cavity in between), are very heavy, and have very likely settled. Undisturbed, such walls may be sound; but openings cut into them must be shored up during construction, adequately supported with steel lintels, and meticulously detailed and flashed. Moreover, openings that are too wide or too close to corners may not be feasible, so a structural engineer needs to make the call.
To close off an opening in a brick wall, remove the window or door and its casings, and then pry out and remove the frame. Prepare the opening by toothing it out—that is, by removing half bricks along the sides of the opening and filling in courses with whole bricks to disguise the old opening. The closer you can match the color of the existing bricks and mortar, the better you’ll hide the new section. As you lay up bricks, set two 6-in. corrugated metal ties in the mortar every fourth or fifth course, and nail the ties to the wood-frame wall behind. Leave the steel lintel above the opening in place.
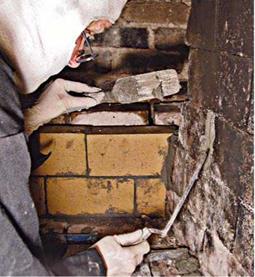
Build up. The rest is basic bricklaying technique. String a bed of mortar as wide as the edge of a firebrick across the back of the firebox and press the bricks firmly into it, working from one side to the other. Bricks should be damp but not wet. Butter the ends of each brick to create head joints, and when you’ve laid the first course, check for level. Use the handle of your trowel or mason’s hammer to tap down bricks that are high. Typically, you’ll need to cut brick pieces on each side of the back wall, to "tooth into” the staggered brick joints on the sidewalls, but that step can wait till the back wall is complete. As you lay up each course of firebrick, lay up the rubble brick courses, which needn’t be perfect, nor do you need to point their joints.
Unless yours is a tall, shallow Rumford fireplace, firebricks in the back wall should start tilting forward by the third or fourth course. To do that, apply the mortar bed thicker at the back. Build up the firebox and rubble-brick walls till you reach the throat opening. Then fill in any space between the firebox and rubble-brick walls with mortar, creating a smoke shelf. The smoke shelf can be flat or slightly cupped.
Once the back wall is up, fit piece bricks where the back wall meets sidewalls. Clean and repoint the mortar joints as needed. With a margin trowel serving as your mortar palette, use a tuck-pointing trowel to "cut” a small sliver of mortar and pack it into the brick joints. Allow the mortar to dry a month before building a fire. Make the first few fires small.
|
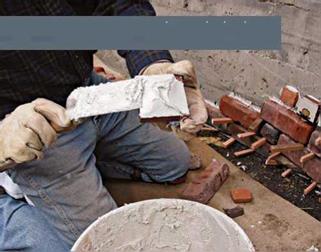
After cutting back deteriorated mortar joints, pack them with fresh mortar. Fill a margin trowel with refractory mortar, as shown. Then use a thin tuckpointing trowel to scrape mortar from it into the joint. Refractory cement is so sticky that it will cling to the margin trowel’s blade even if held vertically. |
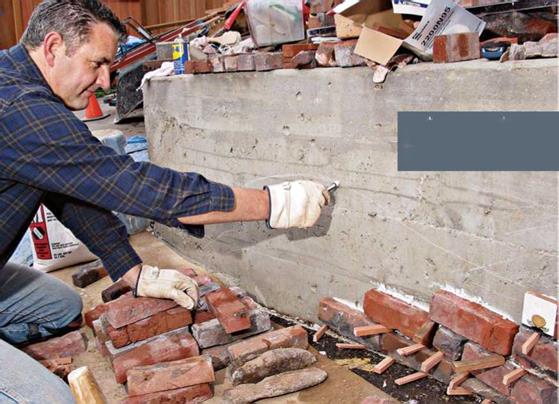
If you’re bored with the drab band of foundation concrete around the bottom of your house, dress it up with a glued-on brick or stone facade. A number of adhesive materials will work well.
In the project shown here, the mason used SGM Marble Set™, intended for marble or heavy tiles, but epoxies would work too. Whatever adhesive you choose, check the manufacturer’s instructions for its suitability for exterior use in your area, especially if you have freezing winters. Use exterior-grade bricks, too.
How traditional or freeform you make the facade depends on your building’s style and your sense of fun. The clinker brick, tile, and stone facade shown completed on p. 182 nicely complemented the eclectic style of the Craftsman house. It would probably also look good on the foundation of a rambling brown shingle, a Gothic revival house, or a more whimsical sort of Victorian.
Not relying on mortar joints to support the courses gives you a certain freedom in design, but it’s still important that you pack joints with mortar and compress them with a striking tool so they shed water— especially if winter temperatures in your region drop below freezing.
Todays masonry adhesives are so strong that they can adhere heavy materials—such as brick, stone, and tile—directly to concrete. Freed from needing to support much of anything, mortar joints can be as expressive as you like.
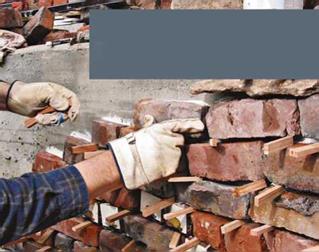
![]() Use short sticks to space bricks, stones, and tiles. Thi prevents what little slippage may occur before the adhesive sets and creates a joint wide enough to pac mortar into. Compress and shape the mortar to mak it adhere and keep the weather out.
Use short sticks to space bricks, stones, and tiles. Thi prevents what little slippage may occur before the adhesive sets and creates a joint wide enough to pac mortar into. Compress and shape the mortar to mak it adhere and keep the weather out.


Leave a reply