LOCATING AND MOUNTING BOXES
After mapping the wiring plan, you can install the boxes. But if you’re wiring someone else’s house, first do a walk-through with the owners so they can approve the locations. Use a builder’s crayon or a heavy marker to indicate boxes or temporarily tack-nail (or screw-fasten) the boxes in place.
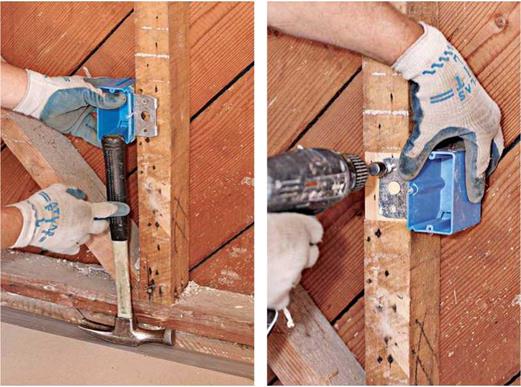
Box heights. There are few set rules about locating boxes. Set the bottom of outlet boxes 12 in. above the subfloor, or use a hammer to approximate box height, as shown in the top left photo on p. 244. In housing for disabled occupants, outlet box bottoms should be a minimum of 15 in. above the subfloor. For outlets over kitchen and bath counters, set the box bottoms 42 in. from the subfloor, so they’ll end up 8 in. above the counters and 4 in. above a standard 4-in.-high backsplash.
Locate wall switches on the lock side of a door (the side opposite the hinges). If you set the bottoms of the switch boxes 44 in. or 48 in. above the subfloor, the box bottoms will align with the seam of a 48-in.-wide drywall panel installed horizontally—which means you’ll need to cut out only one panel. However, if a carpenter has added blocking at that height to nail the panel edges, raise the boxes till they clear the blocking.
Mounting boxes. Mount boxes so they’ll be flush with finish surfaces. Most boxes have tabs or gauge marks stamped on the side to indicate different surface thicknesses. If that’s not the case, hold a scrap of the finish material—for example, %-in. drywall—next to the front edge of the box as a depth gauge. Unless you’re installing nail-in boxes, use screws to mount the boxes so you can make adjustments if you need to. The depth of the Veco box shown on p. 244 can be adjusted after the drywall is up.
To attach ceiling boxes, you have these three choices: (1) screw the box directly to a joist;
(2) end-nail a piece of blocking between the
|
|
||

 joists, and screw the box to that; or (3) install an adjustable metal hanger bar between the joists, to which the box is mounted. Ceiling boxes must be secured to the structure, not merely to the finish ceiling, so that the fixture will be adequately supported.


Leave a reply