LEVELING CEILINGS
The older the house, the more likely its ceiling joists are sagging. If you’re gutting the old finish ceiling, the easiest way to create a flat, level plane for the drywall that will follow is to fasten lightweight steel studs to the old joists at a uniform height below the lowest joist (see p. 168).
With the aid of a helper, stretch a taut, level stringline perpendicular to existing joists at each end of the room and position each string lower than the bottom of the lowest joist so the studs won’t deflect it as you work. Here’s how:
1. Use a self-leveling laser level to establish a level line around the room that is % in. below the lowest point of your ceiling joists.
|
|
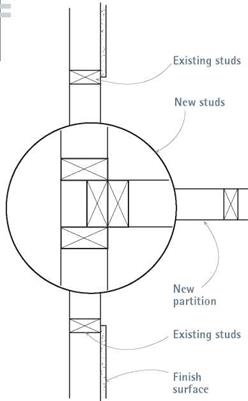
Where a new partition abuts an existing wall, cut back finish surfaces to the centers of the nearest stud on either side, and add studs to nail the partition to.
2. At this height, drive nails into the comers of the room. Stretch a taut string perpendicular to the ceiling joists at both ends of the room.
3. Line up the bottom edges of the steel studs Яв in. above these taut strings, as you and your helper screw studs to the faces of the ceiling joists. (The Иб-in. gap is necessary to avoid moving the string and misaligning studs.)
4. Unless the ceiling is badly out of level (more than 1h in.), use 4-in.-wide steel studs. Lift the studs over the leveled strings, and lower each stud till its bottom edge is Ув in. above the strings.
5. Once the stud is correctly positioned, use 1-in. screws to attach it to the joist; stagger screws every 16 in. along the length of the stud. Place the screws back at least h in. from the lower edge of the joist. Use aviation snips to cut light (20-gauge to 25-gauge) steel framing.
Note: If the ceiling joists are undersize, rotted, or very springy, fix those conditions first. Screwing light steel to the joists won’t strengthen them appreciably.
Before installing drywall on recently gutted or newly erected stud walls, scrutinize them to make sure they’re flat. Stud variations of ‘/ in. (from flat) are generally acceptable, unless they’re in bathroom or kitchen walls—where studs should be within Me in. of flat. There, plumbed cabinets will make high and low spots glaringly obvious. Granted, you can scribe cabinet backs to fit wavy walls, but it’s easier to straighten studs while they’re still exposed.
Eyeball walls for obvious discrepancies. Then stretch taut strings across the stud edges at several heights. If the studs aren’t flush to the top or sole plates, hammer them flush and screw on steel reinforcing-angles (see the photo on p. 61) to attach studs to the new position; more toenailing might split them. Next stretch a taut string, chest high, across the wall plane to find really high (protruding) and low (receding) spots. Mark them with a pencil. Finally, use a 6-ft. or 8-ft. level or straightedge to assess individual studs for bowing. Scribble symbols directly on stud edges, indicating high spots to be planed down, where studs bow toward you, and low spots to be built up, where studs bow away from you. Use special cardboard furring strips to build up the low spots.
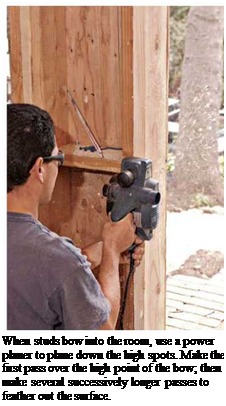
 Plane down high spots. Before power planing the high spots, use a magnet to scan the old studs for nails. Nails will destroy planer blades, so if the nails are too rusty or deep to pull, use a metal-cutting blade in a reciprocating saw to shave down the stud edges—a tedious process. If studs are nail free, plane down the high spots in several passes, starting at the middle of the high spot and gradually tapering out. Because knots are hard, they’ll take more passes. Use your straightedge to check your progress, and use taut strings to check the whole wall again after building up or planing down the studs. Caution: Wear eye protection when using a power planer.
Common sense and “feel” are a big part of the straightening process: If all the studs in the wall have a slight bow inward or outward, the wall won’t be flat, but drywall covering it may look flat. In that case, leave the studs as they are.


Leave a reply