Kitchen Lighting Basics
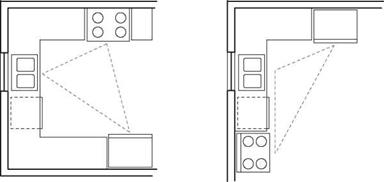
at the sink, position it at the base of the U, with the refrigerator on one side and the stove on the other. If one person preps food or washes while the other cooks, their paths won’t cross too often. If possible, place the sink beneath a window so the eye and the mind can roam.
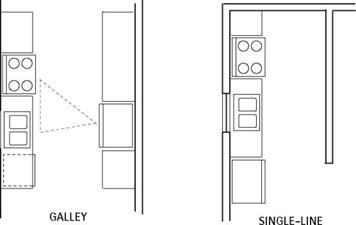
L-shaped kitchens are popular because they allow various arrangements. That is, you can put a dining table or a kitchen island in the imaginary fourth corner. However, this becomes a somewhat less efficient setup if one leg of the L is too long. Again, position the sink in the middle.
![]()
![]()


 |
Galley kitchens create efficient work triangles, but they can become hectic if there’s through traffic. If you close one end of the galley to stop traffic, the galley should be at least 4 ft. wide to accommodate two cooks. To avoid colliding doors, never place a refrigerator directly across from an oven in a tight galley kitchen.

![]()
 12 ft. and there’s a minimum of 4 ft. to the opposite wall. Compact, space-saver appliances can maximize both floor and counter space.
Islands are great in multiple-use kitchens, for they can provide a buffer between cooking tasks. To make sure the island doesn’t interfere with the work triangle, keep 4 ft. to 5 ft. of open space for nearby counters and appliances.
Once you’ve chosen a work layout that you like, make to-scale floor plans: A % in. to 1 ft. scale provides a good amount of detail for a single room yet still fits on an 8/2-in. by 11-in. sheet of graph paper. Include windows, doors, appliances,
and cabinets. You may find it helpful to cut to-scale rectangles to represent the refrigerator, sink, and cooktop. If you cut them from different colored paper or label each piece, you’ll have an easier time trying out your layouts.
Basic layout. Refining the layout is a fluid process, but a few spatial arrangements are so common they’re almost givens. Place the sink under a window. Don’t put a refrigerator and a stove side by side because one likes it hot; the other, cold. In general, place the refrigerator toward the end of a cabinet run, so its big doors can swing free. When the appliances are comfortably situated, fill in the spaces between with cabinets.
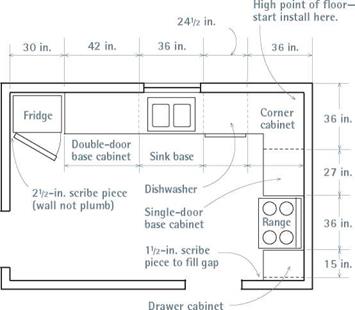
Try not to fit cabinets too tightly to room dimensions. If you’re fitting cabinets into an older house, it’s safer to undersize cabinet runs slightly—allow 1 h in. of free space at the end of each bank of cabinets—so you have room to fine – tune the installation. You can cover gaps at walls or inside corners with scribed trim pieces. Speaking of inside corners, allow enough room for cabinet doors to open freely.
Cabinet dimensions. Basically, there are three types of stock cabinets: base cabinets, wall cabinets, and specialty cabinets.
► Base cabinets are typically 24 in. deep, and 34І2 in. tall so that, when a countertop is added, the total height will be 36 in. Base cabinet widths increase in 3-in. increments, as do wall cabinet widths. Single-door base cabinets range from 12 in. to 24 in. wide; double-door base cabinets run 27 in. to 48 in. wide. Drawer cabinets vary from 15 in. to 24 in. wide. Tray units are generally 9 in. to 12 in. wide.
► Wall cabinets are 12 in. to 15 in. deep, with 12 in. being the most common depth.
They vary from 12 in. to 33. in. high. Wall cabinet widths generally correspond to base cabinet widths, so cabinet joints line up.
► Specialty cabinets include tray cabinets, base corner units, corner units with rotating shelves, tall refrigerator or utility cabinets, and wall-oven cabinets. Specialty accessories include spice racks, sliding cutting boards, and tilt-out bins. Specialty cabinet dimensions vary, not always in predictable increments. Base sink cabinets range from 36 in. wide (no drawers on either side) to 84 in., typically in 6-in. increments.
you’ve never ordered cabinets before, it’s smart to hire a finish carpenter to help figure out exactly what you need.
Before ordering cabinets, clean up floor plans and elevations, and survey the kitchen one last time, noting window, door, and appliance locations; electrical outlets, switches, and lights; and plumbing stub-outs (protruding pipe ends before hookup)—in short, every physical aspect of the space. Carefully remeasure the room and note potential problems such as sloping floors, walls that are wavy or out of plumb, and corners that aren’t square or that have excessive joint com
pound that could interfere with installation. Most of these irregularities can be corrected by shimming cabinets to level and scribing end panels to cover irregular surfaces, but you need to know about them beforehand.
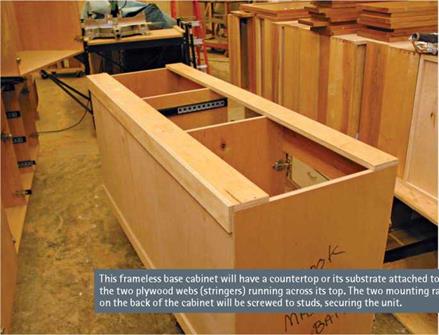
 The key to a successful cabinet installation is leveling the base and wall cabinets and solidly securing them to wall studs and to the floor. As noted earlier, carefully measure and assess the kitchen walls, floor, and corners before you order


Leave a reply