JACKING SAFELY
For safe jacking, you need to proceed slowly and observe the following precautions.
Preparatory steps
► Survey the building, noting structural failings and their probable causes as well as which walls are load bearing. Also determine whether joists or beams are deflecting because of heavy furniture, such as a piano; which pipes, ducts, or wires might complicate your repairs; where the gas pipe shutoff is; and so on.
► Have a plan that anticipates everything.
If excavation is necessary, who’s going to do it? And where will you put the displaced dirt? (Disturbed dirt has roughly twice the volume of compacted soil.) Will you need to rent equipment, such as jacks, compressor, and jackhammer? Where will you store materials? How will rain affect the materials and the work itself? Can a concrete-mixer truck reach your forms or will you need a separate concrete pumper, an auxiliary pump on wheels that pumps (pushes) the concrete from the mixer truck to the pour?
► Assemble safety equipment. This is mostly hard-hat work. You’ll also need safety glasses that don’t fog up, sturdy knee pads, and heavy gloves. For some power equipment, you’ll need hearing protectors. Update your tetanus shot. Set up adequate lighting that keeps cords out of your way—and, on a post near a suitable light, mount a first-aid kit.
Even though a cell phone is handy if trouble strikes, never work alone. Workers should stay within shouting distance.
► Have all necessary shoring materials on hand before you start jacking. Remember, jacks are for lifting, not supporting. Within reason, level the ground where you’ll place footing blocks or shoring plates. As soon as a section of the house is raised to the proper level, be sure to set, plumb, and brace the shoring. Hydraulic jacks left to support the structure too long may slowly "leak" and settle or—worse—kick out if bumped or jostled.
Certain conditions make raising houses difficult. When foundation contractors see the following conditions, they get a second or third opinion from engineers and house movers before bidding on a job:
► Sloping sites, unstable soil, site erosion, or excessive ground water.
► A masonry building.
► Multiple-story house or single-story dwelling with heavy materials, such as stucco exterior walls; plaster interior walls; and tile, slate, or three-layer roofs.
► Quirky framing visible in the basement, such as undersize or cut-in girders, joists running in several different directions, and multiple additions to the original structure.
► Floors that pitch in different directions or are badly out of level.
► Catastrophic foundation failures, such as foundation rotation and sinking corners.
Jacking basics
► Support jacks adequately. The footing blocks or cribbing beneath the jacks must be thick enough to support concentrated weights without deflection and wide enough to distribute those loads. It’s difficult to generalize how big such a support must be; a 4×12 footing block
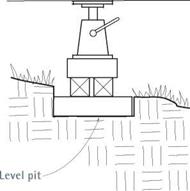
3 ft. long or two layers of 4×4 cribbing should adequately support a jack beneath the girder of a single-story house. In this case, the soil must also be stable, dry, and level. If the soil isn’t level, dig a level pit for the cribbing, as shown on p. 208. (Avoid precast concrete piers as jacking blocks because their footprints are too small and the concrete could shatter when loaded.)
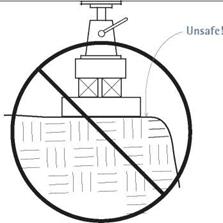
► Don’t place jacking or shoring platforms too close to the edge of an excavation. Otherwise, the soil could cave in when the timber is loaded. The rule of thumb is to move back 1 ft. for each 1 ft. you dig down. Also, don’t put jacks or shoring where they could be undermined later. For example, if you need a needle beam to support joists parallel to the foundation, excavate on either side of what will be your new foundation, and place jacking platforms in those holes. In that manner, you can remove foundation sections without undercutting the jacking platforms.


![]()


![]()
Beam
|
|
|
Cribbing- |
DON’T DO THIS!
|
|
When the jack is loaded, bearing blocks placed unsafely close to the edge of an excavation can cause it to collapse.
► Level support beams, and plumb all posts. The logic of this should be evident:
When loads are transmitted straight down, there is less danger that jacks or posts will kick out, injuring someone and leaving shoring unsupported. Accordingly, cut the ends of the posts perfectly square, plumb the posts when you set them, and check them for plumb periodically as the job progresses.
Where the ground slopes, dig a level footing pit into the soil, as shown in the bottom drawings at left, so footings or cribbing can’t migrate under pressure. (Typically, the foundation contractor digs the pits and prepares the site before the house mover arrives to install the cribbing.) Surrounded by the walls of the pit, the bearing blocks have no place to go.
► Keep checking for level and plumb as you jack. If supports sink into the soil, posts tilt, or the jack starts "walking” under pressure, lower the jack, reset those elements and begin anew. First thing each day, check jack supports and shoring for plumb and level.
Diagonal bracing, plywood gussets, and metal connectors will each help posts stay plumb. When cross bracing temporary posts and beams, use screw guns or pneumatic nailers to attach braces. Hand nailing braces could knock posts out of plumb or cause beams to rotate or jack heads to migrate.
► Raise jacks in small increments—say,
% in. per day—to minimize damage to finish surfaces inside the house. When you’re jacking a structure to be repaired, as when replacing a mudsill, jack just enough to lift the weight off the sill to be removed. If many jacks are involved, raise them simultaneously if possible, so excessive stress (and damage) doesn’t accrue above any one jack.
Steps in jacking and installing shoring.
Setting jacking equipment varies according to the type of jack; the structural elements to be raised; and site conditions, such as ceiling height, access, and soil stability. That noted, the following observations hold true in most cases.
1. Position the jacks and jacking beams as close as possible to the joists, girders, or stud walls you’re jacking. If you’re adding posts under a sagging girder, support may be directly under the girder; but more often, it will need to be offset slightly—say, within 1 ft. to 2 ft. of joist ends—to give you working room. In other words, close enough to joist ends so they won’t deflect, yet far back enough to let you work. Again, don’t put jacks or shoring where they could be undermined by unstable soil later.


Leave a reply