INSTALLING WOOD SHINGLES
Before you start shingling, make sure that windows and doors are correctly flashed, that sheathing is covered with building paper—most pro shinglers prefer 15-lb. felt paper—and that exterior trim is installed.
Materials. For best results, use No. 1 grade cedar shingles. For a standard 5-in. shingle exposure, figure four bundles per square (100 sq. ft.). Always inspect the visible shingles on a bundle to make sure they’re uniformly thick (3з8 in.) at butt ends, of varying widths (on average, 6 in. to
CUTTING SHINGLES CROSS-GRAIN
12 in.), knot free, and reasonably straight grained. Installing shingles requires a lot of trimming, so you don’t want to be fighting knots and wavy grain. Shingle butts should also be cut cleanly and squarely across, not angled or ragged. Send back bundles that look inferior or contain mostly narrow shingles.
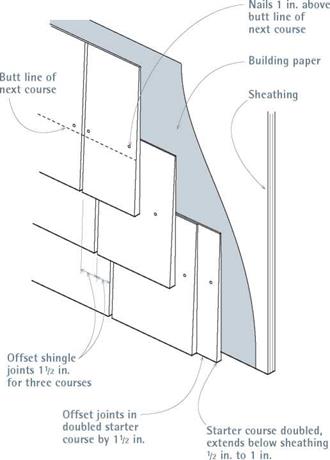
To save a little money, however, you might want to use No. 2 shingles for the bottom layer of doubled starter courses. In this case, order one bundle per 50 lineal (lin.) ft. of wall. Typically, the starter course of shingles along the bottom is doubled, with vertical joints between the two shingle layers offset by at least 1 h in.
Also, pick up a bundle to see how dry it is. Relatively wet shingles are fine, as long as they’re good quality, but they’ll shrink. In fact, most shingles shrink. Though how-to books are fond of telling you to leave a!4-in. gap between shingles during installation, many shinglers don’t bother; unless the shingles are bone-dry, installers assume that all shingles will shrink some.
Use two 1 f4-in. galvanized nails or staples per shingle, whatever its width. Because nails must be covered by the course above, place shingle nails in M in. from either edge and 1 in. above the eventual butt line of the course above. Where nails will be visible—say, on interwoven corners or the top course below a window—use siliconized bronze ring-shank nails or stainless-steel nails. Again, 1!4-in. nails are fine, unless you’re also nailing through a gypsum layer to reach the sheathing on a fire-rated wall.
Installation. If you’ve got a water table (see p. 132), set your first course of shingles atop it, even if it’s not level. That way you eliminate unsightly gaps along the trim, and it’s easy
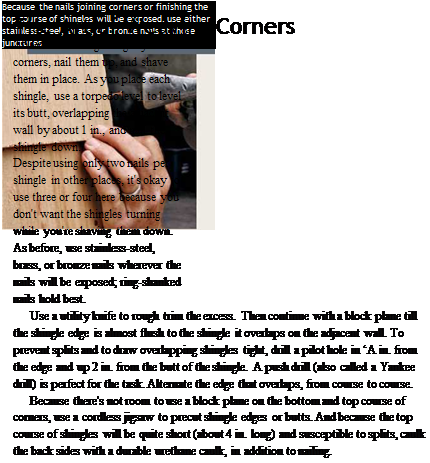
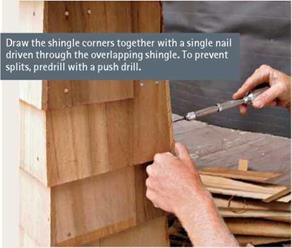
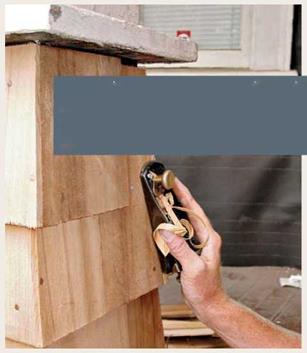
enough to level the next course of shingles. If there are corner boards, snap chalklines between them to mark shingle courses, and off you go. However, if there are no corner boards, weave shingles at the building corners, alternating shingle edges every other course. This requires more skill and patience than just butting shingles to the boards but produces corners that are both handsome and weather-tight. Weave the corners first; then nail up the shingles in between. Because the starter course overhangs the bottom of the sheathing 12 in. to 1 in., measure down that amount at each corner, using a laser level to establish level. After establishing the correct exposure, as described above, shingle up each corner. As you work up the wall, snap a chalkline from corner to corner to line up shingle butts.
As you did on the first course, offset the vertical shingle joints at least Ш in. between courses. If you have a partner, you’ll find it easier if each of you works from a corner toward the middle. Only the last shingle will need to be fitted.
Fit shingles closely to window and door casings. The top of the shingle course under a windowsill should butt squarely to the sill. Because this course needs to be shortened and will be susceptible to splits, caulk the back sides. It’s also wise to caulk the shortened top course of shingles under the eaves. Ideally, the tops of those shingles
will also be protected by a rabbeted-out or built – up frieze.


 |
|
 |
 If you need to angle cut shingle butts for use along gable-end walls and dormers or need to angle cut shingle tops to fit under rake trim, use an adjustable bevel to capture the roof angle and transfer it to shingles. Such angle cuts are best


made all at once, on the ground, using a table saw. To notch shingles around windowsill ears and the like, use a cordless jigsaw. Finally, leave a Я-in. gap beneath dormer-wall shingles and adjacent roofing; otherwise, shingles resting directly on roofing can wick moisture and rot.
The following discussion assumes that you’ve read this chapter’s earlier sections on layout and that you’ve installed door and window flashing, building paper, and exterior trim. It also assumes that the building has corner boards that you can butt the clapboards to. Otherwise, the clapboard corners will require compound-miter joints, which is a considerable amount of work.
Materials. Clapboards are a beveled siding milled from redwood, red cedar, or spruce; for best results, use Grade A or better. Preprimed finger-jointed clapboards are a cost-effective alternative, joining shorter lengths of high-quality wood. Clapboards come in varying widths and thickness, but all are nominally 1-in.-thick boards that have been planed down. Thus a 1 x6 is actually Я in. thick (at the butt) by 5!4 in. wide; a 1×8 is actually Я in. by 7h in., and so on. Traditional clapboards come in varying lengths, whereas finger-jointed products are manufactured in 16-ft. lengths; all are sold by the lineal foot.
To estimate the amount you need, calculate the square footage of your walls, less window and door openings. Then consult the table below, which assumes Я in. of overlap for 1×4 clapboards and 1-in. to 1 J/8-in. overlap for all other sizes. It also factors in 5 percent waste. Order preprimed (or prestained) clapboards. Prepriming seals out moisture, saves tons of time otherwise lost to priming and waiting for primer to dry, and keeps the job moving. You will need a small amount of primer on hand to touch up newly cut ends.
|
Clapboard Needed
|
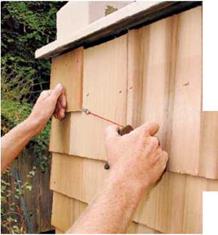
If you split a shingle while installing it (or if you need to remove shingles to install an exhaust vent for a fan), break out the shards, hammer down the nail heads, and replace the shingle. To remove a few damaged shingles on an otherwise intact wall, use a shingle ripper (also called a slate hook), shown in the photo on p. 121. Slide its hooked head up under surrounding the shingles till you can feel it hook around a nail shank. Then hammer down on the tool’s handle till the hook cuts through the shank. To avoid damaging the replacement shingles as you drive them into place, hold a scrap block under the shingle butt to cushion the hammer blows.
Nails. Buy 5d stainless-steel, ring-shank siding nails, whether you’re painting the clapboard or not. True, stainless-steel nails cost four or five times as much as galvanized nails, but that premium buys you peace of mind. Galvanized nails are fine 99 percent of the time. But if their coating breaks off, the nail will rust. Moreover, the tannins in cedar and redwood can chemically react with galvanization, which causes staining. Same with galvanized staples. For every 1,000 lin. ft. of siding, buy 5 lb. of 5d nails.
Installation. Worth repeating: Standard clapboard exposure is 4 in. for 1×6 clapboards (actual width, 5Я in.), but you may want to vary that exposure by І4 in. or less between courses to help align the clapboards with the window and door casings.
The first course of clapboards typically sits atop a water table. First flash the top of the water table with metal drip-edge to forestall rot. To establish the correct pitch for that first course, rip a 1 Я-in.-wide beveled starter strip from the top of a clapboard. (Save the 4-in.-wide bottom waste rip for the top of a wall.) Tack the strip atop the water table, and you’re ready to nail up the first course. The water table may not be level, but that’s okay; better to avoid a noticeable gap between a level first course and an off-level water table. In that case, take pains to level the second and all successive courses.
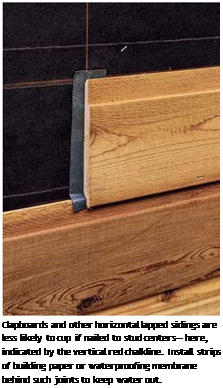
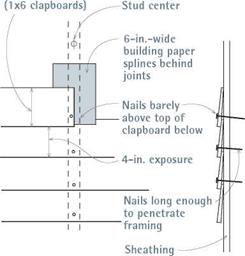
Start at one corner board and work all the way across the wall, nailing clapboards to each stud center they cross. All butt joints should be square cut and centered over a stud so that the ends of both boards can be securely nailed.

|
51/4 in. actual width
|
Position clapboard joints over stud centers.
For the most weathertight joints, bevel-cut ends. Note: For clarity in this drawing, building paper between clapboards and sheathing isn’t shown.
|
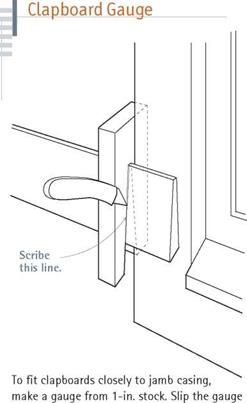
over the clapboard, slide it next to the casing, and mark the casing edge onto the clapboard. |
Remember to stagger joints by at least 32 in. To further weatherproof the joints, back them with strips of building paper; the paper overlaps the top of the clapboard beneath by ‘A in.
For clean, square cuts, rent or buy a 10-in. radial-arm saw with a 40-tooth or 60-tooth carbide-tipped blade. And be prepared to recut joints. When fitting the second board of a butt joint, leave it a little long till you’re satisfied with the joint. If it isn’t perfectly square on the first try, you’ll have excess to trim.
When butting clapboards to corner boards and jamb casings, use the homemade gauge shown below at left. Using the gauge to hold the clapboard tight to the trim, scribe the cutoff line with a utility knife. Never fit clapboards so tightly to the casing that you need to force them into place: Too tight trim can cause window sashes to bind. Where top courses abut the underside of eave or rake trim, rabbet or build out the trim to receive the top edges of the clapboards, as illustrated on p. 133. Caulk all building joints well with latex acrylic or urethane caulk before nailing up the top course of clapboards.


Leave a reply