INSTALLING SHINGLES
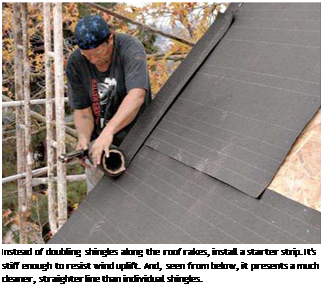
After attaching drip-edge flashing to the eaves and rolling out underlayment over the drip-edge, install the starter course along the eaves. You’ll cover the starter course with the first course of shingles. Running starter courses along the rakes isn’t imperative, but it’s smart because starters stiffen the overhanging shingle edges and create a cleaner line.
The starter course. First determine how much the starter course will overhang the drip-edge:
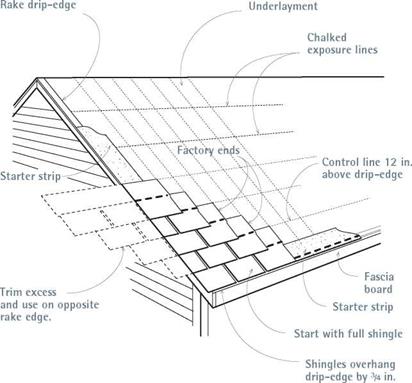
I in. to Va in. overhang is typical, but some roofers allow as much as 1 in. if eaves or rake boards are badly bowed. The starter course will be 7 in. high. Extend your tape measure past the drip – edge the amount of the overhang, and make crayon marks on the underlayment at 7 in. and at 12 in. Do this at both ends of the roof and snap chalklines through both sets of marks. The 7-in. line indicates the top of the starter course; the 12-in. line indicates the top of the first course of shingles.

 Starter courses can be three-tab shingles with the bottom 5 in. cut off or a starter strip that comes on rolls in various widths. Starter strips have the advantage of stiffening shingles above and, viewed from below, providing a clean, unbroken line. Still, trimming three-tab shingles is cheaper, so here’s a quick look at that method.
First, use three-tab shingles as a starter course, rather than laminated shingles, which cost more and don’t lie flat. Traditionally, the starter course was just a full shingle turned upside down so its tabs faced up, but that placed the shingle’s self-seal strip too high to do much good. Far better to measure down 7 in. from the top of the shingle, trim off the bottom 5 in., and snap off the shingle tabs.
Secure the starter course by aligning the shingles’ top edges to the 7-in. control line and nailing them down, four nails per shingle. If you’re installing a starter strip, align its top edge to the 7-in. control line. Next, install starter courses over rake drip-edges, using the same overhang you used for eaves. Rake starter strips overlap eave starter courses when they meet at lower corners. Along both ends of the roof, measure up from the 12-in. control line and snap exposure chalklines for the shingle courses to come. That done, you’re ready to install the first course of shingles.
Shingling the field. Install the first course of shingles over the starter course. If you’re righthanded, start at the left side of the roof and work right; otherwise, you’ll be reaching across yourself continually. Left-handers, of course, should start right and work left.
 |
 |


Leave a reply