INSTALLING FLASHING PAPER
Flashing paper is available in several forms, the most convenient being fiberglass-reinforced rolls either 6 in. or 9 in. wide. (These strips are sometimes called felt splines.) There’s also a plethora

of peel-and-stick flexible flashings; but because they’re expensive, they tend to be used mainly as cap flashing for the tops of doors and windows. Foil-faced flexible flashings like Polyken® Foil- astic, for example, adhere aggressively and seal head joints so water can’t back up behind them.
Uncased windows are commonly used in renovation when it’s desirable to install casing that matches an existing style. Since precased units offer a limited range of casing styles, many builders install uncased windows and buy appropriate casing from a local mill.
Flash the rough sill before installing an uncased window. Tuck the paper into the kerf at the bottom of the sill (if there is a kerf) or fold the paper into the RO, caulk its edge, and set the sill onto it. This provides an unbreachable seal, and apron casing or siding will cover the edge of the paper later.
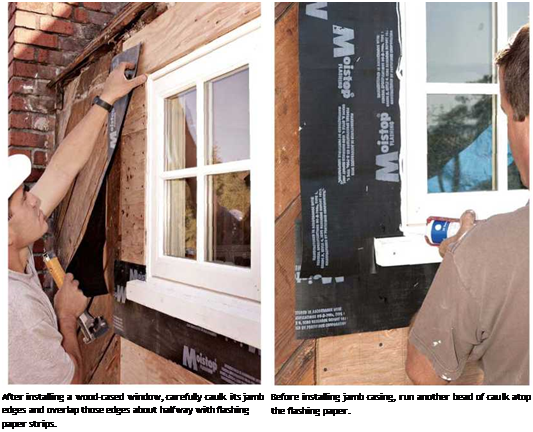
To seal side jambs, consider the doublecaulking method shown above. Caulk each jamb edge, embed a flashing-paper spline in the caulk, and then run another bead of caulk atop the spline before installing the jamb casing. This caulk-and – spline sandwich stops infiltration effectively. Finally, caulk the edge of the head jamb before installing the head casing, but do not insert a spline between the head jamb and the casing— that could direct water behind the head casing.
After the window is cased, add the (metal) cap flashing over the head casing. Before installing flashing paper over metal flashing, careful
builders first caulk the upper flange of the flashing. This will prevent water that gets under the siding from wicking back up under the paper when it hits the window head. This is especially important with stucco siding, which is water permeable and often collects water between the stucco and the building paper. Chapter 6 offers more specifics about cap flashing.
Should jamb flashing go over or under the building paper covering the sheathing? It doesn’t really matter because the strip flashing is extra protection. But under the windowsill, leave the lower edge of the flashing spline unstapled so it can overlay the building paper or housewrap below.
Windows and doors with integral nailing flanges require slightly different detailing. If the flanges are metal, apply fiberglass-reinforced flashing paper along the bottom and sides of the RO first. Then apply a bead of exterior caulk around the perimeter of the paper—close to the edges of the opening—and set the unit over the flashing paper. Position and shim the unit; then nail or screw through the flanges, into the sheathing. Install cap flashing (some units have an integral cap flashing) over the head of the unit, caulk its upper flange; then install flexible flashing over that cap flange. Building paper above will overlay the flexible flashing. Note: Most flanged windows don’t have casing per se. Unlike wood-cased windows, flanged units have jambs that protrude above the surface of the
 sheathing, so siding (or casing) is butted to the sides of these protruding jambs.
In appearance, exterior trim is sometimes ornate and complex, but its basic function is to cover critical building seams.


Leave a reply