INSTALLING CUT-IN BOXES
Cut-in boxes have special mounting devices that enable you to mount them directly to finish surfaces. But first you’ve got to cut a hole for them. Hold the new box at the same height as other outlet boxes in the room, lightly pencil trace around the box, and then drill a small exploratory hole to locate studs or wood lath behind. Insert an offset screwdriver or a bent coat hanger in the hole and twirl it. If the tool hits a stud, move the box till it’s clear. If you hit wood lath, keep drilling small holes within the opening till you find the edges of the lath. If you position the box
correctly, you should need to remove only one section of lath. Cut-in box ears (also called plaster ears) mount to the lath top and bottom, so you may need to adjust the box height to make that happen.
Once you settle on a final location, level the box, trace its outline firmly onto the wall, and use a utility knife to score along the outline to minimize plaster fractures. (If the surface is drywall, don’t bother scoring; just go ahead and cut out the opening.) Plaster is delicate stuff, but a cordless jigsaw can cut plaster without pulverizing it if you hold the saw shoe slightly above the surface. (Drill several J4-in. holes around the outline so you can insert the sawblade.) Finally, when cutting through the lath strip you’ll remove, alternate partial cuts from one side of the opening to the other; if you cut completely through one side of the lath first, that end will vibrate wildly and crack the plaster. After you’ve cut out around the box ears, predrill the lath so the mounting screws don’t split it. (If there’s metal lath, use a finetoothed metal-cutting blade, and proceed slowly.)
Before inserting cut-in boxes, remove knockouts, insert cable clamps, strip sheathing off the ends of incoming cable, feed cable into the cable clamps, and tighten the clamps down. Box mounts vary. Boxes with plaster ears that screw
to wood lath are the most common. Spring-clip types have metal wings that expand once inserted in an opening. Grip-Tite boxes have side-mounted ears that stick out as you turn screws. Mounting tabs (also called elephant ears) slip into the space between the box and the edge of the hole; pull them tight against the wall, and bend the tabs into the box, using pliers. Flatten tabs so they cannot touch any terminal screw of the outlet. For good measure, wrap electrical tape around the devices, as shown in the photo on p. 243.
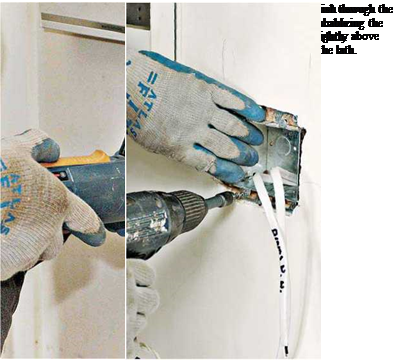
© Once you’ve cut an opening for a cut-in box— but before inserting the box—fish the cable that will run from the existing outlet to the new one.
![]()


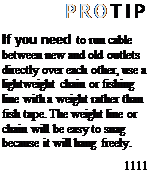
Fishing wires is easiest with a helper. As one person feeds metal fish tape down into an outlet cutout, the second person, with another fish tape, tries to catch the first. (Fish tape ends are often bent over to create a hook.) That accomplished, the first tape is pulled through, to have electrical cable attached to it. Bend and then twist the cable wires tightly over the fish tape, as shown in the drawing on p. 261, and wrap them well with electrical tape. Taper the electrical tape to a point

![]()

 so it will feed more easily into holes. If one person feeds the cable into the opening as the other pulls, the cable should move smoothly.
О To pull cable into an existing box, turn the power off, and then unscrew and gently pull the device out from the box and disconnect the wires attached to it. If the box is plastic, use a screwdriver to create a cable slot. If the box is metal, use a screwdriver to remove a knockout and to loosen the cable clamp nearest the knockout. If a metal box has no internal cable clamp, drill and tap a threaded hole so you can add a clamp. Feed the fish tape through the knockout opening; then pull in new cable and clamp it down.
Run a generous length of cable between the two boxes, so at least 1 ft. of cable protrudes from each box. Strip cable sheathing, tighten cable clamps, group like wires, and attach devices as described earlier. Chapter 15 covers patching finish surfaces.
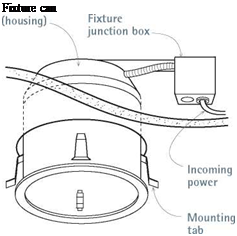
How you mount ceiling fixtures depends mostly on the weight of the fixture and whether framing is accessible. New “remodel” fixtures such as that shown below are light enough to mount to dry – wall or plaster ceilings, but heavier fixtures must be mounted to an adjustable hanger bar attached to ceiling joists or to a metal outlet box secured to the framing. Note: To prevent heat buildup and fire, fixtures in insulated ceilings must be rated
IC (insulation compatible) or insulation must be blocked back at least 3 in. from non-IC-rated fixtures.
Recessed lighting fixtures can usually be installed from below. О is cable in the ceiling cavity—either from an old fixture that was removed or from new cable recently fished to that location—and that the cable is not energized.
If there was no old fixture in the location, use a cordless drill to drill a 18-in. exploratory hole. Then insert a bent coat hanger into the hole and twirl it to locate nearby joists. Trace the template for the fixture can (housing) onto the ceiling.


Leave a reply