INSTALLING CROWN MOLDING
Crown molding dresses up the wall-ceiling joint, as do its fancy cousins cornices, which are formed from several boards. Crown molding can be as simple as a single piece of shaped trim angled along the corners of the ceiling, or you can pair it with a backing trim to ensure a solid nailing surface, which is not always present in an old houses with irregular framing and springy plaster.
Start by locating and marking stud and joist centers on the walls and ceilings. Where joists run parallel to a wall or where you can’t find framing on a regular nailing interval, install a row of triangular nailing blocks along the tops of walls, as shown above. Predrill these blocks to avoid splitting them, and nail them with 8d finish nails to the top plates or studs, spacing the blocks every 24 in. to 32 in. Cut nailing blocks at the same angle as the crown molding, when correctly seated to wall and ceiling.
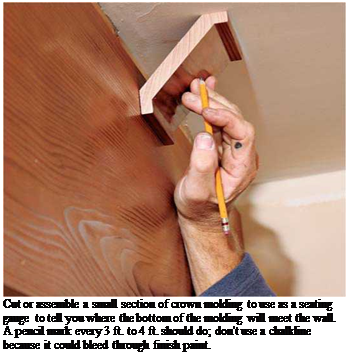
 To determine that angle, cut a short section of crown molding to use as a seating gauge.
Hold the gauge so that trim edges seat solidly on both the ceiling and the wall. Using this gauge, make a light pencil mark every 3 ft. to 4 ft. so that when you nail up the molding you’ll have reference marks for its bottom edge. (Because crown molding is relatively thin, it easily twists and misaligns.) Nail molding roughly every 3 ft., or to every other 16-in. on-center stud and joist. If walls are too long for a single piece of molding, splice boards over stud centers. Use a nailer to attach crown molding and cornices— hand-nailing is too erratic. If you’re nailing molding to blocks, use 18-gauge brads to avoid splits; otherwise, use 6d finish nails. Nail the bottom edge first, then the top, keeping the nails back from edges by at least M in.
To install backing trim—basically, a flat board with a shaped bottom edge—snap a chalkline to line up the bottom edges of the trim. Backing trim is a godsend when you’ve got level upper cabinets but an unlevel ceiling. Install the backing trim level and the crown molding snug against the ceiling. The amount of backing trim revealed (exposed) will vary, but your eye won’t notice it. Use screws to attach the backing trim because they hold better and are less likely to fracture plaster. Before nailing up crown molding, use a seating gauge to mark its position atop the backing trim.
As with baseboard molding, miter outside corners, cope inside ones, and glue all joints before nailing them off. If the first piece of crown molding is long enough to run from inside corner to inside corner, just cut both ends square, pop into place, and then cope the ends of adjacent pieces. Miter-cut the crown molding upside-down, with its bottom edge up—angled so that the molding’s lower edge rests against the back fence of the miter box, and the molding’s upper edge rests on the bottom of the miter box. (Inverting the molding in the miter box is the only way to support both of the molding’s edges and re-create the same angle the crown molding will have when installed against the wall and ceiling. If you cut the molding right-side up in the miter box, the top edge of the molding would be unsupported.) Use the seating gauge you made earlier to establish this angle on your miter saw: Screw a piece
of scrap to the saw bed to hold the molding stock in place as you cut it. When in doubt, test the joints by cutting and joining pieces of scrap.


Leave a reply