INSTALLING BUILDING PAPER
Installation techniques for housewrap and building paper are much the same; in this chapter, both materials are often referred to generically as building paper.
Before starting, survey the sheathing and knock down protruding nail heads and wood slivers that could puncture the paper and admit water.
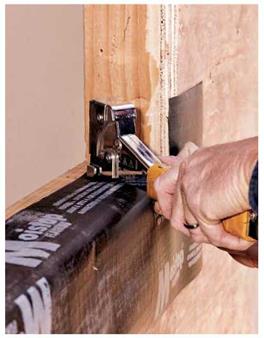
Installation is two-person job, especially if you’re working with 9-ft.-wide rolls of Tyvek. As one person unrolls the material, the other aligns and staples it. Start at the bottom of the wall, overhanging the bottom edge of the sheathing by about 1 in. Position the building paper, tack an upper corner in place, roll out about 8 ft., and raise or lower the roll till the edge of the building paper is roughly parallel to the bottom edge of the sheathing. When it’s in position, staple the paper every 16 in. along the edges and every 24 in. in the field; use!4-in. or Мб-in. staples. Thereafter, roll out 3 ft. to 4 ft. at a time, stapling as you go. Trim the 1 in. overhang later.
As you roll out the building paper, make sure it lies flat to the sheathing. Otherwise, puckers can elevate the siding or trim applied over them, compromising weather tightness. Typically, the person holding the roll maintains a slight tension on the building paper to prevent puckers. Also, take care to avoid tearing the membrane while handling and stapling it—more of a problem with paper than with plastic housewrap, which stretches.
Overlapping and taping seams. Overlap vertical end seams by 4 in. to 6 in.; overlap horizontal seams 6 in. to 8 in. As you work up the wall, applying courses of building paper, upper courses should always overlay those below so any water that gets behind the siding is directed out and down, away from the sheathing. Building paper should also overlay any flashing, especially cap flashing over doors and windows.
Seal building-paper seams, tears, and punctures with seam tape; smooth down the tape to make sure it adheres well. If you’re installing plastic housewrap, use a seam tape recommended by the manufacturer. If you tear building paper, just staple a patch of the same material over it and apply caulking over the top edge. Last, install siding as soon as possible after installing the building paper because wind can lift and stretch it, especially plastic housewraps.
|
To weatherproof windowsills, fold flashing paper strips into the rough opening, staple the paper down, and apply caulking. When the window is installed, its sill will compress the caulk, creating a positive seal. Tuck building paper or housewrap up under sill flashing. |
Corners and rough openings. Take special pains with corners. Although a 4-in. overlap is often adequate for corners, you’ll be safer to overlap outside corners by 1 ft. In addition, many builders reinforce corners with a self-adhering flexible flashing to keep water out should corner boards or siding gap. To prevent the material’s bunching in inside corners—a common problem with building paper—use a straight furring strip to press the paper into the corner before stapling it. That done, tape the corner seams immediately— before wind has a chance to lift the paper.
Builders installing plastic housewrap usually roll it right over rough openings (ROs) for windows and doors, cutting an Xin the middle of the opening and folding the housewrap into the sides of the framing. Well, that method can’t hurt. But it’s doubtful that it truly waterproofs the opening. If you’re installing metal windows, maybe a layer of housewrap will isolate the moisture that condenses on cold metal. But if flashing paper is correctly installed about the perimeter of the window or door, water shouldn’t enter the RO in the first place.


Leave a reply