Installing an Interior Door
There are many ways to hang a door. Thus, the installation sequences that follow occasionally offer alternative methods.
ASSESSING AND PREPPING THE OPENING
Prehung doors usually come preassembled with the door hung on hinges in the jamb and held tight by a screw through the latch jamb into the door. Or the door may be secured with a removable plastic plug through the predrilled hole where the lock will go.
1. Start by measuring the height and width of the opening. Rough openings (ROs) are typically 52 in. to 1 in. wider and taller than the outside dimensions of the door frame, or about 252 in. taller and wider than an unframed door.
2. Measure the thickness of the wall, from finish surface to finish surface. Standard 2×4 walls covered with drywall are 452 in. thick, so standard frame stock is 452б in. wide, providing an extra Иб in. to accommodate wall irregularities— I in. extra would be better. So if you’re using 58-in. drywall, order 458-in. jamb stock.
3. If the finish floor is not yet installed, determine its thickness so that you’ll know how much to cut off the bottoms of the door frame’s side jambs. Ideally, side jambs will stand directly on the subflooring or flooring. Jambs are nailed to the RO, but they must be solidly footed so they can’t drift down later. If a jamb leg is too short to
reach the subfloor, shim it solidly and trim the shim flush; finish flooring will cover the shim.
Allow ‘/ in. clearance above the finish floor, so the door can swing freely. For example, if you’re installing a 6-ft. 8-in. door and 5/i6-in. oak flooring, make jambs 80 in. + 5І6 in. + І4 in., or 80^6 in. long. If you’ll be laying heavy carpet and a thick pad, allow Ш in. + ‘/ in. clearance.
4. Use a level to see if the floor in the doorway slopes; if it does, add the amount below level to the jamb on that side. By doing this, you ensure that the frame head will be more or less level when jambs rest on the floor or subfloor. Check studs and walls for plumb.
If the door is shipped attached to the hinge jamb, pull the hinges and remove the door before fitting the frame to the opening. (Another opinion: Leave the door in its frame, especially if the door is a lightweight hollow core. To mark the bottom
of the side jambs for cutting, lean the frame against the RO. With the door in the opening, you can easily see the exact amount of clearance between the door and the subfloor.
1. Using a circular saw, cut the jambs to length; a small cordless circular saw is perfect for the task. Cut from the back side so you get a nice clean line on the front, and cut through stop pieces, if any.
2. If your door frames are knocked down, fasten the jambs to the head with carpenter’s glue and three or four 6d finish nails or 2-in. screws per side.
3. ![]()

 |
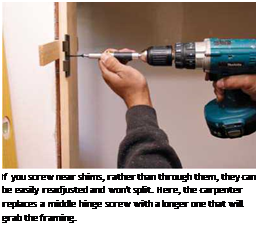
Position the frame in the RO. If stray dry- wall or sole plates sticking into the RO interfere with the frame, cut them off. If screws from hinge plates protrude through the jamb stock— as they frequently do—remove them so you can slide shims easily. Many carpenters remove the middle screw, insert shims behind it and, later, after the jambs have been shimmed, replace that middle screw with an extra-long one.
4. 

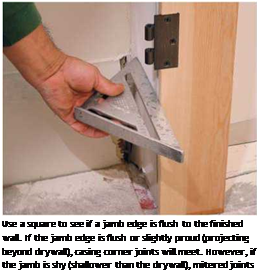
 Use a Speed Square to determine if the studs on either side of the opening are twisted; if so, you can shim the jambs to make them square. That noted, margin the frame in the opening— that is, center the frame in relation to the wall’s thickness. Ideally, a jamb will be slightly wider, so that it is!4 in. proud (extending beyond) on each side.
5. With the frame margined in the opening, use 2h-in. finish nails or trim-head screws to tack it in place. Place shims behind the top hinge, and nail or screw just below the shims. By not nailing through the shims, you can still adjust them, and if you center tack nails in the middle of the frame, they’ll be covered later by the stop pieces.


Leave a reply