INSTALLING A TOILET
When you’re ready to install the toilet, remove the plastic bag you inserted earlier in the closet bend to block sewage gases. Place closet bolts in the closet flange if you haven’t already done so.
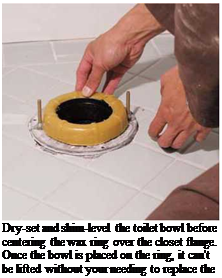
Set the bowl first. Then attach the tank to the bowl. If you’re re-installing an old toilet, as shown in the bottom left photo on p. 296, leave the parts connected, and set the toilet as one piece. But if it’s a new toilet, setting the base first is easier on your back. Place the wax ring in the closet flange, so that the ring’s plastic funnel centers in the flange. Some manufacturers recommend placing the wax ring on the toilet horn and then inverting the toilet bowl, but the wax ring may not adhere and the funnel may not align.
Have help aligning closet bolts to holes as you set the toilet bowl. Don’t rock the bowl when setting it, which could excessively compress the wax ring on one side, creating a gap. Instead, press the bowl down evenly; then use a small adjustable wrench to tighten the nuts gradually, alternating sides, till the bowl is secure. Place a torpedo level atop the bowl edge to see if the unit is level side to side and front to back. If the bowl needs shimming, use plastic shims, which can be chiseled or cut flush to the toilet foot so they’re not visible. Don’t trim the closet bolts till you’ve attached the tank and tested the unit for leaks.
|
||||||||||||||||
|
||||||||||||||||
|
||||||||||||||||
|
||||||||||||||||
|
||||||||||||||||
|
|
||||||||||||||||
|
||||||||||||||||
 |
||||||||||||||||
|
||||||||||||||||
|
||||||||||||||||
|
||||||||||||||||
|
||||||||||||||||


![]()
one side to the other, tighten the nuts snugly.
Use only brass or stainless-steel bolts and nuts. Connect the water supply, fill the tank, flush the toilet several times, and check for leaks. If there’s leaking between the tank and the bowl, tighten the nuts. If there’s leaking only near the foot of bowl, the wax ring may have failed: In this case, pull the toilet and replace the ring. If there are no leaks, trim the closet bolts and caulk around the perimeter of the foot.
Toilet supply connections are essentially the same as sink or lavatory risers. The standard toilet supply riser is 58-in. chrome tubing that attaches (at the top) to a threaded ballcock stem on the underside of the tank, and a 58 by 58 angle stop at the bottom. A better option is a 3з8-іп. flexible braided stainless-steel supply line: It won’t crimp, attaches to the same fittings, and can be easily disconnected.
Bidets. A bidet is easier to install than a toilet. Although a bidet requires hot – and cold-water connections, its wastes are all liquid, so a 154-in. drain will suffice. Mount the bidet base securely, but it doesn’t need to be seated in a wax ring.
In fact, the drain takeoff is similar to that of a tub, which is described next.


Leave a reply