Hanging a Door to an Existing Frame
Hanging a new or recycled door to an existing frame is a common renovation task, but not always feasible. At the very least, the hinge jamb must be straight. If it’s badly bowed and you can’t draw the bow back with screws, you may need to remove the old frame (and its casing) and replace it with a prehung unit.
Creating a Template
The most reliable way to fit a door to an out-ofsquare frame is to create a template. (Read "The Beauty of Templates," on p. 317, for some tips.) Use 4-in.-wide, Vs-in.-thick strips of doorskin plywood; tack-staple the plywood strips to the edges of the doorstops the door will seat against. Where they cross, join the strips with fast-setting hot-melt glue. In addition, run a horizontal strip across the bottom of the door opening from jamb to jamb, and diagonally cross-brace the strips so they will retain the outline of the frame opening after you pull the staples.
|
|
Leave a slight gap between the door and the doorstop, so the door won’t bind.
As you transfer the outline of this template to the face of the door, subtract V8 in. from the top and sides of the template to create an V8-in. clearance between the door and the jambs; subtract 74 in. from the bottom edge of the template for clearance above the finish floor or threshold. If the floor isn’t level, you may need more clearance. Place a 4-ft. spirit level across the opening to see how much out of level the floor is.
Trimming the Door
Trim the door rails of the door, then the stiles.
To prevent splintering, first score along cut-lines with a utility knife (see the photo on p. 96). Then use a 7‘A-in circular saw with a sharp, 40-tooth carbide blade to make the cut. For best results, cut V/i6 in. beyond the cut-line. Then use a belt sander with 80-grit sandpaper to trim the edge exactly to the cut-line. Some carpenters instead trim door edges with a handplane or power plane. If you use a power plane, go slowly to remove the wood gradually, making several shallow passes.
Cutting the Hinge Gains
Cutting hinge gains (recesses) is best done with a router and a template (see the photo on p. 103), but a hammer and chisel are easy enough if you’re hanging just one door. If the door frame already has hinge gains, transfer their locations to the door; otherwise, mortise the hinge gains into the door before transferring hinge marks to the frame. To transfer hinge locations, use shims to position the door snug against the hinge jamb—with an %-in. gap. Then use a utility knife to mark the top and bottom of the hinge leaves in both the frame and the door.
Typically, the top of the top hinge is 7 in. from the top of the door; the bottom of the bottom hinge,
9 in. to 11 in. from the bottom of the door (see "Positioning Door Hardware," on p. 93). If there’s a third hinge, it’s equidistant from the other two.
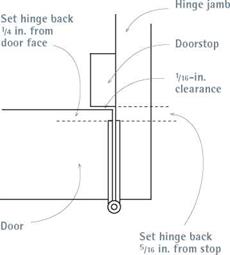
Pull the hinge pins so you can work with one hinge leaf at a time. Set the hinge leaf slightly back from the edge of the door, as shown in "Hinge Setbacks." The setback from the hinge to the doorstop should be slightly greater than that from the hinge to the edge of the door, so there is room for several coats of paint. Use a combination
 |
square to mark setback lines on doors and jambs. Finally, when mortising hinges, it’s best to set the router slightly shallow and then use a chisel to pare away the last little bit of wood so the hinge leaf is just flush. Setting hinges too deep can cause the door to bind.
 Hanging the Door
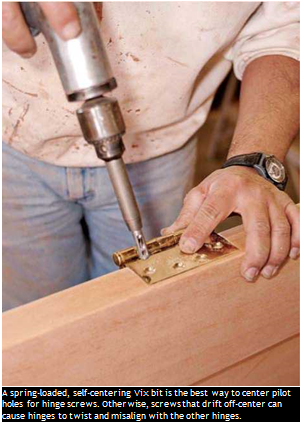
Screw down all the hinge leaves using a selfcentering Vix-bit®, which centers screws perfectly in the hinge holes. Then lift the door into the frame and mate the door’s hinge leaves with those on the frame, starting with the top hinge. Insert the hinge pins loosely, then eyeball the hinges as you open and shut the door. If the clearance between the door and the hinge jamb is excessive, remove the door and set the hinges a little deeper.
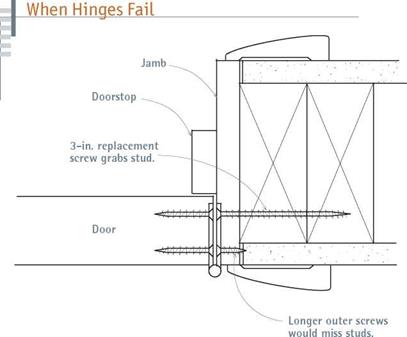


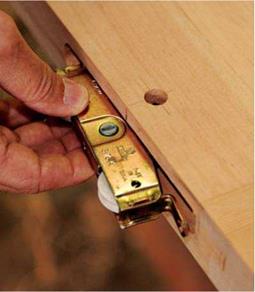
Replacing a short hinge-screw with one long enough to grab the framing should be your first “cure" when hinge leaves pull free from door jambs.
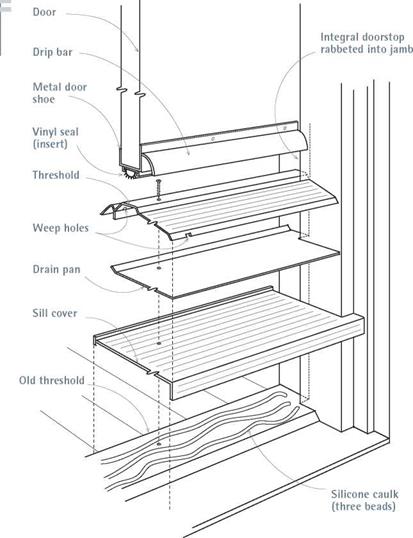
threshold and the drain pan, shut the door and spread a scriber to the distance from the top of the sill cover to the mark(s) on the jambs. Then scribe the bottom of the door to indicate the amount that you’ll need to trim off. Cut down the door, vacuum the existing threshold well, apply three beads of silicone caulking across the opening, and press the sill cover into it. Then do the same with the sill drain pan. Also caulk the jamb – and-pan joints. Finally, screw down the threshold and install the shoe on the bottom of the door, as described in the preceding section.


Leave a reply