GENERAL PREPARATION
Exterior trim can be applied in many different ways, depending on the design of the house and the type of siding. For wood shingles or clapboards, use trim boards that are thicker than the siding, and apply trim to the sheathing before putting up the siding. For flat shiplap and board- and-batten sidings, apply trim boards over the siding. In general, try to use the same materials and installation methods that were used on the house originally.
Solid-wood exterior trim should be a rot – resistant species such as redwood, cedar, or hard pine and sufficiently dry to avoid shrinkage, cupping, and checking. For those reasons, avoid sugar pine, knotty pine, hemlock, fir, and the like. If you’ll be painting the trim, you may find it cost effective to use finger-jointed trim stock fabricated from shorter lengths of high-grade wood. Such stock is widely available and can be durable if you keep it sealed with paint. For best results, specify vertical-grain heartwood grade because it
|
Rake trim
|
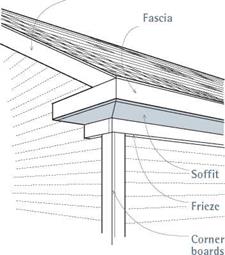
Fascia, soffit, and frieze boards are collectively called the eaves trim.
|
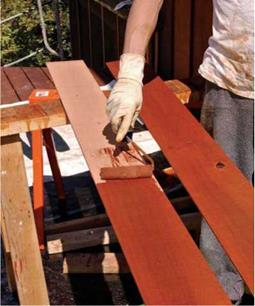
Prime all faces and edges of exterior trim and siding, including the back faces. Back priming is especially important because moisture trapped between back faces and sheathing can lead to paint or sealer failure, cupping or—in extreme cases—structural rot. After cutting trim or siding, be sure to prime the cut edges as well. |
resists decay, holds paint well, and is the most stable dimensionally. Caution: If this trim is allowed to absorb moisture, its finger joints may separate.
Apply primer to all faces and edges of exterior wood (and engineered wood) siding and trim, including the back faces. Back-priming is critically important because wood will cup (edges warping up) when the sun dries out the exposed front face, while the back unexposed face retains moisture. The greater the moisture differential between front and back faces, the more likely the cupping.
While cutting trim or siding, keep a can of primer and a cheap brush nearby to seal the ends after every cut; unprimed end grain can absorb a lot of moisture. (It’s especially easy to forget to prime cut edges when you’re using preprimed trim.) Ideally, apply at least two top coats of acrylic latex paint after priming to seal trim and siding. If you want stained or clear-finished trim or siding, use cedar or heart redwood.
As a rule, for best attachment, secure exterior trim to framing. In those rare instances where you have only sheathing to nail to, angle the nail so that it will be less likely to pull out.
Choosing attachers. Pick a nail meant for exteriors. If you’ll be using a transparent finish, making nail heads visible, stainless-steel nails are the premier choice; though expensive, they won’t
rust. Aluminum nails won’t stain but are somewhat more brittle and more likely to bend. Galvanized nails are the most popular because they’re economical, stain minimally, and grip well. Many nail types (including stainless) also come in colors matched to different wood types—cedar, redwood, and so on. Ring-shank nails hold best.
For stained exteriors, some contractors prefer galvanized finish or casing nails because their heads are smaller and less visible. Box nails are a good compromise. Their larger heads hold better than finish nails, yet their shanks are smaller than those of common nails, making box nails less likely to split wood. There are also “splitless” siding nails that come with preblunted points to minimize splits. (The blunt point smashes through wood fibers, rather than wedging them apart.)
Where trim is exposed—say, at cap trim atop a half wall—and you want maximum grip, use stainless-steel trim-head screws instead of nails.
drive nails quickly and accurately, reducing splits and eliminating errant hammer blows that mar trim. After setting the trim with finish nails, you can always can go back and hand nail with headed nails to secure the trim further. Or you can use headed siding nails in the nailer.


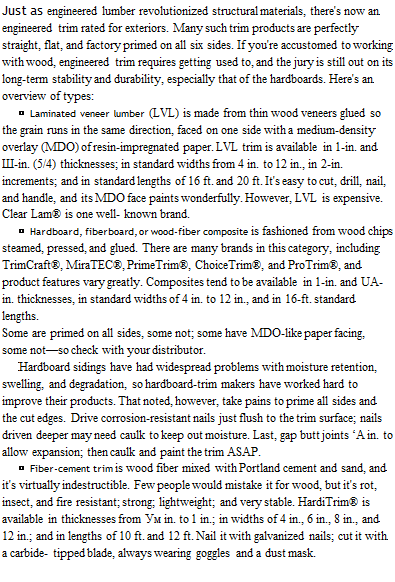 |
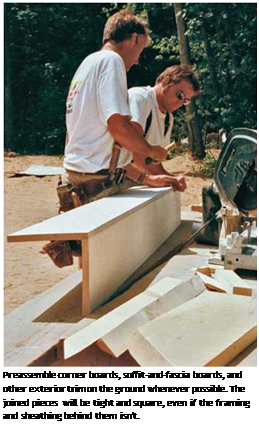
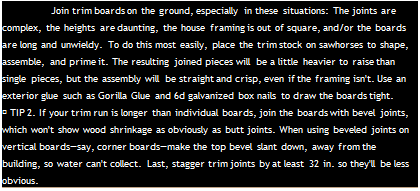
Nailing schedules. To face-nail nominal 1-in. trim (actual thickness, % in.), use 8d box nails spaced every 16 in. Nail both edges of the trim board to prevent cupping, placing nails no closer than h in. to the edge. If the trim goes over siding, say, at corners, use 8d to 10d box nails. To draw board edges to each other, use 6d nails spaced every 12 in., and drive them in a slight angle. If you’ll be painting the trim, also caulk this joint or glue it using an exterior urethane glue, such as Gorilla Glue®.
![]()
![]()
 rior Trim tips
About nail heads. Taking the time to line up nail heads makes the job look neater. For example, when nailing up jamb casing, use a combination square to align nail pairs. If you’re putting up a long piece of trim that runs perpendicular to studs, snap chalklines onto the building paper beforehand so that you’ll know stud positions for nailing. If the trim will be painted, take the time to set the nail heads slightly below the surface, using a flathead punch. Then use exterior wood filler to fill the holes. If you don’t set the heads slightly, they may later protrude as the wood shrinks, compromising the paint membrane and admitting water. On larger jobs, carpenters are usually expected to set nail heads. Painters fill and paint them.
Because eaves trim is often complex and can impact framing, roofing, ventilation, and the house’s aesthetic integrity, draw a cross-section of it as early as possible.
There is no single correct way to construct the eaves, but the boxed eaves on the facing page are a good place to start. First, a fascia board that overhangs a soffit by % in. to in. enables you to hide rafter irregularities—rafters are rarely perfectly straight or cut equally long. Second, that overhang accommodates a rabbeted fascia-soffit joint, which protects the outer soffit edge, even if the wood shrinks slightly. Third, if you rabbet out the back edge of a frieze board or build it out using blocks, the frieze will conceal the top edge of the siding. A built-out frieze also creates an inconspicuous space to install an eave vent.
Ventilation channels at eaves allow air to flow up under the roof and exit at ridge or gable-end vents. This airflow is beneficial because it lowers
attic temperatures and helps remove excess moisture from the house, thus mitigating mold, ice dams, and a host of other problems. To keep insects out, soffits need screening. In a wide soffit, there’s plenty of room for screened vents in the middle. In a narrower soffit, you may need to leave a M-inch space at the front of the soffit or at its back, hidden behind a built-out frieze board.
If the house has exposed rafter tails rather than soffits, cut down the blocking between rafters so air can flow over the top. Again, staple fine mesh screen or corrugated vent strips behind ventilation passages to keep insects out.


Leave a reply