Documenting What’s There
This section explains how to measure rooms and record the location and condition of the structure and mechanical systems (plumbing, electrical, heating/cooling) as well as how to explore building elements that affect design. Here, too, you learn how to map the site and consider how well exterior renovations will suit the neighborhood.
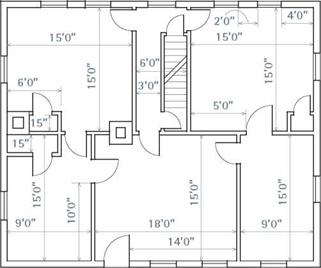
Start by drawing a basic plan of each floor.
![]()

![]()

 |
Using a 25-ft. retractable tape measure, record the overall dimensions of each room, noting the position of existing doors, windows, closets, fireplaces—anything that affects space. Take the time to record this information accurately. Be consistent in your measurements, always measuring to window and door jambs, not just to casings. (You are really measuring finished openings in walls.) Also note header and sill heights as well as ceiling heights and plane changes. Determine interior and exterior wall thicknesses by measuring door jambs.

![]()

![]() To create accurate floor plans, transfer your recorded measurements to graph paper. Graph paper is handy because it helps you draw square corners and maintain scale without needing fancy drafting equipment. As to scale, most people find that Va in. = 1 ft. is large enough for detail and thus doesn’t require graph paper larger than 8’A in. x 11 in.
To create accurate floor plans, transfer your recorded measurements to graph paper. Graph paper is handy because it helps you draw square corners and maintain scale without needing fancy drafting equipment. As to scale, most people find that Va in. = 1 ft. is large enough for detail and thus doesn’t require graph paper larger than 8’A in. x 11 in.
Once you’ve created floor plans, use a 100-ft. tape to measure the overall exterior dimensions. Using graph paper with a smaller scale than you used for the interior drawings (say, f8 in. = 1 ft.), position the house as accurately as you can on the lot. If you don’t know exact lot dimensions, check the closing documents you obtained upon purchasing the house or consult public records.
Also sketch locations of major site features, such as fences, trees, driveways, walks, ponds, streams, gardens, dog runs, and outbuildings. In the margins of the sketch or on separate sheets, draw in or note structures and features on adjacent properties that affect your property or its use—such as a tree you enjoy seeing or a garage you don’t. As you gather information, think about how your proposed renovation might affect your neighbors. If a house addition blocks a neighbor’s view, you might have trouble getting it approved. Likewise, there’s no point in adding a window if it would overlook something ugly.
Most communities have setback requirements, minimum distances from structures to property lines; and seeking variances from setbacks is
often a long, frustrating process. Finally, don’t assume that existing fences accurately represent property lines. Verify property lines early on.


Leave a reply