BASIC MASONRY TOOLS
Most of the tools listed in this section are hand tools. Chapter 3 describes impact drills, rotary hammers, and other useful power tools. Important: Wear goggles and a respirator mask when striking, grinding, or cutting masonry. Errant chunks of masonry can blind you, and masonry dust is not stuff you want to breathe.
Trowels are indispensable masonry tools. If you have no other tool, a trowel can cut brick, scoop and throw mortar, tap masonry units into place,
THE Point OF IT ALL
When you see the term pointing in masonry texts, someone is doing something to mortar joints—usually shaping or compressing them so they weather better. Repointing or tuck-pointing refers to adding (and shaping) new mortar after old, weak mortar has been partially removed from a joint, usually with a tuck-pointing chisel or a tuck-pointer’s grinder

![]()
 Mason’s hammers score and cut brick with the sharp end and strike hand chisels with the other. The blunt end is also used to tap brick down into mortar.
Brick sets have a cutting edge beveled on one side, so you can cut bricks precisely or dislodge deteriorated brick without damaging surrounding ones.
Brick cutters are rentable levered tools that precisely cut or “shave” brick, as you often must do when fitting firebricks to fill gaps in a firebox.
Line blocks (or pins) secure a long, taut line to align masonry courses. They’re less important in renovation masonry, where you’re often filling in between existing courses or laying short runs, such as the sides of a chimney.
Mason’s levels are indispensable for leveling courses and assessing plumb. Generally 4 ft. to 6 ft. long, better quality levels have an all-metal casing and replaceable vials. During work, be sure to wipe wet concrete or mortar off a level before it hardens and affects the readings.
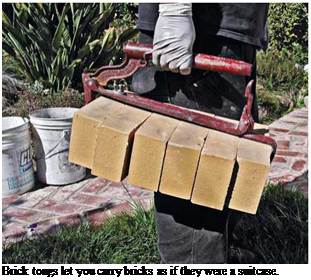
Brick tongs enable you to carry up to 10 bricks comfortably, as if they were in a suitcase.
Concrete tools include floats (used to level concrete), finishing trowels (for smoothing surfaces), and edgers (short tools that contour edges). You’ll also need a strike-off board (usually a straight 2×4) for leveling freshly poured pads. Action photos of these tools appear in Chapter 10.
Miscellaneous tools include goggles, knee pads, rubber gloves, rubber boots (concrete work), a flat bar, and a homemade mortarboard (a platform that holds mortar near the work) made from scrap plywood. You’ll also need sheet plastic to cover sand or cement, a concrete mixer or a mortar pan, a wheelbarrow, square-nose shovels, buckets, a garden hose, stiff-bristle brushes, and so on.
The following tips will help your job go smoothly.
Code. Check local building codes and get necessary permits.
Water. Protect materials from rain as soon as possible. Because water causes cement to set, sacks of portland or mortar cement left on the ground—or on a seemingly dry concrete floor— will harden and become useless. If outdoors, ele
vate sacks on a pallet or scrap lumber and cover the pile with sheet plastic, weighting down the edges with rocks.
Although bricks should be wetted before being laid, don’t leave them uncovered in a downpour. They will absorb too much water, which can dilute the concrete and weaken the bond. (Concrete blocks, on the other hand, should be laid dry. Don’t wet them beforehand.)
Sand and gravel are little affected by water, but if they absorb a lot of water, you’ll need to reduce the amount of water you must add to a mortar or concrete mix. Damp sand won’t ball up when you squeeze a fistful; it contains about 1 qt. of water per cubic foot. Wet sand will ball up and will contain about 2 qt. of water per cubic foot. Dripping wet sand oozes water when you squeeze it and will contain about 3 qt. of water per cubic foot. Of greater concern is the purity of these aggregates: Unload them onto an old sheet of plywood or a heavy (6-mil) plastic tarp to keep them from being contaminated with soil or other organic matter.
Weight. Masonry materials are heavy. To save labor, have materials delivered close to the work site. Likewise, have a mortarboard within 3 ft. of your work area and about waist high so you don’t need to bend over to scoop mortar. For this reason, scaffolding is a sensible investment if you will be working higher than shoulder height. If you’re not strong or in good shape, divide materials into loads you can handle without straining, and use ramps and wheelbarrows when possible. As you lift, get close to the object and lift with your knees, not your back.
Game plan. Before mixing mortar, complete preparatory work, such as chiseling out old joints, removing old brick, and brushing dust off receiving surfaces.
Curing. Give masonry time to cure. Because freezing compromises strength, plan your work so the mortar joints or new concrete will set before temperatures drop that low. Admixtures can extend the temperature range in which you can work, but exterior masonry work is easiest when the 24-hour temperature range is 40°F to 80°F. On hot summer days, start early—prefer – ably on a shady side of the house—and follow the shade around as the day progresses. Cover fresh work with burlap sacks, dampened periodically, or with sheet plastic. The longer masonry stays moist, the stronger it cures.
Protecting surfaces. Spread tarps to catch mortar droppings. And if you’re working on a chimney, tack plywood over the windows to protect glass from falling bricks, tools, and such.
Cleanup. At the end of the day, clean tools well. Wet them down and use a wire brush as needed to remove hardened materials. Before lunch breaks or at the end of the day, run a few shovelfuls of gravel and a few buckets of water in the concrete mixer to loosen caked materials. Then dump it out, ensuring that the barrel wall and mixer blades are clean.


Leave a reply