Asphalt Shingles
On residences, two primary types of asphalt shingles are used. Until recently, most were three-tab shingles with two slots dividing the exposed part of the shingle into thirds. But today, laminated shingles (also called architectural and dimensional shingles) are gaining in popularity. Consisting of two bonded layers, laminated shingles are thicker, more wind resistant, and somewhat easier to install because they have a random pattern,
with no shingle cutouts to line up. When installed, they look distantly like wood shakes.
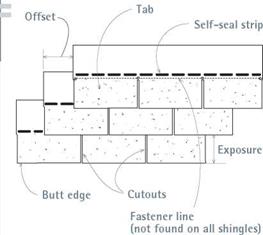
Shingle dimensions vary by maker. Three-tab shingles are typically 12 in. by 36 in. Laminated shingle dimensions are often metric, roughly 13 in. by 40 in. Most shingles are installed with a 5-in. exposure, though shingles with metric dimensions may specify a 5%-in. exposure.
Calculating shingles needed for a complex roof is.. .complex. Begin by measuring the roof accurately, making a to-scale sketch on graph paper as you measure. Note valleys, ridges, chimneys, skylights, plumbing vents, and other elements that require flashing, waterproof membranes, or special attention. With that sketch, a building supplier can develop a final materials list for shingles, nails, underlayment, flashing, vents, and so on.
Asphalt shingles come three to five bundles to the square (100 sq. ft.), depending on shingle dimensions. Thus you need to calculate the square footage of roof surfaces and divide that number by 100 to get the number of squares needed to shingle the field. In addition, you’ll need materials to reinforce shingles along eaves and rake edges—either by installing a double layer of shingles along the roof perimeter or by applying a heavy starter strip before shingling.
If you’re installing laminated shingles, use three-tab shingles as an underlayer along the eaves and rakes. For this purpose, three-tab shingles are far cheaper than laminated shingles and will lie flatter. If you’re installing woven valleys, you’ll interweave roughly one bundle of shingles per 16 linear (lin.) ft. of valley. Finally, add two extra bundles for waste, ridge and hip caps, and future repairs.
Shingle colors often vary from one production lot to another. So, to avoid having a new roof with a patched-together look, specify that all bundles come from the same lot when you order. Then when your order arrives, check the lot numbers on the bundles and open a few bundles from different lots. If lot numbers don’t match and the color variation is noticeable, call the supplier and ask it to rectify the situation. If the color varies only slightly, you might mix lots every other shingle during installation. Finally, have shingles delivered directly to the roof. Many suppliers will place bundles on the roof by means of truck booms or conveyor belts.
Roofing nail quantities vary according to method: hand nailing, power nailing, or some combination of both. Typically, use 4 nails per shingle, or about 2 lb. of nails per square if you’re hand nailing. However, high-wind areas require

6 nails per shingle or 3 lb. per square. Roofing nails come in 5-lb. and 50-lb. quantities. Boxes of pneumatic nails typically contain 120 nails per coil and 60 coils per box. At 4 nails per shingle, you’ll need about 313 coils (400 nails) to attach a square of shingles.
Use corrosion-resistant roofing nails at least 1 !4-in. long for new roofs; 113-in. nails if you’re roofing over a previous layer. Ideally, nails should sink three-quarters into sheathing or stop just short of penetrating all the way through for h-in.- to 53-in.-thick sheathing. Hence, if the roof has an exposed roof overhang (you can see the underside of the sheathing), use M-in. ring-shank nails
![]()

 |
Many local codes don’t allow pneumatic staples to attach roofing, and for good reason. Slight variations in compressor-line pressure or setting depth will blow staples right through shingles, and even if staple depth is correct, shingles can easily work loose from the skinny crown holding them down. Roofing nails are vastly superior.

![]()

 (along the overhang) for a new roof; 1-in. ring- shank nails for roofovers.
When ordering, don’t forget tabbed roofing nails for underlayment and metal-compatible nails for attaching flashing or valley clips.
We’ll assume that the roof has been stripped of old shingles, that failed sheathing has been replaced, and that the roof is safe to walk on.
Reconnoiter the roof. Use a tape measure to see whether the roof is square, the ridge is parallel to eaves, the rake edges are parallel, and whether— overall—the width of the roof requires shifting shingle courses left or right. To determine square, measure diagonally from both ends of the ridge down to the opposite eaves corner; if the readings are roughly equal, chances are the roof is square. If the ridge is parallel to eaves within h in., run shingle courses right up to the ridge. But if ridge – to-eaves readings differ by % in. or more, you’ll need to compensate by adjusting shingle – exposures as you approach the ridge.
The last two measurements, for parallel rakes and roof width, are of most concern if you’re
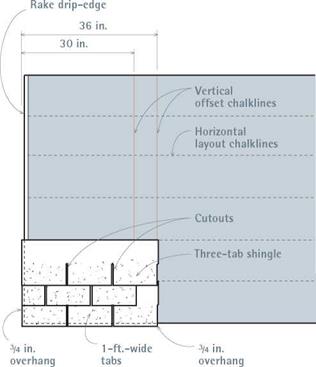
installing three-tab shingles. Because three-tab shingle patterns align vertically, avoid cutting shingle tabs less than 2 in. wide along either rake edge—such short tabs look terrible. It’s far better to shift the shingle layout (and thus the vertical control lines) slightly right or left, so the shingle piece is larger. For additional strategies for installing three-tab shingles, see Mike Guertin’s fine book, Roofing with Asphalt Shingles.
Establishing control lines. After installing drip – edges along the eaves, many pros measure only once, to establish a horizontal control line parallel to the eaves, to which they nail the shingle starter course. After the starter course is down, they put away their tape measure and use only the exposure gauge of their pneumatic nailer or shingle hatchet to position successive courses.
But, to keep courses evenly spaced and straight, you should mark horizontal lines at regular intervals on the underlayment. If your shingle exposure is 5 in., snap chalklines for every course or every third course—whatever works for you. Snapping lines doesn’t take much time and will help ensure professional-looking results.
If you’re installing three-tab shingles, it’s also wise to snap a pair of parallel, vertical control lines 6 in. apart, to line up the slots of alternating shingle courses, as shown in "Laying Out Three – Tab Shingles,” at left. With a 6-in. offset, the slots of every other course line up, creating a strong visual pattern. If slots don’t align, the installation will look sloppy. On the other hand, laminated shingles have no slots to align and so don’t need vertical control lines.


Leave a reply