STEPS Install the Countertops
Many types of countertops are available these days, but the most common type of affordable countertop is plastic laminate applied over particleboard or MDE Laminate countertops come in many colors and styles. Remember that if you choose this type of countertop, scratches show up more on dark surfaces than on lighter ones. Also, be aware that very hot pans can leave burn marks on laminate countertops. Sometimes, a countertop is also needed in a bathroom, but often the bath vanity comes with a countertop and a sink already attached. A plumber usually installs that type of cabinet.
A countertop ends where it meets a wall or stove and extends 1 in. or so beyond the end of the last cabinet. When I’m ready to install a countertop, I go to a supplier, pick a color, and give the clerk the exact measurements of the base cabinets. I prefer the style of laminate countertop that comes with a backsplash. If you provide the size and location of the sink, the supplier can cut the hole for it, often at no additional cost (see the photo on the facing page). Otherwise, a hole can be cut on the job site with a jigsaw or a reciprocating saw
(sabersaw) equipped with a fine-tooth blade. Just follow the directions that come with the sink. Put some duct tape on the base of the saw to keep it from scratching the laminate surface.
In many Habitat houses, the kitchen layout provides for straight countertop surfaces rather than L-shaped countertops, which are more difficult to install. If you need an L-shaped countertop, the supplier will make the necessary miter cuts and provide special hardware for joining countertop sections from underneath. Before joining mitered sections, put waterproof silicone caulk on the two mating edges.
Test-fit each countertop section, placing it on top of the base cabinets and seeing whether the unit fits properly. If the back – splash doesn’t fit tightly against the wall, fill small gaps with silicone caulk after attaching the countertop. If necessary, especially on a crooked or wavy wall, scribe a line on the backsplash and then use a belt sander to remove material from the backsplash to make it fit against the wall.
ATTACH THE COUNTERTOP WITH SCREWS.
Usually, base cabinets are built so the top can be screwed directly to them. For some cabinet and countertop combinations, though, a supplier may advise you to put strips of lx material on top of the base cabinets so the counter – top nosing won’t prevent cabinet doors and drawers from opening.
![STEPS Install the Countertops Подпись: CHECK THE MANUFACTURER'S PLANS FOR THE SINK CUTOUT. The dimensions and cutting details for this hole should come with the sink you plan to install. If your countertop supplier can't make the cutout, do it yourself with a jigsaw equipped with a fine cutting blade. [Photo ® Larry Haun.]](/img/1312/image939.gif)
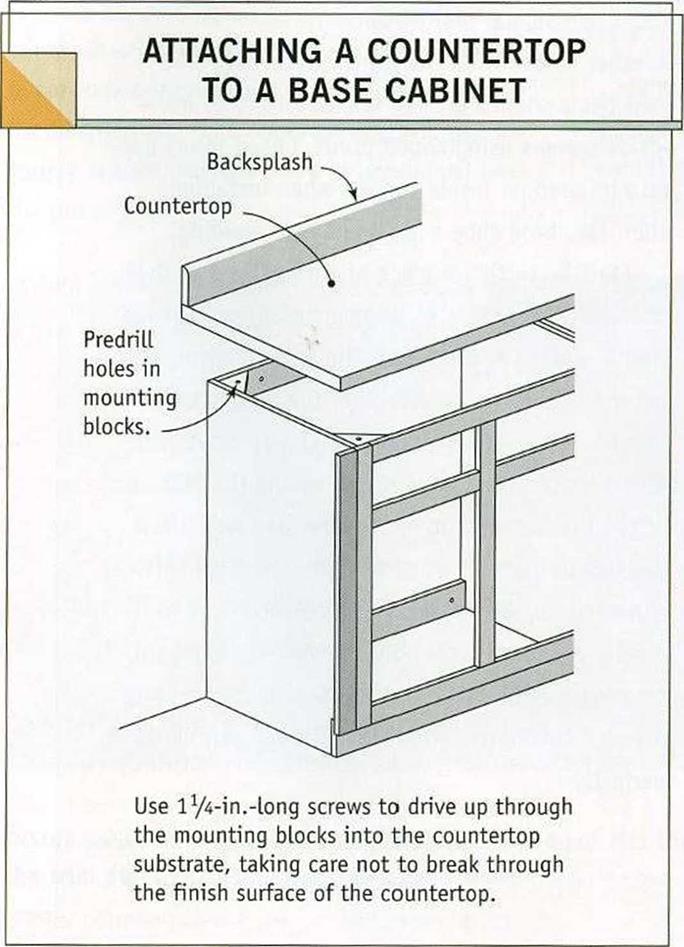
 Prefinished countertops must be attached with screws from below. Attach the countertop by driving l%-in.-long screws up through the lx mounting blocks installed by the cabinet manufacturer (see the illustration at right). Predrill a screw hole through the mounting blocks, but be very careful not to drill or drive the screws so deeply that you break through the finish surface. It’s easy to strip a screw
driven in a countertops particleboard or MDF substrate, so don’t try to drive installation screws extra tight. Complete the job by running a neat bead of silicone caulk between the backsplash and the wall.
STEP 6 Install the Baseboard and Chair Rail
The old house I grew up in had full 1×12 baseboards. In our part of the country, they were called mopboards. In those days, people used big mops to clean their floors with soap and water. The baseboard not only covered the
joint between the plaster and the floor but also protected the walls from being banged by the mop.
Today, baseboard trim is made from real or manufactured wood, and there are many styles available. In the last Habitat house we built here on the coast, we used 1×4 baseboards made of preprimed MDF. Once it was installed and painted, it looked great, but it was so solid that you could hardly drive a nail through it by hand.
In other houses, we have used З-in.-wide trim that’s about % in. thick at the bottom and slopes up to a slender top edge. The thin edge


Leave a reply