Safety on the Job MAKING A LAYOUT STICK


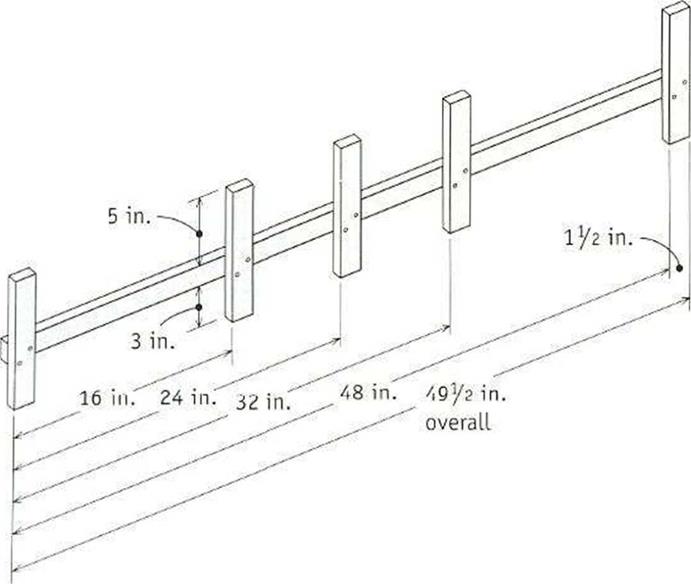
WHETHER YOU USE a store-bought layout stick or make your own, this tool will save you a lot of time when marking plates in preparation for wall construction. A stick like the one shown here can be used to lay out studs on 16-in. and 24-in. centers.
To make your own layout stick, cut a series of ІУг-in.-wide strips from a panel of 34-in.-thick plywood. Cut one strip 497? in. long and five strips 97? in. long. Glue and nail the short pieces to the long piece at right angles and at the spacing shown in the illustration. The З-in. legs allow you 😮 mark top and bottom plates at the same time. The 5-in. legs make it easy to mark two plates side by side and to mark headers and rough sills along with the plates.
indicate the studs’ locations. This will give vou a 14k:-in.-wide rough opening for the medicine cabinet. Write UMC>> on the plates between the two stud locations.
Include blocking requirements when marking up plates. As explained in the sidebar on p. 89, blocking between studs provides solid backing for important items, such as towel bars, built-in shelves, and so on, which will be installed after the interior walls are finished. II you’re building a porch, this is also the time to mark the location of any porch beams (see chapter 6). Porch beams recess 3 in. inside the walls and require two trimmers underneath to support them.
1 don’t know who made the first layout stick for marking stud locations, but I have been using one for almost 50 years. You can either make one (see the sidebar above) or buy one (see Resources on p. 278). 1 learned howto do stud layouts with a long tape and a small square, but 1 think it is taster and easier to use a layout stick.
Take a look at the building plans. Exterior walls generally have studs spaced 16 in. o. c. Interior wall studs may also be spaced 16 in.
o. c. but are more often 24 in. o. c. When exterior walls arc sheathed with plywood orOSB, the studs arc spaced to fit these 4-ft. sheets.
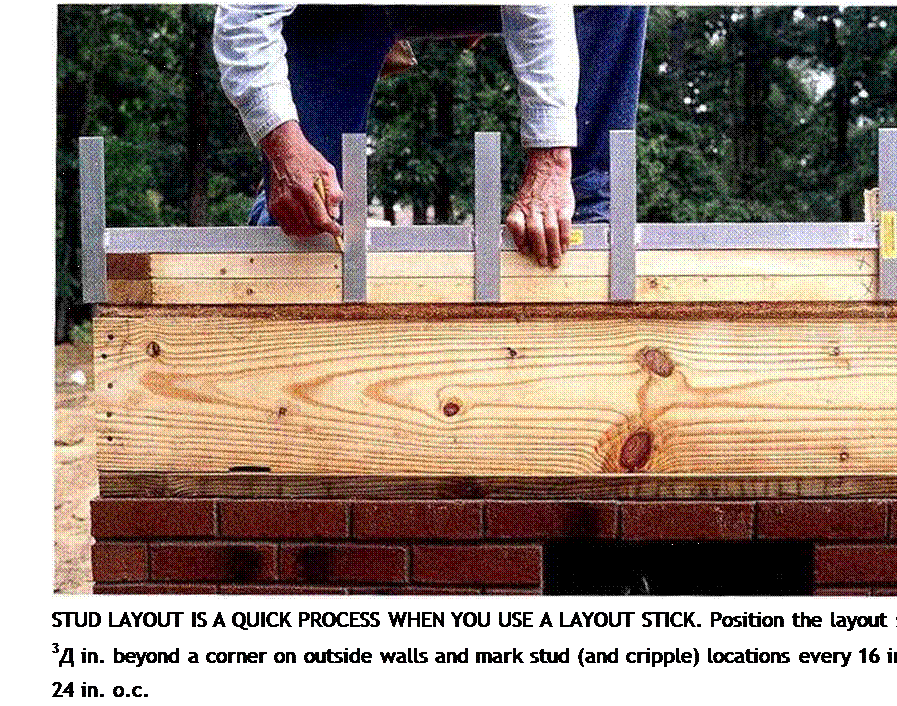
Start the stud layout at one end of a long exterior wall. Place the layout stick on the out – side edge of the plates, with the first tab rin.


beyond the end of the wall. This sets up a 16-ІП.-О. С. or a 24-in.-o. c. layout that will accommodate the 4-ft.-vide sheathing sheets (see the photo at right). Mark both sides of the remaining tabs to note the locations of the next three studs. Move the layout stick, line up the end tab with the last mark, and mark again. ІГ you’re nailing a sheet of OSR at the outside corners for bracing, make sure you lay out a stud 4 ft. from each comer in both directions.
When you come to a door or window
»
opening, just continue the stud layout, marking cripple locations on the headers and the rough sills. Lay out all exterior walls and then begin on the interior walls. The layout of interior walls is not as critical as that of exterior walls, because most drvwall hangers use long
j О О
sheets of drvwall, which often run from corner to corner, fust put the stick in a corner against a through wall and start marking. Make sure you put the stud markings on the same side of the plates as the header markings. When you encounter rough plumbing, don’t pat a stud next to a pipe. Give the plumbers room to finish their work. Kach intersecting wall automatically has a stud on each end, so there’s no need to mark those locations.
Old codes required that a stud be placed tinder every break in the top plate. Here in the West, this hasn’t been a requirement for nearly 40years, but check with your local building inspector. My guess is that few, if any, areas in
the country still require it. As long as you have a double top plate, locating a stud under a plate break adds little to the structural integrity of the frame.
Because of the sheer number of marks required on walls, it’s a good idea to walk through every “room” after you have finished marking all the plates. Visually check whether all of the wall plates, headers, rough sills, corners, and channels are proper у marked. The time you take to inspect your work now can save vou much more time later. It takes a lot
4
longer to tear out studs and frame a door that was missed during layout than it does to take a leisurely but focused stroll through the house to make sure everything is in order.
|
|||||||
|
|||||||
|
|||||||
|
|||||||
|
|||||||
|
|||||||


Leave a reply