Nail rim joists first
Rim joists form the exterior of the building and are the first joists to he installed. The layout of other joist locations are marked on the top edges of the rim joists. Cut the rim joists to length and toenail each one flush with the outside of the sill. I drive one I6d nail every 16 in. around the perimeter (see the photo below). In earthquake and high-wind areas, code may require that the rim also be secured to the sill with framing anchors, so check with
your local building inspector. If there are no vents in the foundation, they can be cut into the rim joists. A standard screened vent fits in a 41^-in. by 14^-in. opening.
If you’re framing a floor with 1-joists, you’ll probably use the specially made OS В rim joists supplied with your I-joist order. Install rim joists along only one side of the house. Then lay the I-joists flat across the sills, butting the end of each joist fast against the installed rim joist. The opposite ends of the joists will extend over the sill at the other side of the house. You can now snap a line across the ends to establish where the I-joists need to be cut. A simple jig, explained in the sidebar on the facing page, makes it easy to cut the joists smoothly and accurately. After cutting the I-joists to length, complete the rim joist installation.
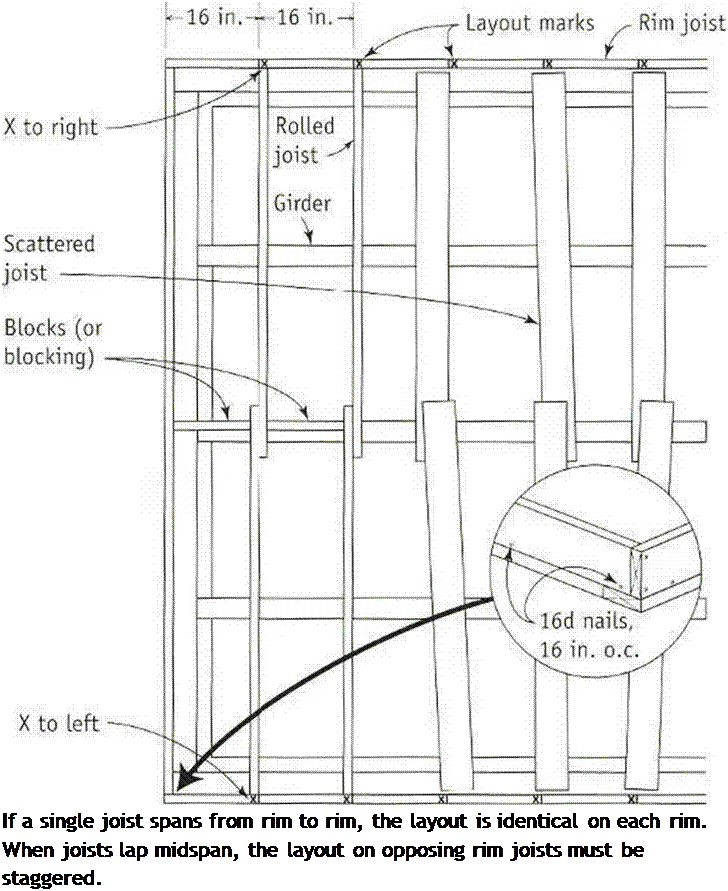
When a single joist spans a house from edge to edge, the layout is identical on parallel rims, lust hook a long tape on the end of the rim joist and make a mark on top every 16 in.
(32 in., 4cS in., etc.) down the entire length. Put an “X” next to each mark to indicate which side of the line the ioist goes on.
When the joists la}-» over a central girder or wall, the layout on the opposing rim joists must be staggered. On one rim joist, mark the 16-in. o. c. locations with an “X" to the right; on the opposite side, lay out the joists with an “X" to the left. T his allows the joists to lap and nail over a girder or crib wall, where they will be stabilized with blocks (see the illustration on the facing page).
Your joist layout may include openings (called headouts) for a stairway or to provide clearance for plumbing or vents. Your plans


Tool Talk I-JOIST CUTTING GUIDE
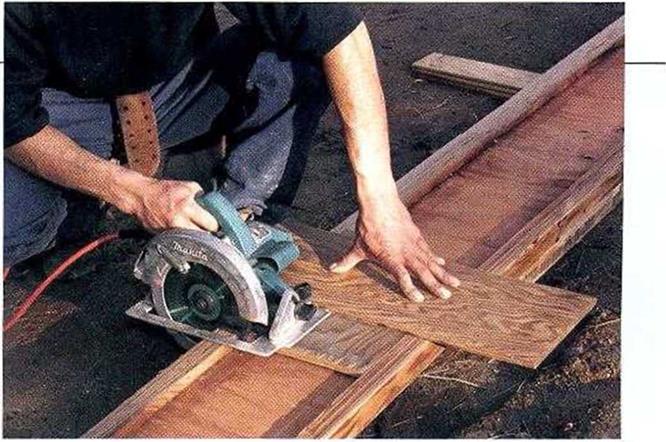
I-JOISTS ARE AWKWARD to cut because the top and bottom chords are wider than the web. To overcome this difficulty, make a simple jig with УИп.-thick plywood. Cut a rectangular piece of plywood to fit between the chords and serve as the base of the jig. Screw a longer piece to the first p’ece, positioning it to guide a 90-degree cut. The edge of the top piece guides the base of the circular saw, as shown in the photo. Lay the guide on the I-joist, set the saw on it, and make a square cut. It’s that simple.
CUT I-JOISTS WITH A GUIDE. Scrap sheathing that is nailed or screwed together creates an effective guide for cutting I-joists. [Photo by Roe A. Osborn, courtesy Fine Homebuilding magazine, The Taunton Press. Inc.]


should show these openings, but it s always a good idea (and it could save a lot of time and effort) to check with the plumber. A common mistake is leaving insufficient room between the joists for the tubs trap and the toilet’s
drain. You mav need to frame a headout to
і
make room for plumbing. For headout tram ing details, see the sidebar on p. 67. When framing with 1 joists, remember that, like any other type of engineered joist, they cannot be notched or cut midspan without destroying their structural integrity.
Cut the joists in place
If you trust your eye, try cutting 2x joists in place rather than measuring each one individually. As you become comfortable using a circular saw, you’ll be able make a square cut without using a square (see the sidebar on p.68). This technique is definitely worth learning. Over the course of framing a house, it will save a significant amount of time.


Leave a reply