Make the Attic Accessible
CODE REQUIRES AN ACCESS HOLE
for the attic. This allows workers to get into the attic to install insulation and wiring. You may also want to get up there some day to check on a roof leak or just to see how the spiders are doing.
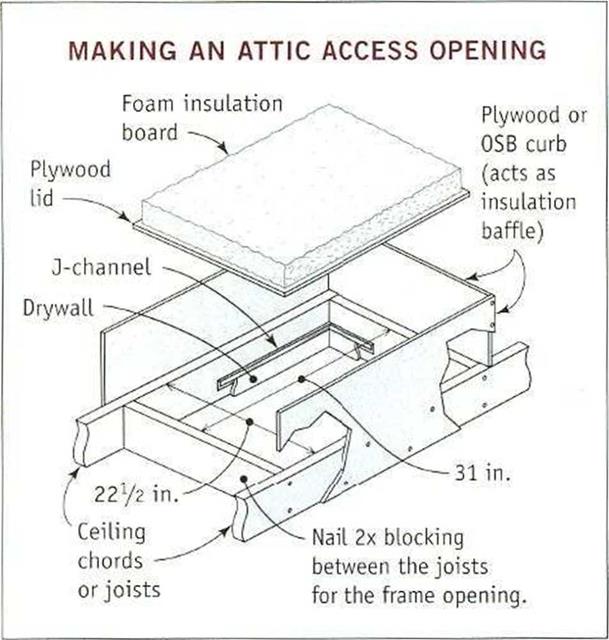
The standard attic access hole has a rough 2x frame that is 22/ in. wide by 31 in. long. This rectangular opening fits nicely between ceiling joists installed on 2-ft. centers. Usually, the hole is located in a closet or along a hallway. Once you select a spot for access to the attic, cut a pair of 2x$ to lit between the ceiling joists and nail them 31 in. apart. The bottom edges of the blocking should be flush with the bottom edges of the joists. Take the time to measure the hole diagonally to
make sure its square. After V*-in. dry – wall is nailed in place, you will have a 21^-in. by 30-in. access hole.
If you are using blown-in insulation to insulate the ceiling, build a plywood or OSB curb around the access hole in the attic (see the illustration at location). Make sure the curb is tall enough (at least 12 in.) to keep the insulation from falling on your head every time you open the lid to the attic. The lid can be cut from
drvwall and should be insulated with
/
rigid foam board.
Instead of a simple lid for the access hole, you may want to install a pull-down stair kit. If you’re using the attic for storage and need to go up there on a regular basis, a pull-down staircase is the way to go. The stairs
are factory-made and designed to tit in the 22’A-in. space between the joists. The rough opening must be longer, however—54 in. is common. Check the manufacturer’s specifications before you frame the opening.
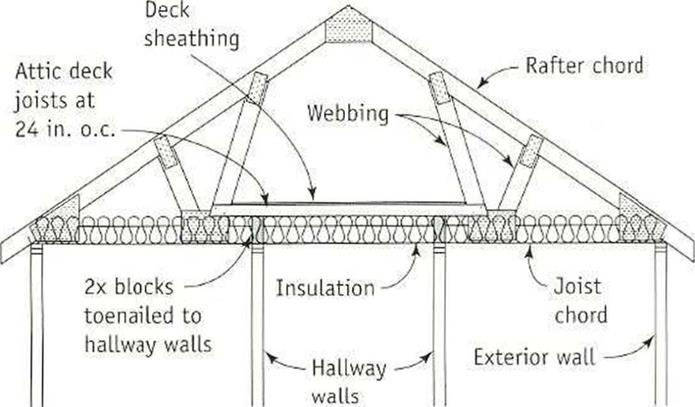
Create attic storage. There is some usable space in most truss-roof attics. To make use of it, don’t lay sheathing directly on the joist chords of roof trusses, since trusses are not engineered for this. Instead, frame a storage platform above the joist chords, making sure that there’s room for insulation beneath the platform. You can support the platform’s joists on short (8-in. to 12-in.-long) cripple studs nailed to the double top plates of nearby walls. Sheathe the platform with l/’-in. plywood or OSB.

|


than with trusses, the ridge board can also run long at this stage. This process ensures a straight barge rafter. It also lets you straighten a bowed gable rafter. Hoist a supply of 2×4 lookout stock up to the roof, set each lookout in its notch, and secure the end of each one against the face of the first inboard truss (or rafter) with two 16d nails. Keep the top surface of the lookout flush with the top edge of the truss. Now, before driving a pair of 16d nails into each notch, move the gable-end rafter in or out to make the framing member as straight as possible. Nail all the lookouts in their notches, and leave them like this for now.
If the truss tails have been set straight, begin to cut and install the gutter or fascia boards. If they’re not straight, snap a line across the top or bottom edges, then mark plumb cuts to
I lineup the truss ends in the same plane. This is another exception to the “never cut a truss" rule. As long as you’re onlv making a small cutoff at the end of the truss (well away from joints and gussets), there’s no chance of structural damage. Check the cave overhang called
O’ о
for in the plans. Measure this distance on the gable-end trusses at opposite ends of the house. Then snap a line across all the trusses, going from one end of the house to the other. Mark the cut lines on the truss ends and make the cuts. This technique also works when building plans call for exposed rafter tails that must be cut in the same plane. Use a iig or pattern, such as the one shown in the top illustration on p. 132, to mark identical plumb cuts on the rafter tails. You can make the cuts from above, while standing on the top plate of the wall, or from below, while standing on a ladder or seal Inkling.
Install the gutter or fascia boards
Although both gutter and fascia boards are nailed to the rafter tails, the distinction between the two is that gutter boards are later
covered with trim (aluminum or vinvl clad-
/
ding or lx finish material), fascia, on the other hand, is a finished surface. Some builders install lx fascia boards over 2x gutter boards or subfascia, while others use the 2x stock as the finished fascia.
Obviously, smooth, accurate cuts are required to install fascia boards, while gutter boards are less demanding. On this house, we installed gutter boards that were latei clad with coil aluminum (see chapter 7).


Leave a reply