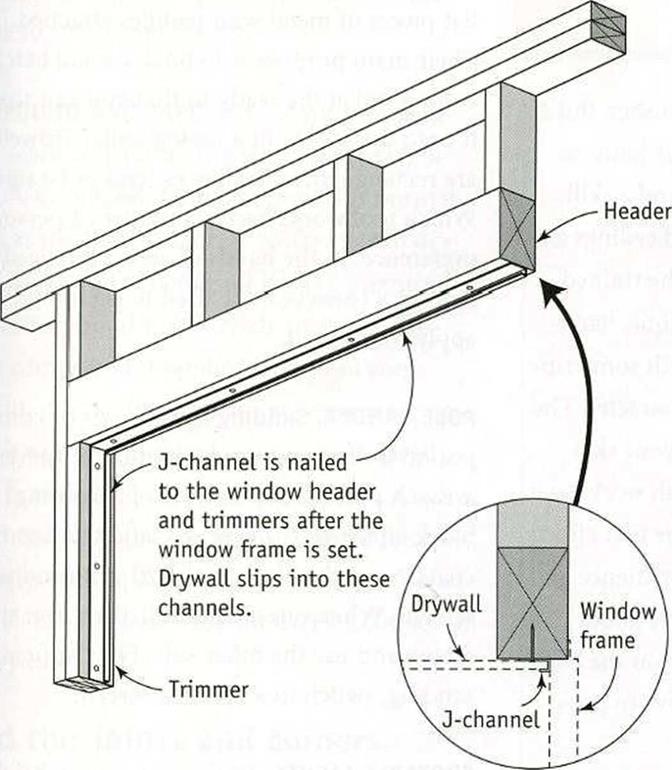
INSTALLING J-CHANNEL AROUND WINDOWS
Dispose of waste drywall. Before you send waste dry – wall to a landfill, contact the Gypsum Assoriation (see Resources on p. 278) to see whether there’s a recycling facility in your area. Local builders may also know of recycling possibilities that can help reduce the amount of construction material sent to landfills.
Using J-channet around a window makes a dean joint between the drywall and the window frame.
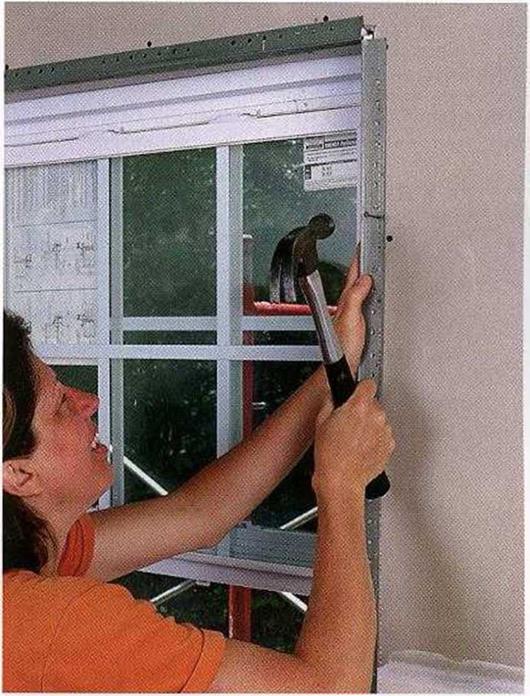
corner beads are designed to be nailed or stapled in place. Use tinsnips to cut floor-to – ceiling beads. Cut them at least Zi in. short, but hold them tightly against the ceiling. Starting at the top and working down, fasten the bead to the corner stud (below the top plates) with pairs of nails or screws opposite each other every 8 in. to 10 in. A pneumatic stapler also works well. Make sure all the beads are straight and lie flat against the wall.
Beads around windows and doors are attached just like those on corners. The header beads are cut square on both ends and then nailed in place. The side trimmer pieces are also cut square and butt into the top piece (see the photo at right).

 STEPS Mud, Tape, and Finish the Drywali
I am not a professional drywali finisher. But I have taped enough wall and corner joints to know that this job is both an art and a skill. Some finishers can leave walls and ceilings as straight and smooth as glass. To the trained eye, my work looks more like antique, handmade glass—generally flat, but with some rippling and variations that give it character. The thing to remember, regardless of your skill level, is that taping drywali is finish work, so it needs to look good. Although your first efforts aren’t likely to be masterful, with patience and know-how you can learn to achieve good, solid work. This section will give you the basic know-how. The patience you111 have to provide yourself.
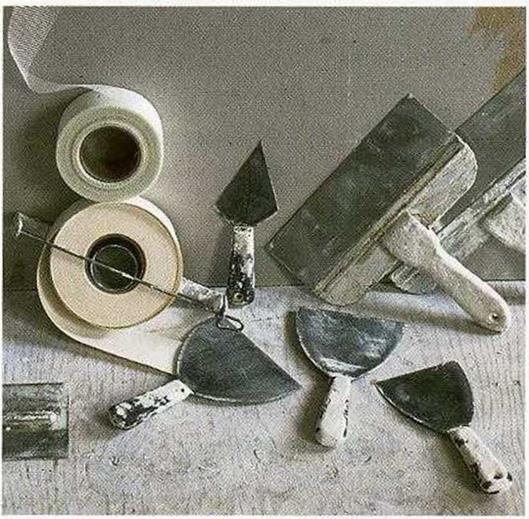
Although professional drywali finishers rely on an assortment of equipment, including stilts to speed ceiling work, you can achieve very good results with just a few tools. You’ll find them at well-stocked hardware stores, home centers, and drywali-supply outlets.
TAPING KNIVES. Mud applicators are called knives, even though they look more like overgrown spatulas. A 5-in.-wide knife is good for applying joint compound (referred to as mud). Wider knives are used to smooth and feather the edges of mud, tapering it so thin that it will be as undetectable as possible once the paint is applied. If you’re new to drywali work, start with 5-in., 8-in., and 12-in. knives for best results.
TROWELS AND HAWKS. These tools are simply flat pieces of metal with handles attached. Their main purpose is to hold a small batch of compound at the ready so that you can scoop it onto the wall with a taping knife. Trowels are rectangular, while hawks tend to be square. Which tool works best is a matter of personal preference. In the hands of an experienced worker, a trowel can be used to both hold and apply compound.
POLE SANDER. Sanding finish coats of compound is often necessary to smooth uneven areas. A pole sander consists of a sanding block attached to a pole. To sand the first two coats, cover the block with 120-grit sanding screens. When one side is dull, turn over the screen and use the other side. For the final sanding, switch to a 150-grit screen.
PORTABLE LIGHTS. With one or more bright, halogen-type work lights, you’ll have a much easier time finding flaws in the top coat.
DUST MASK AND GOGGLES. Don’t begin to sand drywali compound without donning safety gear.
Before you start taping and mudding, make sure that all fasteners are below the surface of the drywali. You can do this by running your hand or a wide drywali knife over the fasteners in the walls and ceiling. If any fasteners are proud of the surface, they will show when you apply the first coat of mud.
You may need to do a bit of repair work around electrical-outlet boxes. If the fit around these boxes is sloppy, use a fast-setting (as opposed to a slow-drying) joint compound that’s available at supply stores. Mix a batch and fill the gaps with a small putty
knife. If the gaps are quite narrow, use latex caulk to seal around them.
COMPOUND AND TAPE. Part of your preparation work is making sure you have the right supplies on hand. Joint compound is normally used as the bed for tape. If you’re new to dry – wall work, you’re better off buying premixed joint compound that is ready to apply. Topping compound is applied over joint compound; it has a finer, creamier consistency so that it can be smoothed out nicely. It’s available in premixed and powdered forms. You’ll also need enough tape to cover all the joints between panels, including the inside corners. Buy about 400 ft. of tape for every 1,000 sq. ft. of drywall.
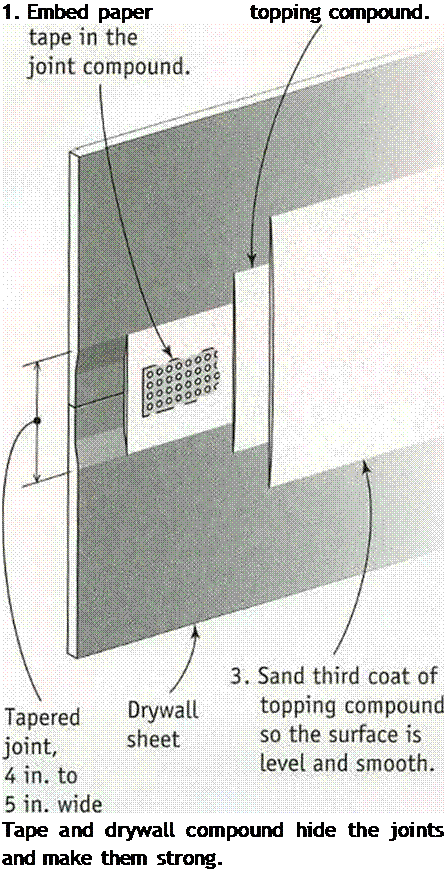
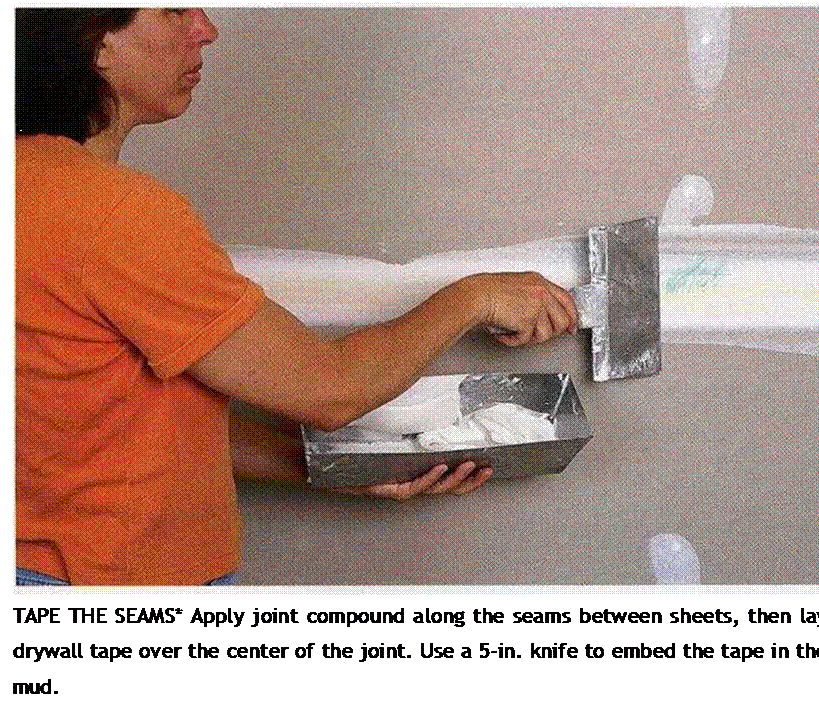
The long edges of drywall panels are tapered, allowing the seams between adjacent panels to be filled with joint compound and taped to create a level surface. Begin by using a 5-in. knife to apply mud about % in. thick along the entire seam. Roll out the tape from corner to corner, center it on the joint, press it lightly in place, and then pull it tight and straight.
Once the tape is in place, drag the knife over the top, applying enough pressure to embed the tape as you go (see the photo at left on p. 230). Make sure the tape is flat, wrinkle- free, and embedded in about % in. of mud. Be careful not to create mud buildup in the corners. Clean any excess compound from along the edges of the tape with your knife.

 Inside corners and wall-ceiling joints are taped a bit differently than flat joints in a ceiling or wall. Use a 4-in. or 5-in. knife to apply an S^-in.-thick layer of joint compound on each edge of the corner. Next, fold the tape at the crease and press it into the corner, flatten-
ing it as you go. Working on one edge at a time, press the tape against the drywall and into the mud with the taping knife.
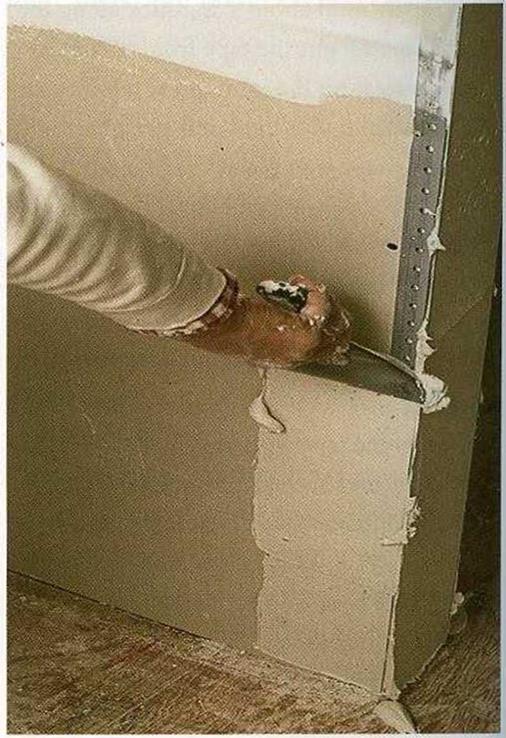
Outside corners covered with corner bead are easier to do (see the photo at right below). Using the same 4-in. or 5-in. knife, press mud along the length of the corner. The outside edge of the comer bead acts as a guide for your knife as you pull off excess mud.
The ends of a drywall sheet are not tapered like the edges are. For this reason, you should use less mud to cover the tape at the butt joints, where the ends of adjoining sheets meet. Otherwise, you can create an obvious bump in the wall. Cover the tape lightly with mud, and feather the edges away from the
MUD THE CORNER BEADS. Apply joint compound generously along each side of a corner bead. To level off the compound, run the taping knife over the rounded outside edge of the bead. [Photo by Charles Miller, courtesy Fine Homebuilding magazine, ® The Taunton Press, Inc.]
center of the joint so any bumps that result will be slight.
In hot, dry climates, joint-compound applications dry rapidly. Mud that dries too fast may not bond well and can crack. Try mudding a couple of joints in a room and then applying tape right away, rather than mudding every joint first. You may need to close up the house to retain moisture and create a slower drying time. You can also use an easy-to-sand setting compound that hardens with little shrinkage and is basically unaffected by hot, dry conditions.
Its a different story in cold and humid areas. Builders in those regions often have to close up the house, turn up the heat, and open the windows a bit to let out moisture. Portable propane heaters work well to help things dry, but they exhaust additional moisture into the air. If you’re using them, leave a window open so moist air can escape. Kerosene heaters also work well, but it may take a while for the smell to leave the house.
|
|


Leave a reply