Install the base cabinets in kitchens and baths
Cabinet installation details are the same, whether you’re working in the kitchen, the bathroom, or any room. Some people prefer to install wall cabinets first so they won’t have to reach over the base cabinets. Perhaps
because 1 am tall, I generally install base cabinets first. Either way, it’s best to begin in a corner. Corner cabinets tend to be large and are trickier to install because they have to fit against two wall surfaces. But once you get a corner cabinet installed plumb and level, you’ll have an easier time with the rest of the job.
PLANNING AND PREPARATION ARE IMPORTANT. Before you screw any cabinets to the wall, it’s a good idea to line them up and see whether they will fit into the allotted space.
It’s not unheard of for one or more cabinets to be manufactured in the wrong size, so this test-fitting exercise is important. At this stage, and during the installation process, it’s important to allow adequate clearances between cabinets for the major appliances. For example, you should leave between 30% in. and 30% in. of space between base cabinets to fit a standard 30-in.-wide range or stove. Your final prep step is to label all cabinet doors and drawers, then remove them until you’ve fin – ished the installation process.
START WITH A LEVEL LINE. Begin the installation process by marking a level line on the wall, where the top edges of your base cabinets will fit. If you suspect that the floor surface isn’t exactly level where the cabinets will be
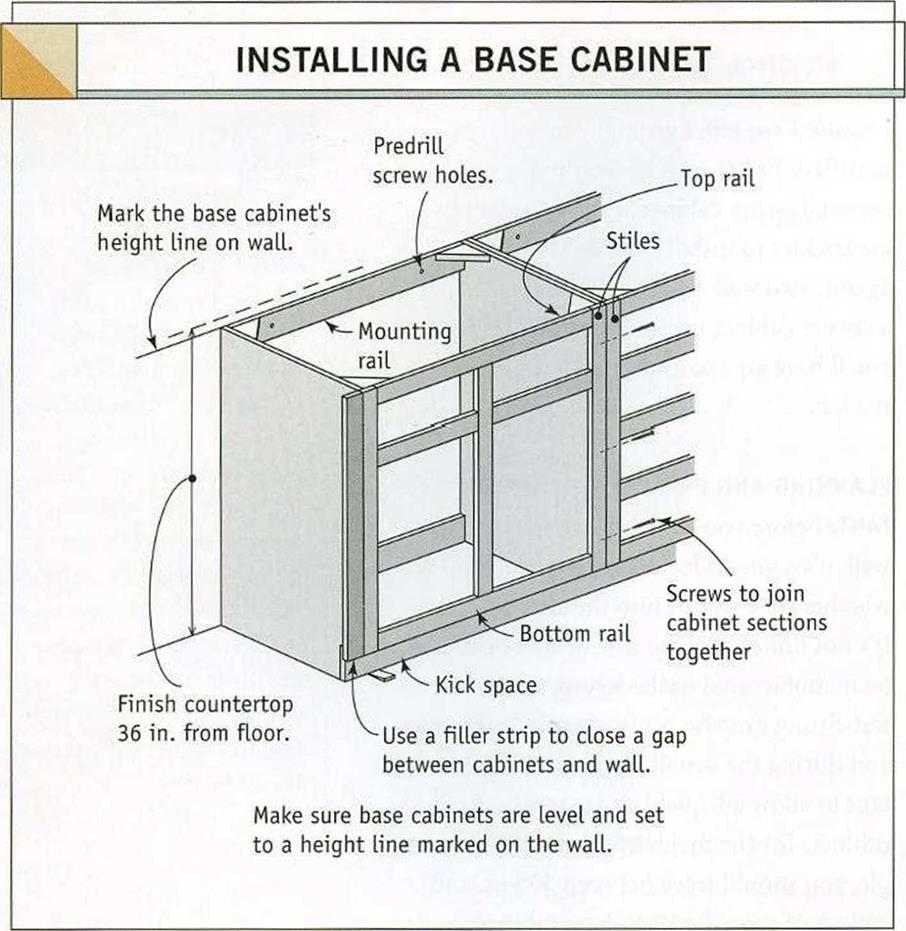
 installed, use a level to find the highest spot on the floor, then measure up the wall near that spot. The standard height of base cabinets without a countertop is usually 34/ in. or 35/ in., depending on the manufacturer (see the illustration above).
DRIVE INSTALLATION SCREWS INTO STUDS.
Base cabinets are screwed into wall studs or the 2×4 backing described in chapter 4. If stud locations were not marked on the floor, you can locate them by tapping lightly on the dry- wall with a hammer and listening for a solid sound. To make sure you’ve found a stud, drive a nail through the drywall in a place where the cabinet will cover the holes. Once you locate one stud, other studs should be 16 in. or 24 in. o. c. Use З-in. flat-head screws to install cabinets. Don’t use drywall screws, because they tend to be brittle and aren’t designed to support heavy loads.
GET CABINETS LEVEL. Make sure the top back edge of the cabinet sets directly to the wall line so it’s level. Predrill holes for the installation screws through the mounting rail and into the studs. Then screw the cabinet to the wall. Now place a 2-ft. level across the top of the cabinet from the back edge to the front edge. As necessary, wedge shims under the cabinet to get the top of the cabinet level in all directions. You can glue the shims in place to make sure they don’t shift around. If any part of a shim projects beyond the front or side of a cabinet, cut or chisel it flush. Use this leveling technique when installing all base cabinets.
JOIN CABINETS TOGETHER. Separate cabinets, both base and wall types, are joined together where their stiles meet. A stile is a vertical member in the rectangular face frame that forms the front of most cabinets. Horizontal frame members are called rails (see the illustration at left). If the cabinets are European- style frameless ones, join them together by screwing the sides to each other. With face – frame cabinets, the stiles of adjacent cabinets are clamped together, drilled, and screwed.
As you join and clamp one cabinet to another, make sure each cabinet is level and at the proper height. A pair of clamps should be sufficient to hold two stiles together until you screw them to each other. Drill countersunk pilot holes for two screws, one near the top hinge and one near the bottom hinge. A third screw can be driven near the center of the stile, if necessary. With a countersunk pilot hole, the head of the screw should be just slightly below the wood surface.
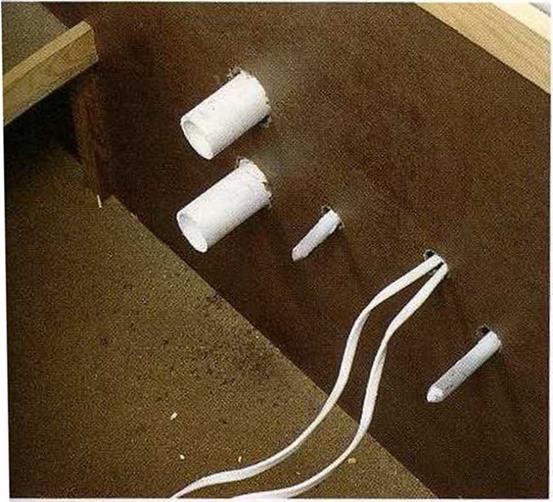
CUT HOLES IN SINK CABINETS. A base cabinet that will hold a sink needs to have holes drilled or cut at the back for water supply and waste lines. A kitchen sink base will also have an electrical line coming in, if a garbage

 MAKE ROOM FOR UTILITIES BENEATH THE SINK. Holes must be drilled in the back of sink cabinets to make room for pipes and electrical wires.
disposal unit and/or a dishwasher will be installed (see the photo above). Measure from the floor and the adjoining cabinet to locate the centers of the access holes. You can use a jigsaw or a drill with a hole saw to cut the holes. Drill slowly and leave a neat-looking job. Seal any holes around pipes with expanding foam or caulk.
FILL GAPS WITH STRIPS. At times, you may need a vertical filler strip to close a gap between the edge of a cabinet and an adjoining wall. A filler strip is like a stile. It is cut to the width of the gap and then screwed to the cabinet stile, as shown in the illustration on the facing page. If the space allotted between walls is too small for the cabinets to fit in, the overhanging part of a stile can often be trimmed to make more room.
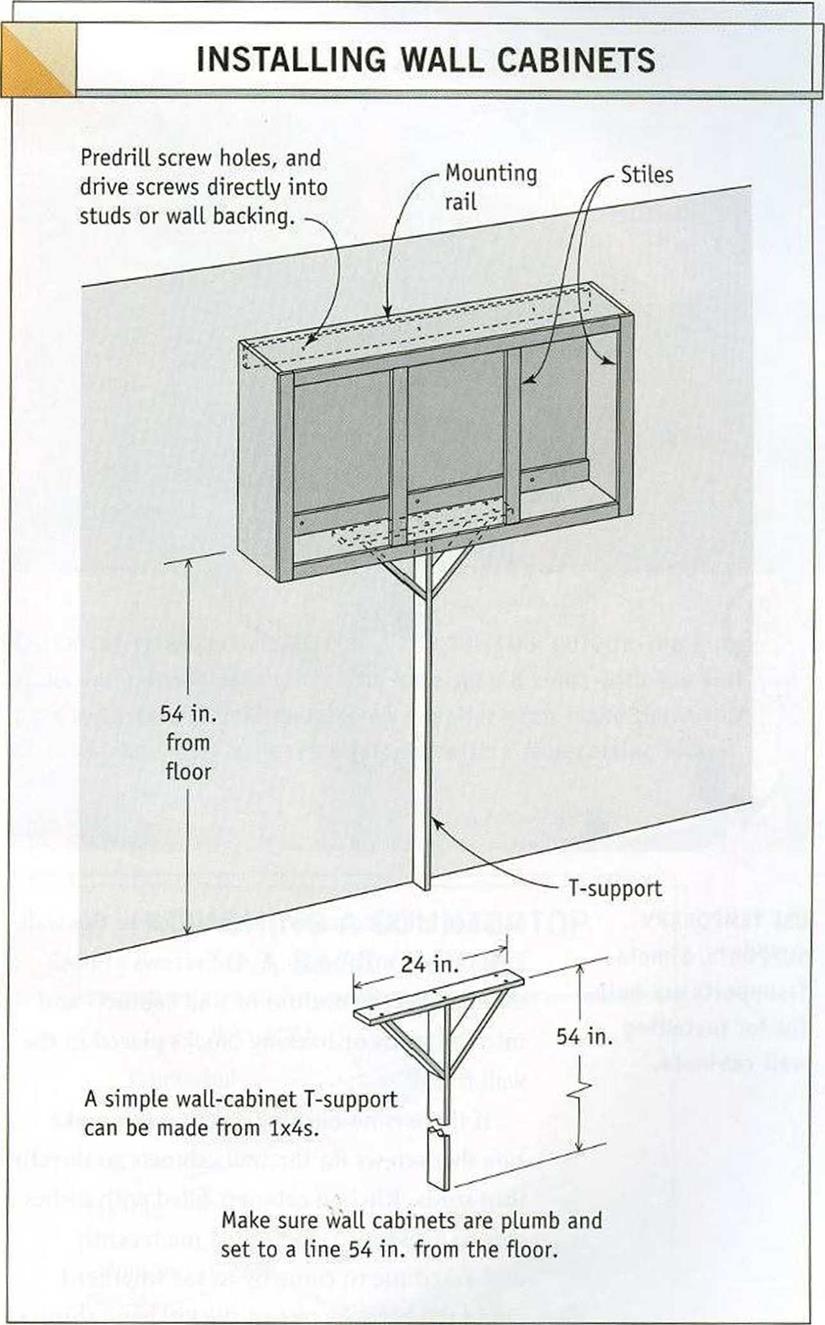
Wall cabinets are usually installed with their bottom edges 54 in. from the floor, or 18 in. above a countertop (see the illustration above). Mark a level line for the wall cabi
nets with a soft pencil, so that it can be erased or easily covered with paint. If there is a kitchen soffit (discussed in chapter 5), make sure the cabinets are secured to the walls, with their tops fitting snugly against the soffit.
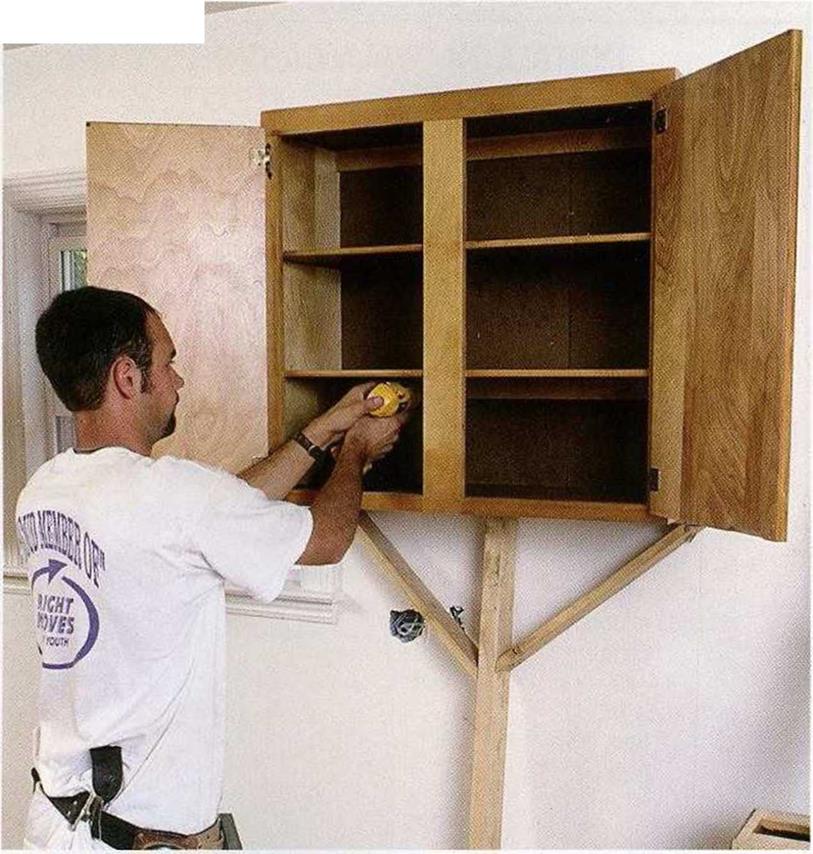
Before hanging wall cabinets, remove the doors and shelves to make the cabinets lighter. Just as with base cabinets, start in a corner and install every unit level and plumb. Use a T-support or something similar to hold a


studs. Tap gently on the wall and listen for a duller sound when you tap over a stud. Or drive nails behind the cabinet to locate a stud. When one stud is found, other studs should be 16 in. or 24 in. from it. Once the studs are found, mark their locations inside the cabinets on the mounting rail. Predrill screw holes in the cabinet mounting rail, set the cabinet in place, and drive a screw into each stud. If the screw misses the stud, check again for its location until you get it right. And feel free to use a few extra screws in wall cabinets. Just make sure they go into studs.


Leave a reply