Colorful Character for a Colorful Home
![Colorful Character for a Colorful Home Подпись: [Photo © Anna Carter.]](/img/1312/image921.gif)

IN 1991, WE REHABBED A HOUSE
for a couple with seven children. The father, Eddie, had never had his own bed as a child. As we worked together fixing up the house that would become his family’s new home, it was clear that he was overwhelmed with pride.
Eddie had a colorful personality, and he loved color in every aspect of his life. Each room in his soon-to-be completed house was to be painted a happy color—hot pink for his girls, electric blue for his boys. And on the outside? Bright-yellow vinyl siding.
After the house was finished, Eddie and his family came to our church to thank the congregation for sponsoring the rehab of their new home.
Striding down the aisle with his wife, Shandra, and all their kids,
Eddie—whos at least 6 ft. 3 in. and rail-thin— was all smiles. What a happy man he was that day.
But he wasn’t the only one smiling. As Eddie and his family made their way to the front of the church, past the 900 people sitting in their pews, T couldn’t help noticing his shoes, and I smiled myself. They were fire-engine red. Color, obviously, is important to Eddie.
-Anna G. Carter
Often referred to as door and window trim, casing hides the joint between the drywall and the door or window jamb. Spend some time at your local lumberyard and you’ll see all the styles and grades of casing, including the type that’s installed at the factory on many prehung doors. Solid wood casing can be used if you want to leave the wood natural.
Paint-grade trim—made from MDF or from shorter pieces of wood that have been finger-jointed together—is also available and costs less. Some people prefer a plain, narrow, simple style, while others prefer wider, more complex profiles. Purchase 14-ft. lengths to
minimize waste. Another option is to buy 7-ft.-long pieces that have a 45-degree miter precut on one end.
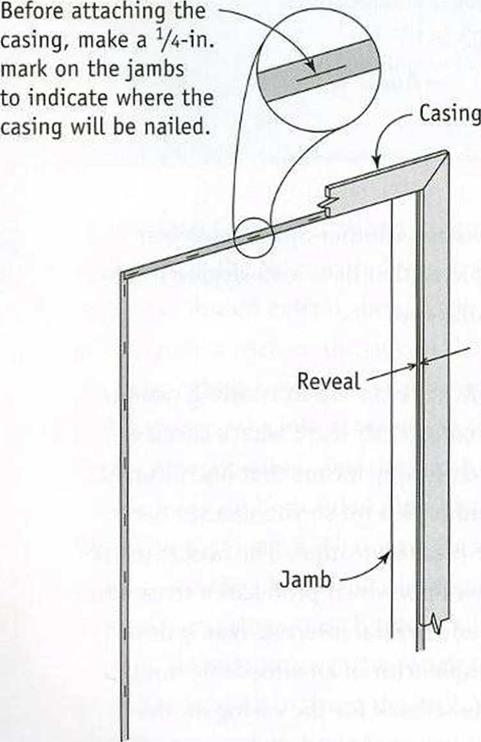
PLAN FOR A REVEAL. When running casing, carpenters commonly leave what’s called a reveal, which simply means that one piece of wood is held back a bit so you can see the edge of the piece beneath it. The idea is to create a shadow line, which produces a sense of depth and adds visual interest. ‘Phis is done even on simple trim in an affordable house.
To mark the setback for the casing on the jamb, use an adjustable combination square. Set it at about %6 in. to % in. in from the inside


 edge of the jamb—whether it is on a door, a window, or an attic access—and mark a pencil line in several places (see the illustration below). With a little experience, you’ll be able to mark a setback by eye, without a square. The casing is cut and nailed to that line.
MARK AND CUT THE CASING. Now its time to cut the side and head casings to length. Cut and nail the casing with its thinner edge facing in, toward the door opening. The baseboard trim butts into the wide edge of the casing at the floor line. To find the length of a piece of side-jamb casing, measure from the floor to the horizontal reveal line at the top of the door or window. That measurement is the distance to the short point of the miter cut.
Another way to obtain this measurement is to hold a piece of casing alongside the door or across the head jamb and mark the short end of the miter cut at the!4-in. reveal line (see the photo at left on the facing page). Make a diagonal mark on the casing to show which way to make the cut. Just make sure the mark will be cut off, so it won’t be visible once the casing is installed. Take the casing stock to the chopsaw and make the cut. Side casings are cut in pairs, one for the jamb on the right and one for the jamb on the left. Take your time. Work slowly. Make sure you are cutting in pairs.
The same technique can be used for windows with sills and jambs. Measure from the sill to the horizontal reveal on the head jamb (for side casings) and from one vertical reveal line to the other on the side jambs (for head casings). All these marks are made from heel to heel, or short point to short point, of the miter cut.
In theory, once you know the length of one piece of casing, you should be able to set up at the saw and cut every piece for doors and windows of the same size. This can eliminate repetitive measuring and lots of time spent walking back and forth to your saw. In practice, side casings may vary slightly in length. But small gaps at the floor line will be hidden by carpeting or cut to uniform distance to accommodate wood or other finish flooring. Find out what carpenters are doing in your area.
Nailing trim around doors and windows can be difficult when the wall extends past the jamb. If drywall edges protrude just a little, they can usually be knocked back enough by hitting them gently with a hammer. Just make sure the casing will completely cover the flattened, compressed drywall.
MARK THE CASING; DON’T MEASURE. Mark the short end of the casing’s miter cut by holding the casing in place on the jamb.
Sometimes, I start by installing door casing inside a closet, where people won’t readily notice mistakes. Think of it as a warm-up exercise. Begin by nailing a piece of side casing first, holding it to the reveal marks. (Other people start with the head casing first.) If you re nailing the casing by hand, drive a pair of nails at the top and then about every 16 in. down the casing. Drive 4d nails through the trim and into the jamb, and drive 6d nails through the thicker part of the trim and into the wall frame. A pneumatic finish nailer makes this job much easier, and you won’t have to use different size nails.
Next comes the head casing. Check the joint between the head and the side casing.
If it looks good, add a bit of glue to the ends
LEAVE A REVEAL. Install the casing so its inside edge sits back a uniform distance (У* in. or so) from the corner of the jamb. This creates a pleasing reveal.
of the two pieces, then nail the head casing to the wall along the horizontal reveal line (see the photo above right). If the joint is open a little, cut the miter again and fine-tune the angle of the chopsaw, if necessary, to get a better fit. If the joint is open more than a little, cut another headpiece; start a little long and make sure you have the angle right before cutting it to length. If all else fails, fill the joint with putty before painting. Repeat this process for the second piece of side casing.
Casing installed around an attic staircase or access hole can be cut and nailed in the same way. The only difference is that you’ll have miter joints at all four corners.
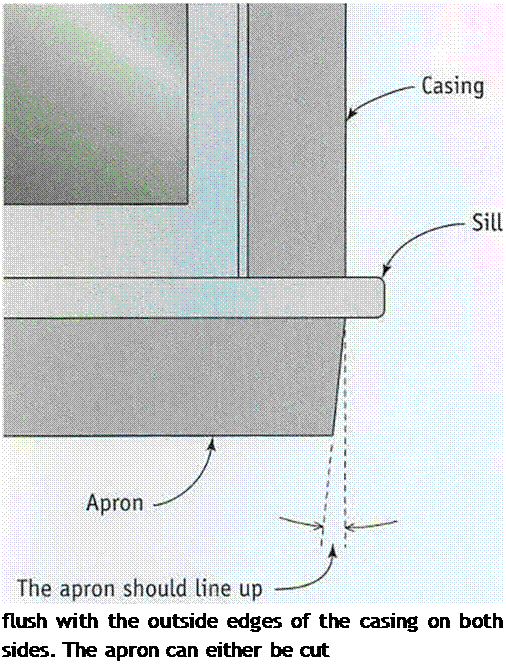
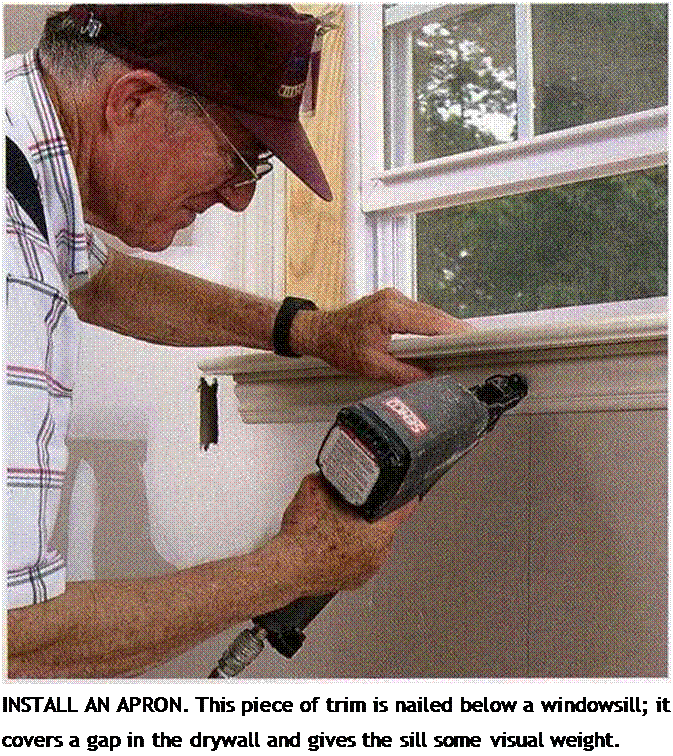
Just as you’d imagine, the piece of trim called an apron is installed beneath the windowsill. It covers the joint between the drywall and the sill and is usually cut from casing stock. Nail it in place with its wide edge up against the sill to support it.
The apron does not run the full length of the sill. If the window sides are covered with drywall, cut the apron 2 in. longer than the window opening. For windows with wood jambs and casing, the apron should line up with the outside edges of the casing on both sides of the window. You can cut the apron square or give it a slight back-cut of about 6 degrees (see the illustration at left). Then nail the apron directly below the windowsill (see the photo at left).
STEP 4 Install the Cabinets 1 started doing finish work as a helper to a cabinetmaker. In the ’50s, there were few factory-made cabinets available. Every cabinet that we installed in every house was built piece by piece on the job.
Today, there is no need to build cabinets on site. Home centers and cabinet shops carry many cabinet styles that are built to order. The price depends on a number of factors, including the amount of solid wood used in the construction; the style of doors and drawer fronts; and the quality of the hinges, handles, drawer slides, and other hardware. Most base cabinets are sized to provide a countertop height of 36 in. But other sizes and styles are available to accommodate wheelchair access and folks with special needs. A local woodworker in his small shop builds the cabinets we use in Habitat houses here on the Oregon coast. They are made from pine or birch and particleboard. Although simple in style,


![]()
 |
they’re also beautiful and, thankfully, rather inexpensive.
Kitchen and bath cabinets can be installed any time after painting. Base cabinets should be installed after the underlayment and the vinyl floor are in place. That makes it much easier for the vinyl-floor installer. Just be careful not to mar the floor while installing the cabinets. Baseboard trim is installed after the cabinets because it butts into the base cabinets.
Today’s kitchens are filled with many appliances, such as a refrigerator, stove, microwave oven, garbage compactor, and dishwasher.
Most appliance suppliers are more than happy to look at your house plans and help you design a kitchen in which every cabinet and appliance fits into its allotted space. Once you settle on a cabinet style, you can choose different sections—one for dishes, one for pans, one for utensils, and so on. After cabinets are delivered to the job site, they are installed one section at a time.


Leave a reply