Ace
WHETHER YOU’RE AN EXPERIENCED BUILDER, A HABITAT VOLUNTEER, ora novice carpenter, the wall-framing phase of a homebuilding project is especially exciting. Piles of lumber scattered around a flat platform are soon assembled into a complex skeleton that defines the shape and si/.e of a homes interior spaces. For the first time, it’s possible to experience the look and feel of a new house, identifying where bedrooms and bathrooms will be and enjoying the view through rough window openings. We’re still a long way from move-in condition, but the completed frame is a dramatic step forward.
Although quite gratifying, framing walls is also hard, intense work. It requires an abundance of energy, good teamwork, and real presence of mind. As you’ll see on the following pages, it takes quite a few steps to got the walls up and ready for roof trusses. Wall locations must be chalked out on the slab or subfloor; plates must be scattered; headers, rough sills, cripples, and trimmers must be cut; plates must be marked; and the pieces must be nailed together. After the walls are nailed together, they must be raised, braced, connected, plumbed, lined, and
![]()
1 Lay Out the Walls
2 Plate the Walls
3 Count and Cut the Headers, Rough Sills, Cripples, and Trimmers
4 Mark the Plates
5 Build the Walls
6 Raise the Walls
7 Plumb and Line the Walls
8 Install and Plumb Door and Window Trimmers
9 Sheathe the Walls
|
|
|


sheathed. It all happens fast, though, and before you know it, there’s a house standing where there wasn’t one before.
As a novice carpenter, I was often afraid that 1 would make a huge mistake while doing wall layouts. Transferring measurements from the building plans to the floor sheathing or slab seemed like a precise and unforgiving science, the principles of which I didn’t fully understand. I knew that once the house was framed, the wall-layout lines would be real spaces—bedrooms, bathrooms, and kitchens—so accuracy seemed critical. After
4
laying out a few houses, however, I learned that, as with most other aspects of carpentry, wall layout just needs to be close—normally within :4 in. tolerance—not accurate to a
machinist’s or scientist’s tolerances. After I realized that, I was able to relax and get on with the work.
I’ve done plenty of house layouts on my own, but its better to tackle this job with a helper or two. The work goes faster when you have someone else to hold the other end of the tape or chalkline. More important, your chances of catching mistakes improve significantly.
A building plan is a guide, just like a road map. There are symbols and measurements to tell vou what to do (see the illustration on the
4
facing page). You don’t have to visualize every detail on a road map to get from Texas to Maine. Neither do you have to visualize every detail on a plan to be able to build a house. You just have to know how to read the plan, then take it one step at a time.
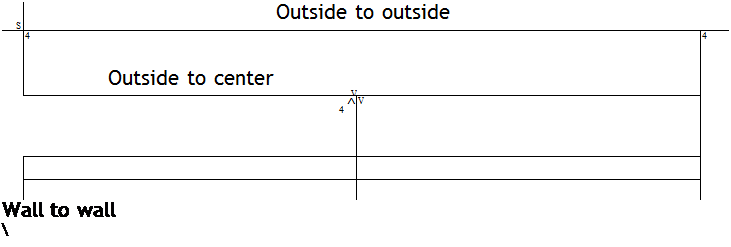
The most common plan scale uses / in. to equal 1 ft., so l in. on a plan equals 4 ft. on a subfloor. Plan dimensions, however, can be labeled as outside to outside, outside to center, or center to center (wall to wall), so you need to pay close attention to this information (see the illustration at left). For layout purposes, if you encounter an outside to center (o/s toe) dimension, simply add I M in.—half the width of a 2×4—to the overall measurement to obtain the outside to outside measurement, which you can then transfer to the floor. (For a 2×6 wall, add 2і/ in.)
The first layout work involves transferring key information from the building plans to the subfloor or slab. These lavout lines enable
j
you to lay down the top and bottom plates for every wall in the house—a process called plating the walls. With each wall’s top and bottom


Leave a reply