Extra joists and headouts
Extra joists are needed under parallel walls (walls that aren’t perpendicular to the floor joists) to carry the added weight that gets transferred down through these walls. Move the extra joists away from the center of each
parallel wall about 3 in. to allow room for pipes and conduit to be run up into the walls from below (see the drawing above).
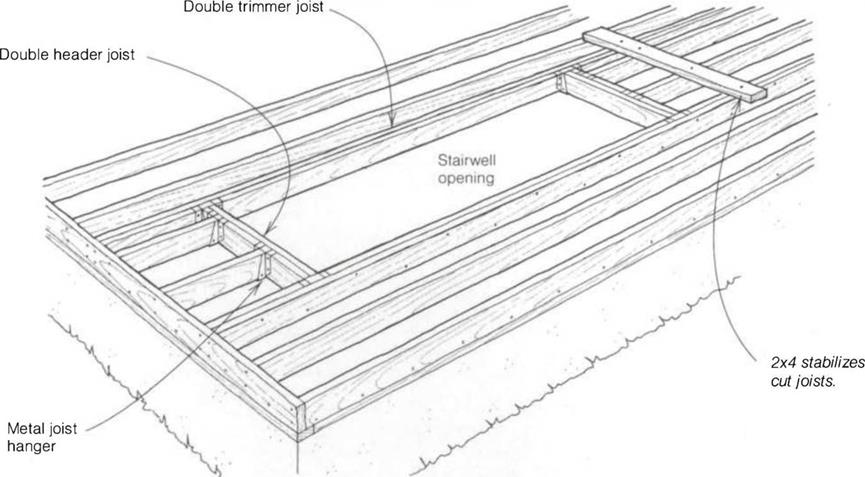
Sometimes joists must be cut to allow room for a stairway, access to an attic, a place to install a skylight, or even for a heater vent in a wall or a tub trap in a bathroom. Carpenters call these openings headouts (see the drawing on p. 98). Regular 2x joists (not I-joists) can be cut as long as they are supported by a header joist and fastened to parallel joists. Here are some basic rules for headouts:
• If more than one joist is cut, double the header joist and side joists.
• Support cut joists temporarily by nailing a flat 2x across their tops.
• Nail 16ds through the header joists into the cutoff joists.
• Support both header and cutoff joists with metal joist hangers at intersecting points.
• 
Nail double joists together with 16ds at 1 б in. o. c.
• Keep all wood at least 1 in from heating vents.
• A common mistake made by carpenters framing a headout is to forget to leave room for the header joists. If, for example, a 6-ft.-long floor opening is needed, cut it б ft б in. This leaves room for a double header joist at each end.
SHEATHING THE FLOOR
Once floor framing is complete, it’s time to cover it with sheathing. Although it’s easier to install rough plumbing and heating ductwork now, this can be done after the subfloor has been laid. After the sheathing is nailed in place, you’ll have a level platform, perfect for building a house or for having a dance!
Normally floors are sheathed with 4×8 sheets of 5/s-in. or 3/4-in. tongue-and – groove (T&G) plywood or OSB. The sheathing should be exterior grade so that it won’t come unglued when exposed to moisture. While square- edged sheathing can be used, codes often require it to be supported by edge blocking between joists. The edges of T&G sheathing are self-supporting and don’t require blocking.
Floor sheathing is bulky and awkward and in windy conditions can act like the sail of a windsurfer. So be mindful when handling it. Also, T&G plywood should be handled with care so you don’t wind up with damaged edges, which can make it hard to fit two sheets together. When I carry sheathing, I grasp it with one hand underneath and one on top


for balance, allowing much of the weight to rest against my upper body.
Or I get a helper.
Sheathing is installed so that the 8-ft. edges are perpendicular to the floor joists. Before laying any sheathing down, though, first measure in 481Л in. from each end and snap a chalkline across the joists between these two marks. This line acts as a control, or reference, line for the first row of sheathing, and the extra 1/4 in. allows for any slight variation in the rim-joist alignment. With the first row of sheathing straight, the rest of the job will be easier.
It’s a good idea to lay down a bead of construction adhesive on each joist before installing the sheathing. The adhesive secures the sheathing tight to the floor joists and helps prevent or reduce floor squeaks, which happen when joists dry out and shrink away from the subfloor. Apply а Ул-т. bead to each joist over a section large enough to lay down a 4×8 piece of sheathing (see the top photo at right).
Lay the first sheet with the grooved edge right along the control line with each end hitting along the center of a joist. If the plywood edge doesn’t fall on a joist, snap a chalkline and cut the sheet to length so that it breaks on the center of the joist. Set the circular saw to the proper depth (% in.) and make the cut. Don’t leave the cutoffs under the floor, or you’ll give termites an easy meal.
Tack down the sheet to the joists with one 8d nail near each corner. On large floors, nail off the sheets after you have laid four or five; otherwise, the adhesive could set up (especially in hot weather). Be careful not to drive nails within 6 in. of the leading edge, because you’ll need
|
a little flexibility here to make it easier to mate the groove of the first row with the tongue of the next
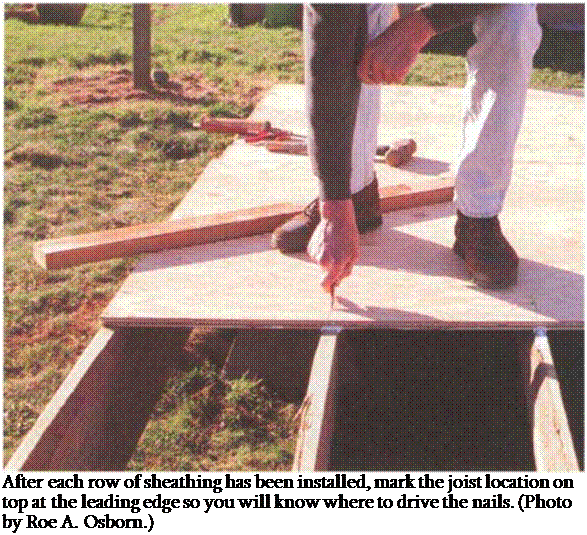
After placing a row of sheathing, mark the location of every joist with a pencil or keel on the leading edge of the sheathing (see the bottom photo on p. 99). This will make it easy to find the joists when you start nailing all the sheets down.
If you live in a wet climate, leave about Vs in. between the ends and edges of the sheets to allow for expansion. This gap can be gauged by eye or by using an 8d nail as a spacer.
Don’t install sheets so that four corners meet at the same point. Instead, stagger the plywood joints, as a bricklayer would do when building a chimney, to add strength to the floor (see the drawing above). Begin the second row with a 4-ft. by 4-ft. sheet, and install it adjacent to the 8-ft. sheet in the first row. Then complete the row with 8-ft. sheets.
Sometimes a little extra persuasion is needed to unite T&G plywood. One way to do this is for one person to stand on the sheet, holding it flat and snug against the previous row of sheathing. The second person places a scrap 2x against the edge (to protect the edge


Leave a reply