Calculating individual risers and treads
Once you’ve determined the total rise of a set of stairs, you can calculate exactly how many steps are needed to get to the second floor and how high each step will be. The total rise for a typical two-story house with 8-ft. walls (accounting for plates, studs, and joists) is often around 109 in., so I use this number in my calculations. Just remember that the first point in building any set of stairs is to measure the actual total rise accurately.
Some codes allow an individual riser to be up to 8 in. high. This is too steep for most of us and makes going up the

stairway like climbing a mountain. But people tend to take shallow steps two at a time, which can be just as uncomfortable and dangerous. The angle of a set of stairs needs to be close to 35°, so wherever possible, I like to build stairs with a 7-in. rise and an 11-in. tread, which experience (and building codes) tells me is a safe and comfortable set of stairs for most people.
Divide 109 in. by 7 in. (the height of a normal step) and the result is 15.57 in. Because there can’t be a partial step, round the result to a whole number to get the number of risers needed. If you divide the rise (109) by 1 5, you get 7.26, or 71/4 in., which is an acceptable rise. If you divide 109 by 16, you get a rise of 6.81 in., which is probably a little too shallow.
An 11-in.-wide tread makes for safer stairs. But if you increase each tread by 1 in., you increase the total run by 14 in. or 1 5 in., depending on the number of treads. That’s okay if you have enough room to build a longer set of stairs. But like most things in carpentry, there is always more than one way to go. As you’ll see, a 10-in. tread can be extended to 11 in. with no increase in the total run. So let’s lay out and cut this 14-tread stair with 10-in.-wide treads and 1 5 risers that are 7Ул in. high. Because stairs have one less tread (14) than risers (15), the total run of these stairs will be 140 in. The upper landing takes the place of the last tread.
Treads and risers are supported by diagonal wooden members called stringers, carriages, or horses. As noted, finish interior stairs are normally at least 36 in. wide, a width that requires three stringers. You aren’t penalized for exceeding code, however, and I like to use four stringers when the material is available. This ensures that the stairs won’t feel bouncy.
The majority of rough stair stringers for a full-flight set of stairs are cut from 1 6-ft. or 18-ft. 2x12s. Pick out three or four good stringers that are straight and free of large knots and place them on sawhorses. I prefer a wood like Douglas fir for interior stair stringers because of its strength. I use pressure-treated wood for exterior stringers because they resist insect and moisture damage.
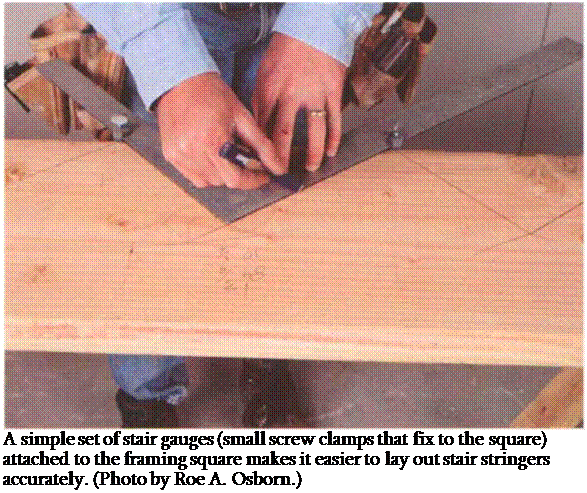
I use a framing square for stringer layout, and a simple set of stair gauges (small screw clamps that attach to the square) makes it easier (see the photo above). Screw one gauge at 71A in. (the unit rise) on the tongue, or narrow part, of the square, and the other gauge at 10 in. (the unit run) on the blade, or wider part. Begin the layout at the bottom end of the stringer with the blade downward. Mark across the top of the square with a sharp pencil and label this riser #1. Slide the square up and mark the next riser #2, and so on. Take your time and work accurately, making sure

that each time you slide the square, you have the tread mark directly on the last riser mark so that each tread and riser are the same (see the drawing above).
I once built a set of stairs without using stair gauges. In the middle of the stringer, I made a mistake and laid out a riser at 8 in. instead of 7 in. Easy enough to do. I set the stringers and sheathed the treads and risers. When I walked up the completed stairs, I tripped on the 8-in. riser. I had the pleasure of building this set of stairs twice. Codes do allow for a bit of variation though. Even stairs don’t have to be built to perfection.
Riser height can vary up to Vie in. from step to step, for example.
Often the stringer is attached to the upper floor system, one step below the level of the upper landing (see the drawing on p. 1 60). This means that the step to the landing makes the 15th riser, so lay out 14 risers on the stringer. Once the risers and treads have been marked on a stringer, finish with a level mark at the bottom of the first riser and a plumb mark at the end of the last tread (see the drawing above).
Now give the stringer a 1 – in. back cut to make the treads 11 in. rather than 10 in. wide. This back cut doesn’t change the total run, but it does change the look of the stairs by tipping the riser back and providing a wider (and safer) tread. Back cut the risers by slipping the riser gauge down the blade until the tongue of the square rests 1 in. in from where the riser mark meets the tread mark. Remark all the risers, making them slant back. The uppermost tread needs to be extended 3A in. to allow for a riser board to be nailed against the landing header (see the drawing on the facing page).


Leave a reply