TOENAILING BASICS

![]()
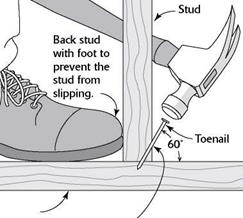
![]() Driving a couple of nails through the side of one 2x into the edge or face of another creates a strong connection. This is a good way to join two 2xs at a right angle. But sometimes this isn’t possible, either because the board is too thick or because its face is not exposed. That’s when you resort to driving a nail at an angle, or toenailing.
Driving a couple of nails through the side of one 2x into the edge or face of another creates a strong connection. This is a good way to join two 2xs at a right angle. But sometimes this isn’t possible, either because the board is too thick or because its face is not exposed. That’s when you resort to driving a nail at an angle, or toenailing.
To toenail two boards together, hold the nail at a 60-degree angle and start it about 1 in. from the end of the board. If the nail angle is not correct, the connection between the two pieces of wood will not be as strong. Back up the wood with your foot to hold the board in place as you toenail. With practice, you’ll soon gain skill, speed, and confidence.
![TOENAILING BASICS Подпись: The girders that support the joists need to break over a post. [Photo by Don Charles Blom]](/img/1312/image219_1.gif)
attaches to the pier post and holds it in position. Secure a TT-in.-thick pressure-treated pad to the top of the pier if the posts will be cut from untreated lumber. You can measure for the post’s length just as you measured for the crib wall’s studs, stretching a line above a piece of girder stock placed on the pier. Cut your posts to length, then secure them directly to the piers or toenail them to the blocks attached to the piers. Make sure the posts are plumb and parallel to one another.
Girders must butt together over a post. When the end of a girder fits into a pocket in the foundation, you’ll have to shim up the girder to get the top surface level with the top of the sill. The shims used beneath girders will bear the full weight of the floor, so they must be cut carefully from pressure-treated stock. Cut uniformly thick shims instead of tapered ones and make them large enough to fit in the bottom of the foundation pocket. Rather than foundation pockets, we inserted a metal 4x post base in the footing next to the stem wall to hold the end of the girder.
![TOENAILING BASICS Подпись: Plywood gussets tie girders securely to their post supports. [Photo by Don Charles Blom]](/img/1312/image220_0.gif)


 Solid lumber versus engineered I-joists
Up until 20 years ago, most of the floors in this country were built with standard 2x joists. These days, more floors are being built with engineered I-joists. So named because of their “I” profile, I-joists have plywood top and bottom chords connected by an OSB web (see the top left photo on p. 62). They offer several advantages over solid lumber. Being an engineered product, they are knot-free and can span long distances without interior support. I-joists don’t
Volunteers who help build Habitat houses use only hammers to drive nails. But these days, buildings are nailed together with all kinds of pneumatic nailers. These are good, reliable tools, available for framing, finish work, siding, and shingling. However, there are basic safety considerations to keep in mind.
■ Treat a pneumatic nailer with respect. Be mindful of what you are doing. Never point a nailer at yourself or at others.
■ Read and follow the instruction manual regarding its maintenance and use.
■ Don’t walk around with your finger on the trigger. You could accidentally fire a nail.
■ Adjust the air pressure as needed. Larger nails require more pressure.
■ Wear safety glasses or goggles.
■ Disconnect the nailer from the air compressor before clearing a jammed nail.
■ When nailing on a sidewall, don’t hold the nailer in front of your face. Hitting a metal strap or other hardware beneath the surface could cause the nailer to recoil into your face with considerable force.
■ Drain moisture from the compressor tank after using it. A rusty, compromised tank can explode under pressure.
■ No one under 18 years of age should use a pneumatic nailer.
■ Pneumatic nailers should only be used by a trained professional or an experienced volunteer under supervision.


Leave a reply