STEP 8 SEAL THE ROOF WITH FELT PAPER
Now that the house has been framed and sheathed, it’s time to seal it from the elements. As long as you are able to work safely on a roof, you can cover it with roofing felt and shingles. It’s best if all the plumbing and heating vents are through the roof before you install the felt.
If that isn’t possible, just make sure they’re installed before you begin shingling.
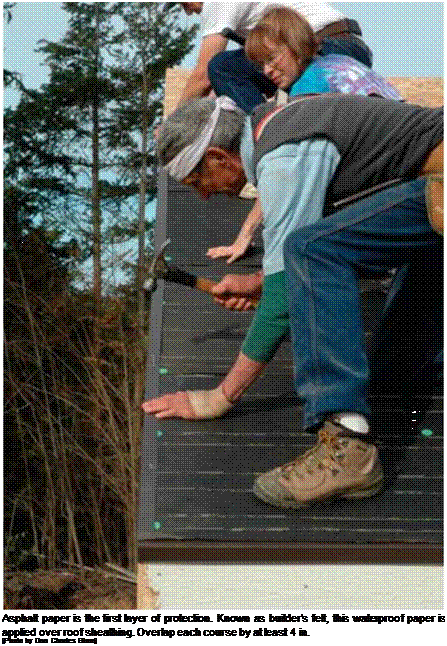
Felt paper, sometimes called tar paper or builder’s felt, is the first protective layer installed over roof sheathing. This material has evolved in a fashion similar to that of a candy bar. In the
old days, you could buy a good-size candy bar for a nickel. Today, you get a much smaller bar at a higher price. Similarly, the felt paper available today is much lighter, even though it’s still sold as 15-lb. and 30-lb. felt. I like to use 30-lb. felt for the underlayment because it provides extra protection and the cost difference isn’t that great. Roofing felt has horizontal lines marked on it. Follow a line that provides a minimum 4-in. lap as you roll one row over another.
Some builders like to snap a chalkline on the sheathing 36 in. up from the edge of the gutter or fascia board and lay the first roll of felt to that line. This makes the roll lay down straight. Alternatively, you can hold the felt flush with the edge of the roof. Unroll the felt flat (with no bumps or wrinkles) and tack it down with roofing tacks. A roofing tack is a small nail with a large plastic button (generally green, orange, or red) on top (see the photo above). Or you can use a pneumatic nailgun to nail these plastic buttons in place. Stepping on felt that is not nailed well can cause you to slip off the roof, so use plenty of roofing tacks (6 in. o. c. at the
bottom and ends and 10 in. o. c. from top to bottom every 24 in. o. c. across the roof). Roofing tacks hold the felt in place, which is especially important if the roof won’t be shingled for several days. Pick up any tacks that fall to the ground so that no one steps on them. Finally, trim the felt flush with the gable ends.
Whether you are tacking down roofing felt or nailing on shingles, it’s important to consider whether the nails can be seen from below. When the eaves around the house are open (no soffit), a long nail penetrates the roof sheathing and is visible to anyone who looks up. Hundreds of shiny nails sticking through the plywood or OSB is unattractive. Therefore, when tacking felt around the perimeter of the roof, take care to nail the tacks into the barge rafters and gable-end rafters—not just through the sheathing into the air. When nailing shingles, use 5/s-in. nails at the gable overhangs and eaves. When working over the house frame, nails that penetrate the sheathing in the attic are not a problem.


Leave a reply