STEP 5 INSTALL THE DECKING AND STAIR TREADS. the ready supply of redwood decking has disappeared along with the big trees. Cedar decking is available in some areas, but at a premium price. More and more people are using plastic decking material or deck boards that are a combination of wood chips or sawdust and recycled plastic. Although the up-front cost of this high – tech decking is greater than that of PT wood, the new materials don’t warp, crack, or require regular finishing treatments to maintain an attractive appearance. They are worth considering
If you’re installing wood decking, keep in mind that many boards have a tendency to cup because of their circular grain structure. If you see a curve in the end grain of a board, lay it so the curve forms a hill rather than a valley. Should cupping occur sometime in the future, water will run off rather than pool. Exposed PT or cedar decking needs to be treated with a good deck finish every other year or so.
On narrow decks, the boards are often installed at a right angle to the house. I usually attach the first board on the end of the deck where the stairs are (or will be). Let the deck board overhang the end framing by about 1 in.
I cut the boards slightly longer than the deck. With the boards a bit long, you can snap a chalkline and cut them off evenly so everything looks neat and proper.
I use 16d nails as spacers between wood decking boards. Placing one nail near the house and
 another near the edge of the porch maintains consistent spacing. Where a board crosses a joist or beam, drive two decking screws. Those steel screws have a galvanized or polymer coating that protects against rust, and their coarse threads drive quickly and hold much better than nails do. To install l’T-in.-thick decking, use 3-in. screws. To install 5/4 boards, 21/2-in. screws will do. Although it takes a bit more time, I predrill the screw holes in the decking with a 3/i6-in.-dia. bit. This makes it easier to pull the boards tightly against the framing and just about eliminates the possibility of splitting a board.
When you reach about 6 ft. from the end beam, calculate how many more boards will be required to cover the distance, and check whether the distance is equal along the ledger and along the rim joist. You may need to fine-tune the spacing between boards to restore parallel orientation and to make sure the final board is of a reasonable width.
Once all the deck boards are in place, snap a chalkline across the front edge about 1 in. from the rim joist, then cut them straight with a circular saw. Tack a lx to the deck to guide the saw and ensure a good-looking, straight cut. Take your time and do a good job. This is finish work, and it must look right.
Most codes require railings only when a deck is more than 30 in. off the ground, but you may want to build a rail on a lower deck anyway, for appearance if not for safety. The basic structure of a typical deck or porch railing consists of posts, rails, and balusters, which are also called uprights or pickets.
Even with basic PT lumber, many designs are possible. For example, you can eliminate the bottom rail, extend the balusters down, and fasten them to the rim joist. You can include a 2×6 “cap” installed over the tops of the posts and over the top rail. And you can use a chop – saw to bevel one or both ends of each baluster to give your work a sleeker appearance. There are even decorative PT balusters, along with shaped top and bottom rails that are grooved to hold baluster ends. Also available are quality vinyl railings that are attractive and maintenance-free. As I mentioned at the beginning of this chapter, it’s worthwhile to investigate the design possibilities, so take a drive around your neighborhood and visit a lumberyard or home center that carries these building supplies. No matter what the design, make sure the railing meets code requirements (see the sidebar on the facing page).

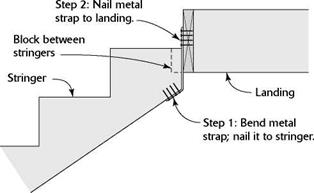
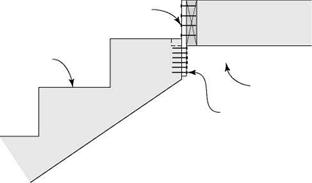
TWO WAYS TO HANG STAIR STRINGERS
1. WITH METAL STRAPS 2. WITH A PLYWOOD HANGER BOARD
|
|
|
|
|
|
|
|
|


Leave a reply