STEP 2 INSTALL THE LEDGER
On a house built over a basement or crawl space, a deck or porch can be attached to the house frame. Deck building then becomes a lot like framing a floor-joist system inside a house (see
Chapter 3). Step one in this process is to attach a ledger to the house frame. Straight, level, and solidly secured to the house, the ledger acts like a rim joist for the porch. It extends the full length of the porch, supporting its inboard side.
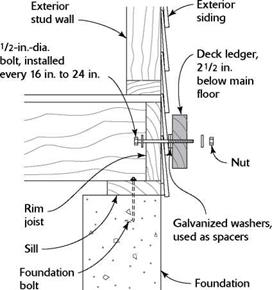
There are several concerns when attaching a ledger, and all of them are important. First, the ledger must be at least 21/2 in. below the level of the interior floor. When l/Tin. deck boards are screwed on top of the ledger, the deck will be l in. lower than the interior floor, which is just about right. If wheelchair accessibility is a concern, plan to build a small ramp to bridge the distance between the deck and the doorsill.
Reserve your best boards to use as ledgers— clear lumber with straight, square edges and

![]()
![]()
![]()
![]()
![]()

![]()
no major imperfections (cracks, large knots, or warping). When installing a ledger, make sure water cannot get behind the ledger and into the house frame, where it could cause rot. And make sure the ledger is secured to the house in a manner that will hold for the life of the building.
Many builders like to use flashing when installing a ledger. Find out which types of flashing builders use in your area. I tend to use heavy-gauge aluminum behind the ledger, though I sometimes opt for high-quality galvanized sheet metal or even copper—expensive though it is—instead of aluminum. Although it can take a while, ocean air and city smog will gradually take their toll on aluminum flashing, causing it to deteriorate.
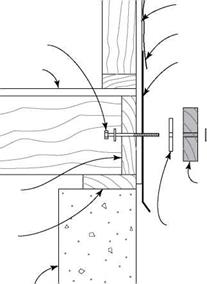
The flashing is installed before the exterior siding. It can be nailed directly to the wall framing and rim joist if no sheathing has been used on the exterior walls. Otherwise, install the flashing on top of the wall sheathing (see the top illustration at right). Order flashing that is wide enough to extend several inches above the ledger and down over the rim joist. At door openings, cut the flashing just enough to bend it over and lay it flat on the subfloor. Use as few nails as possible when installing flashing, and keep them high on the wall. The ledger and exterior siding will hold the flashing in place. If you install housewrap (such as Tyvek or Barricade) over the wall sheathing, make sure the flashing tucks underneath the housewrap, as shown in the illustration.
In the dry Southwest, the ledger can be fastened directly on top of the flashing. Otherwise, use galvanized washers or PT shims to create a narrow (3/8-in. to!/2-in.) drainage space behind the ledger. This prevents buildup of moisture or mold.
1/2-in.-dia. bolt, installed through rim joist every 16 in. to 24 in.
Nut
Deck ledger
PT spacer,
3/8 in. to 1/2 in. thick, (galvanized washers can also be used as spacers)
Spacers allow water to flow behind ledger.
|
|
Air space behind the deck ledger allows water to drain freely. Caulk bolt holes before inserting bolts.
|

![STEP 2 INSTALL THE LEDGER Подпись: Ismet and Rahime Osami are an inspiration to their daughter—making a new life for themselves in Tucson after fleeing Kosovo and building a new home with the help of Habitat. [Photo courtesy HFHI]](/img/1312/image588.gif)

Ismet Osmani and his wife, Rahime, fled Kosovo in the midst of ethnic strife and war and landed in Tucson, AZ, in April 2002. Five years later, with a four-year-old daughter and infant son in tow, they are on the path to homeownership, partnering with Habitat for Humanity Tucson.
“I used to live in a house over there, but it was burned, destroyed in the war," Ismet says of his home in Serbia. “Now we’ve been living in an apartment for five years, and you always have to be careful about noise and leaving stuff on the porch— it’s hard."
Ismet has a degree in education and was a counselor before he immigrated with his family. Now he
works as a driver for a hotel and holds down a second job in a restaurant—overqualified, perhaps, but he is glad to be working. Despite his busy schedule, Ismet dedicates every spare hour he has toward building his home. In fact, he finished his required 400 hours of “sweat equity" with Habitat long before the construction of his house was complete. When work kept him away from the house site, Ismet would often drive by to see how things were coming along.
This past summer Ismet and Rahime became U. S. citizens, an accomplishment earned through study, English lessons, and perseverance. They are extremely proud of all that they have been able to do since leaving Kosovo, and are ready to put down roots in Tucson.
“We worked hard and feel like we’ve accomplished a lot," he says. “We’ll probably live the rest of our lives here." —Rebekah Daniel
1ІІІ1І111ІІ11І11ІІІ1І111111ІІ11І1»І1»ІІ1І1І11ІІ1І1І1І1ІИ1ІІ1ІІІІ1НІ1ІІ1І111І1ІІІ11ІІІІІІІІІІ1ІІІ1ІІІ1ІІ111ІІІІ1ІІ1ІІІ1І1І1ІІ1І1ІІІ1ІІ1ІІ1І1І11І1І111ІІ1І1ІІІІ11Н1ІІ11ІИІІІІ1І1ІІ1І11ІІІІ1І1І1І1І11111ІІІІ1ІІ1І1І11ІИІ11І1ІІ1Ш1ІІІІІІІ1ІІ1ІШ111І1ИІ1ІЩІ11Ш1ШШ1]
|
|
||
|
|||
|
|
||
|
|||
|
|||
|
|||
 |
|||
|
|||
|
|||
|
|||
|
|||
|
|||
|
|
|||
 |
|||
|
|||
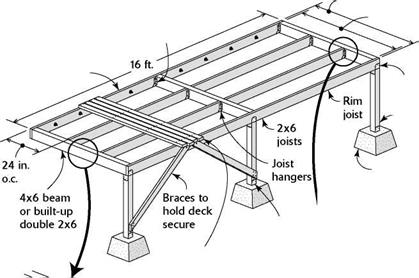

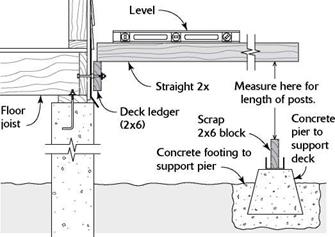

width and set the piers so they are in line with the ledger board and square with the building.
Next, measure the length for the posts that will extend from the piers to support the floor framing. You can do this with a 6-ft. level or with a shorter level attached to a straightedge (see the bottom illustration on p. 183). Lay the rim joist (or a scrap board of the same size) on top of each pier and set the level or straightedge on the ledger, extending it directly out over the pier. The distance between the rim joist on the pier and the level or straightedge is the post’s length. Cut those posts from PT 4 x4s; make them Vi in. short (be consistent) so that the deck will slope away from the house just a bit.
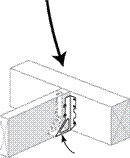
Cut the two end beams (girders) first, using PT 4x 6 lumber or doubled ix 6s, as shown in the top illustration on p. 183. For a deck that is 6 ft. wide, cut the two end beams at 5 ft.
8 in. The ledger and rim joist will add 3 in. to the overall width. Those beams connect to the ledger by a metal framing connector and rest, with i in. bearing, on the end posts. Connect any beams falling between in the same manner, but run them long over the tops of their posts. Stretch a chalkline from the ends of the two end beams across the interior beams and snap a line. Cutting the interior beams to length in this manner ensures a straight rim joist in the front.
Next, cut the rim joist to length. On a rectangular deck, the rim joist is the same length as the ledger. If you have a long deck and use several pieces of rim, make sure they break over a post. The rim rests on the posts and is nailed into each beam with two 16d galvanized nails. Toenail both the beam and the rim to the post. Then reinforce the beam-post-rim joist connections with metal framing connectors. You can nail a flat, gusset-type connector over the joint between a post and the rim joist and use rightangled connectors on the inside.
Before installing the joists between beams, make sure the post-and-beam assembly is parallel and square with the house and all the posts are plumb. Brace the porch frame so it will remain square until the stairs are attached and the decking is screwed in place. When cutting and installing joists, I recommend using joist hangers to ensure that all joist-to-beam connections are strong. The joist spacing you use depends on the decking material you plan to install. A 24-in. o. c. spacing is usually adequate for F/2-in.-thick PT decking boards. For 5/4 (F/4-in.-thick) PT decking, use 16-in. o. c. spacing. If you use any of the synthetic decking material that’s becoming more popular these days, follow the manufacturer’s recommendations for joist spacing.
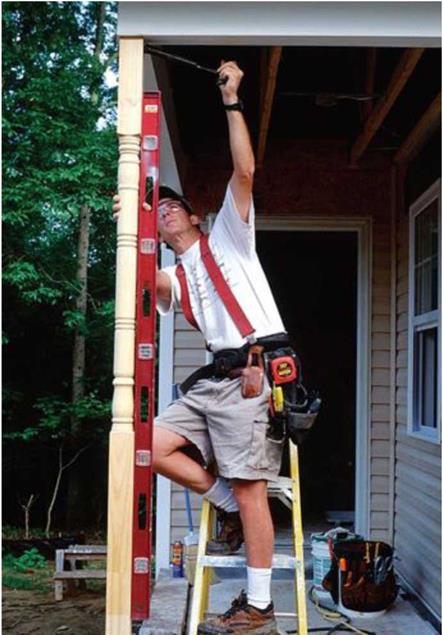
The corner post is crucial. Holding a long level against the flat sections of a turned post, a volunteer makes sure the post is plumb.
 |
|
|
|
|
|
|
|





Leave a reply