SIZES AND TYPES OF DRYWALL
Drywall is made by sandwiching a gypsum core between two sheets of paper. The “good" side of the panel is faced with smooth, white paper that takes paint easily. The “bad" side is darker in color, with a rough, porous paper surface. Panels (also called sheets) of drywall are packaged in pairs; to open the package, simply pull off the strips of paper that extend along each end.
The standard width for drywall panels is 48 in. For houses that have 9 ft. ceilings, use drywall sheets that are 4 ft. 6 in. wide. Different lengths are available, but for affordable housing the most commonly used lengths are 8 ft. and 12 ft. The most common thickness for drywall is V2 in. However, 5/8-in.- thick panels are often used on ceilings where the joists are spaced 2 ft. o. c. because they are less prone to sagging. Most
codes require 5/8-in. panels between the garage and the house for fire resistance. If you use 5/8-in. drywall on the walls, be sure to order wider door jambs.
Water-resistant drywall is often used in high-moisture areas, such as bathrooms. Called “greenboard" because of its green-paper facing, it is treated to resist moisture damage but is not waterproof. It’s most often used to cover wall areas above tub and shower enclosures. Greenboard can be taped and painted just like regular drywall. It should not be installed on the ceiling unless the joists are spaced 12 in. o. c. to keep the board from sagging.
The short (48-in.) ends of a drywall panel are cut square, leaving the gypsum core exposed. The long edges of the panel are faced with paper and tapered so that the seams between panels can be leveled with the surrounding drywall during the finishing process.
![]()

 to following the advice explained here, see the sidebar above and on p. 217 for information on sizes and types of drywall and how to order and store the material.
Make sure the studs and joists are dry
Framing lumber used today often arrives at the job site with a high moisture content. Over time, it will shrink—sometimes quite a lot. When the studs and joists shrink after the drywall has been installed, the fasteners can work loose. A loose nail or screw can create a noticeable and unsightly bump, or nail pop, in the drywall surface.
To reduce the chances that nail pops will mar your drywall work, you may need to close in the house and turn on the heat for a couple of weeks. Leave a couple of windows cracked open to allow moist air to escape as the wood dries. You can ignore this advice if you’re working with dry wood or if you’ve had the good fortune to frame your house in clear, warm weather.


Otherwise, make sure the wood dries out. You can even run a dehumidifier inside, if necessary.
Take time to clean up any scraps of wood or trash on the floor. Once the floor is clean, use a piece of keel (I use red because it shows up well) to mark the stud, trimmer, and cripple locations on the floor and the joist locations on the top plate. Knowing the location of studs and joists makes it easier to nail off drywall and, later, baseboard trim.
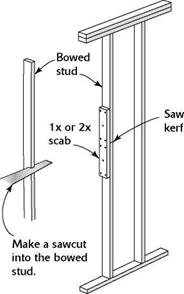
To straighten a wall stud, cut a kerf into the stud at its most bowed point, pull the stud straight, then nail a 1x or 2x scab alongside it to strengthen the stud and keep it straight.
 Dryall has delicate corners and edges. When you store and handle sheets of drywall, make sure you protect the panels’ edges and corners from getting damaged.
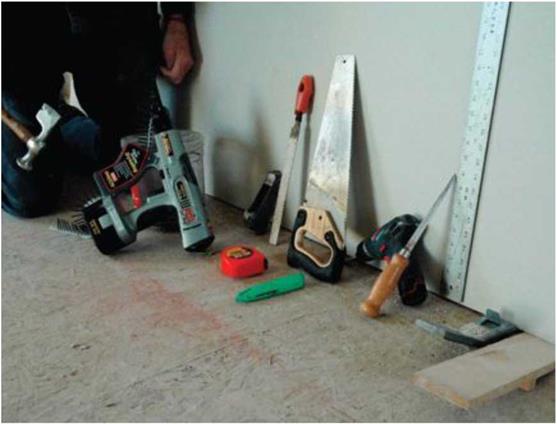
Several specialized tools make it easier to cut and hang drywall on ceilings and wall studs. [Photo by Don Charles Blom]

Even if all the studs were crowned in one direction during wall framing, it doesn’t ensure a perfectly straight wall. Sight down the length of the walls or lay a straightedge across them to locate bad studs. Replace any badly bowed studs, or fix a bowed stud by making a cut into the bowed area, forcing the stud straight, and bracing it with a 1x cleat (see the illustration on p. 215).
The tools you need to install drywall are pretty basic. In addition to the chalkline and tape measure you’ve used for the work covered in earlier chapters, you’ll need the following tools:
UTILITY KNIVES AND SPARE BLADES.
Most straight cuts in drywall are made with a utility knife. Have a good supply of new blades handy. A sharp blade cuts cleanly through a panel’s paper facing, whereas a dull blade can tear the paper.
DRYWALL SQUARE. This large, aluminum, T-shaped square enables you to quickly and easily make straight, square cuts in drywall. SCREW GUN. A screw gun takes the guesswork out of fastening drywall because it sinks drywall screws just the right distance into the panel. This tool resembles an electric drill and holds a replaceable Phillips-head bit. DRYWALL HAMMER. This hammer looks like a small hatchet with a convex hitting surface. The curved face allows you to set the nail below the surface of the drywall without breaking the paper. The hatchet end is not sharp and can be used for levering or wedging drywall into place.
SURFORM® TOOL. Designed to function like a handplane, this shaping tool is very useful for trimming small amounts off the edge of a panel to improve its fit on the wall or ceiling. Avoid large Surform tools; the smaller versions are more maneuverable and fit in a pouch on your tool belt.


Leave a reply