MAKING A BLOCK-CUTTING TOOL
Many carpenters cut blocks with a chopsaw, which is fine if you have one. But there is another easy way to cut blocks. Try making a simple block-cutting tool to use with a circular saw. Once you have the guide, simply hook it on a 2x and make the cut along the edge.

joists, bridging is often visible between the rim joists and the interior girders or crib walls in the basement or crawl space of an old house. Stress tests have long shown that bridging provides little extra stability to a floor sheathed with plywood or OSB. My experience is that most midspan bridging does little except increase floor squeaks.
Blocking between joists, on the other hand, helps stabilize a building and keeps the joists from falling like dominoes under severe lateral stress, such as that generated by an earthquake
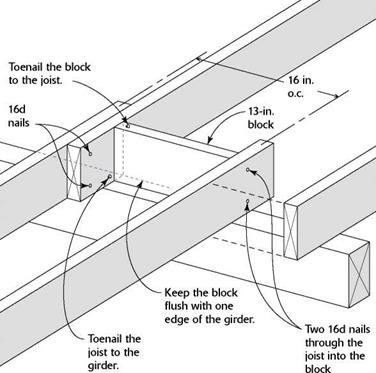
or high winds. Blocking is installed at the bearing points where joists cross girders or crib walls. On many houses, this is also the spot where joists from opposite sides of the building lap against each other (see the illustration on the facing page). To quickly cut identical blocks with a circular saw, use a jig like the one shown in the sidebar above.
If you’re building with I-joists, you’ll need to determine the length of the blocking on the job site, as I-joist width varies from manufacturer to manufacturer. The most common width


for residential I-joists is 9V2 in., so you can cut blocking from scrap pieces of I-joists or from 2×10 lumber. Cut the blocking to fit snugly between the chords of adjacent I-joists, and nail the blocking to the chords.
When nailing blocking between joists, it’s best to begin at one end of the house and simply work your way toward the opposite end. Sight down the length of the first joist (the one closest to the rim joist) and make sure it is running straight. Measure the first joist space and cut the block to length. Set the block on edge over a girder or a crib wall. Drive two 16d nails into one end of the block and two 16d nails through the floor joist into the opposite end. Then nail the joist directly into the girder with two 16d nails. Finish by nailing the lapping joists together with two more 16d nails.
Once you have a few blocks nailed in place, use a tape measure to make sure the joists are maintaining an accurate 16 in. or 24 in. o. c. layout so that the sheathing will land mid-joist. If necessary, cut the blocks a bit short or long to maintain accurate spacing.
In many parts of the country, rough plumbing and heating ductwork are installed before the floor is sheathed, so be sure to check with those contractors before sheathing. Also, find out whether you need a floor joist inspection before you install the floor sheathing.
STEP 8 INSTALL THE FLOOR SHEATHING
Before plywood and OSB were readily available, we sheathed floors with softwood 1x 6s that were cut and nailed diagonally across the joists. To make the joints between the 1×6 boards, the ends of each board were cut at a 45-degree angle. Frequently, the 1×6 lumber was of poor quality and had large knots. I still have scars
Lapped joists spaced at 16 in. o. c. require a block about 13 in. long between the joists.


Leave a reply