Locate and drill bolt holes
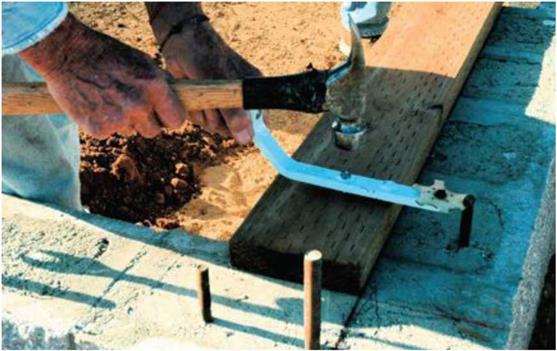
Anchor bolts sometimes come out of the foundation at odd angles. You can straighten bent bolts with a length of pipe, as shown in the photo at left. Then set long, straight, pressure-treated sill boards in place for marking and drilling. You can use a square and a tape measure to lay out the bolt hole locations
![Locate and drill bolt holes Подпись: A long pipe straightens a short bolt. A length of 1-in.-dia. pipe straightens any bolts that may have been bent during (or since) the foundation pour. [Photo © Roger Turk]](/img/1312/image197_1.gif) ІІІІШІІІІШШШШШШШШШІІШІШШШМШІМШІІІШІІІІІІШІІІШШІІІШІІШШШШШШШШІІІІМШШШШШІІШШШШІІІШШШШШШІІІІІІІІШШШШІМШШІІІ
ІІІІШІІІІШШШШШШШШШІІШІШШШМШІМШІІІШІІІІІІШІІІШШІІІШІІШШШШШШШШІІІІМШШШШШІІШШШШІІІШШШШШШІІІІІІІІШШШШІМШШІІІ
POSITIONING SILLS ON THE FOUNDATION
![]()
 Siding without sheathing
|
|
|
Nut and washer |
|
Sill |
|
|
|
Anchor bolt |
|
|
|
Concrete foundation |
ABC
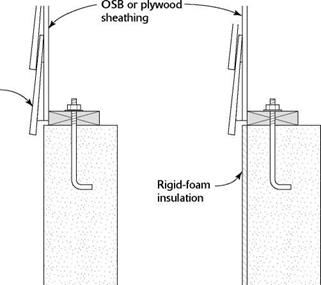
Sill plates can be set flush with the edge of the foundation (A) and the siding nailed directly to the walls. When sheathing the house frame with OSB or plywood, though, hold in the sill plates 1/2 in. (B). When using rigid foam to insulate a basement or a crawl space (C), position the plates so that the outside face of the sheathing is in plane with the outside face of the foam.
|
|
|
|
|
|
|
|
|
|
|


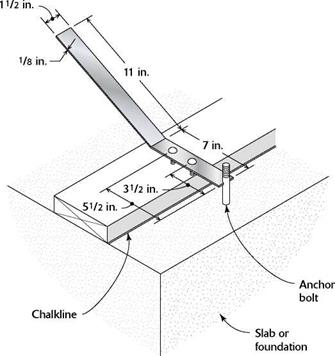
z/2-in. bolts. For 5/8-in. bolts, use a 3/4-in. bit.

on the sills, but it’s a lot faster to mark the hole locations with a bolt marker. You can make a bolt marker or buy a ready-made version (see the illustration on p. 59 and Resources on p. 279). To use this layout tool, place each plate directly on the inside of the chalkline.
Once the bolt locations are marked, set the sill plates on blocks of wood or sawhorses and drill the holes. Use a 5/8-in. bit to make holes for
Install sill seal and termite shields
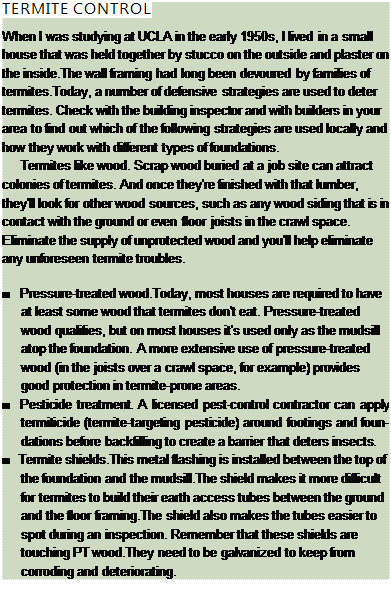
Sweep the foundation clean of debris, then put down a layer of sill seal insulation where the sills will be located (see the photo on the facing page). Sill seal does just what its name says. As an alternative, you can run two heavy beads of silicone caulk between the sill plates and the foundation. This also prevents cold air leaks between the foundation and the sill. In areas where termite infestation is a possibility, you’ll also need to lay down a termite shield over the foundation bolts and under the sill. As shown in the illustrations on p. 50, the shield edges must extend beyond the foundation (including the foundation insulation) and the sill.
Place the sills over the bolts, put on the washers and nuts, and tighten the nuts with a crescent wrench, taking care to keep the inside edge of the sill on its layout. (Note: When working on a slab, drill holes in the plates but leave them unbolted until after the wall is raised— see Chapter 4 for details.) Codes in earthquake and high-wind areas often require the use of larger washers (galvanized, /4 in. thick, and 2 in. square). These larger washers help secure the mudsill and keep it from splitting when under pressure from lateral forces.
If the measuring work you did at the beginning of this step told you that parts of the foundation were out of level, you can expect the sills to be that way, too. To correct slight discrepancies (up to /4 in. or so), you can insert pressure- treated shims underneath the sills. For larger errors, it’s best to call in a concrete contractor.


Leave a reply