Install step flashing at roof – wall intersections
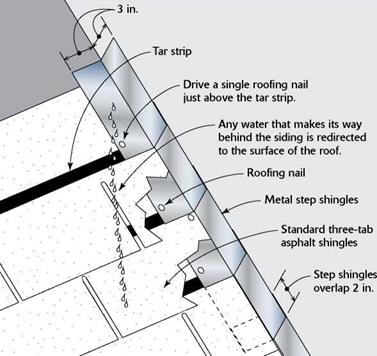
Use metal step flashing to waterproof the intersection where a roof butts into a wall. Usually made from aluminum or copper, metal step flashing is bent to form a series of elongated, L-shaped pieces that are lapped over each other in successive shingle courses as well as upward along the wall. The step flashing we used on this house is 10 in. by 6 in., and each leg is 3 in. wide.

 |
The illustration on p. 144 shows how step flashing is installed on each course of shingles that runs into a wall. (It’s also used where shingles meet a chimney or a skylight curb.) Each time a regular shingle is laid down, a step shingle is placed under it—on the part of the regular shingle that will be covered. Lap step shingles by about 2 in., one on top of the other. One nail above the tar strip should be enough to


hold each step shingle in place. As each successive course of shingles is nailed in place, a portion of the step shingle on the roof is covered. Later, when the wall is covered with siding or stucco, the vertical leg will be covered as well.


Leave a reply