Foundation wall insulation
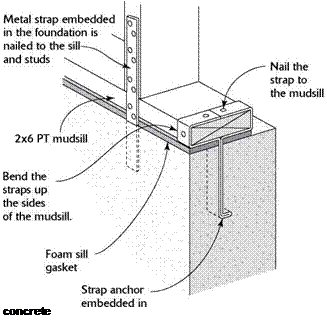
Foundation insulation isn’t used in mild climates. But in areas with frigid winter months, it can improve interior comfort and save on heating costs. Even though it’s not required by code in many areas, it’s definitely worth installing wherever prolonged freezing temperatures are expected. You can install insulation on the inside or outside of a crawl-space or basement wall. Exterior insulation, in the form of rigid foam boards, is glued to the foundation walls before backfilling. Where they’re exposed above the finished grade on the exterior, insulation boards must be protected with siding material or stucco. It’s important to remember that any type of foundation insulation can provide a hidden passageway for termites and other insects to enter the house. Make sure you cut off this passageway by installing a termite shield beneath the sill. As shown in the illustrations on pp. 50—51, the shield should be installed between the top of the foundation and the sill.
Drainage around the foundation
After you’ve taken care of the details, you can begin backfilling around the foundation. Along the footing, install perforated drainpipes in a bed of gravel several inches thick. Cover the pipe with at least several more inches of gravel. To prevent the drainage channel from silting up, cover the top layer of gravel with filter fabric before backfilling it with soil.
![]()


![Foundation wall insulation Подпись: Snap chalkline to lay out the sill. The line shows where the sill's inside edge rests. If the foundation isn't perfectly square, adjust the line's position so that the sills will be. [Photo by Roe A. Osborn, courtesy Fine Homebuilding magazine © The Taunton Press, Inc.]](/img/1312/image193_1.gif) Most codes require that anchor bolts be located 1 ft. from each corner of the foundation, 1 ft. from the ends of each sill plate, and a maximum of 6 ft. o. c. everywhere else. These are minimum requirements. Builders living in earthquake or high-wind areas often use 5/8-in.-dia. anchor bolts rather than ‘A-in. bolts and reduce the spacing to 4 ft. o. c. or less. As mentioned in Chapter 1, it’s important to check with the local building inspector to ensure that the house you’re building meets or exceeds code.
Most codes require that anchor bolts be located 1 ft. from each corner of the foundation, 1 ft. from the ends of each sill plate, and a maximum of 6 ft. o. c. everywhere else. These are minimum requirements. Builders living in earthquake or high-wind areas often use 5/8-in.-dia. anchor bolts rather than ‘A-in. bolts and reduce the spacing to 4 ft. o. c. or less. As mentioned in Chapter 1, it’s important to check with the local building inspector to ensure that the house you’re building meets or exceeds code.
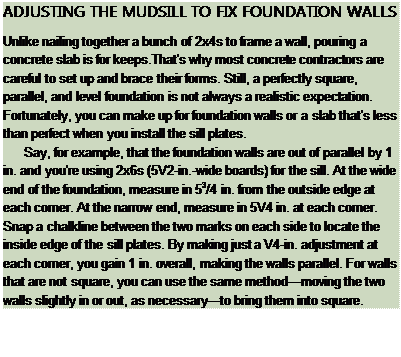
Unfortunately, you can’t assume that your foundation is straight, parallel, square, and level. But here’s some good news: If you know how far off it is, you can usually make the appropriate corrections when installing the sills (see the sidebar on p. 55). It’s worth it to make the sills as straight, parallel, square, and level as possible. Otherwise, the mistakes made at this preliminary stage tend to become even more troublesome further down the line. Here’s how to check the foundation:
STRAIGHT. Check the walls for straightness by stretching a dry line (string) from corner to corner. At this point, you just need to know how straight the top outside edge of the foundation is, because you’ll be measuring in from this edge to locate the sill.
PARALLEL. Measure across the walls at both ends and in the middle. All three measurements should be the same. I use /4 in. over 20 ft. as the tolerance limit for parallel.
SQUARE. Plus or minus ‘/2 in. over 20 ft. is the tolerance that I use for square walls.
You can check any rectangular foundation for square simply by comparing the diagonal measurements, which should be equal. When that isn’t possible, use the 6-8-10 rule to check for square corners. Measure 6 ft. in from a corner on one side and 8 ft. on the other side (see the photo on the facing page). Then measure between those two points. If the corner is square, the hypotenuse of the triangle should be 10 ft. For smaller buildings, 3 ft. on
![Foundation wall insulation Подпись: Test for square. One way to test foundation corners for square is to measure 6 ft. from the outside corner along one side and 8 ft. along the other. If til e til ird side of the triangle measures exactly 10 ft., you have a right angle. [Photo © Roger Turk]](/img/1312/image194_0.gif)
one side and 4 ft. on the other should yield a 5-ft. hypotenuse. On a large building, use measurements of 12 ft., 16 ft., and 20 ft.
LEVEL. I like to check a foundation for level with a builder’s level (especially one with a laser beam) set on a tripod. If you don’t have one of these available, an inexpensive water level will work fine (see the illustration below). The walls should be level to within V4 in. over 20 ft.


Leave a reply