DETAILS
From Locks to Smoke Detectors to Landscaping
it was the great Yankee catcher, Yogi Berra, who said of baseball, “It ain’t over ’til it’s over.” The same is true of building a house. Even as you finish the interior painting, install the cabinets, and complete all the plumbing and electrical work, there’s still plenty to do before a new house is ready to welcome its first inhabitants. Although most of these final tasks are small compared to the major construction stages that have already been done, there are a surprising number that belong on what some contractors refer to as a punchlist. Such tasks range from installing the toilet-paper holder and mounting a fire extinguisher to nailing up house numbers and putting in the medicine cabinet. Taken together, these little assignments can demand just as much of your time—and possibly more—than some of the bigger jobs you did earlier. The step-by-step format in this chapter will help you divide these details into manageable chunks of work.
STEP 1 INSTALL THE HARDWARE AND FIXTURES
Most finish hardware will be seen and used for the life of the house, so take your time installing items such as door locks, drawer pulls, and towel bars. Once they’re installed neatly and accurately, they’ll look attractive and work well for a long time. Keep in mind that safety items, such as grab bars, also need to be installed securely so that they’ll be safe to use.
Choose and install exterior-door locksets and deadbolts
![DETAILS Подпись: Find a comfortable seat. A small workbench or even a 5-gal. bucket allows you to sit down when installing latches and locksets. [Photo by Don Charles Blom]](/img/1312/image849.gif) Buy your welcome mat early! To reduce the amount of dirt that gets tracked into a house after new carpeting and vinyl and wood flooring have been installed, set up some sort of dirt-catching mat. Put it by the front door near a sign that says, “Please wipe your feet or remove your shoes.”
Buy your welcome mat early! To reduce the amount of dirt that gets tracked into a house after new carpeting and vinyl and wood flooring have been installed, set up some sort of dirt-catching mat. Put it by the front door near a sign that says, “Please wipe your feet or remove your shoes.”
![DETAILS Подпись: Use an easier handle. A lever-type door handle is easier to open than a round knob is, especially for older folks and those with arthritis or carpal-tunnel pain. [Photo © Rex Cauldwell]](/img/1312/image850.gif)
have a bunch of keys made and give a key to any contractor who needs to get in. There is no need to install the finished locks until after the painting is done and just before the final inspection.
With door locksets, you’ll find a wide range of prices for different products. The quality range is just as broad. You don’t need to buy the best lock on the shelf, but you shouldn’t buy the cheapest, either. The exterior lockset is used many times every day, and a bargain-basement lock won’t hold up over the long haul.
LEVERS, KNOBS, AND KEYS. Instead of buying a lockset that opens with a round knob, consider one that opens with a lever, as shown in the photo at left. This type of lockset and handle is much easier on the hands of older folks and people with arthritis. Also, be sure to buy exterior locks and deadbolts that open with the same key. If a supplier doesn’t have enough identical-key locksets in stock, order them. This will eliminate the hassle of having different keys for all the exterior doors.
и и їм и їм їм и їм їм и їм и їм їм и їм їм и їм їм и їм и їм їм и їм їм и їм и їм їм и їм їм и mi и
|
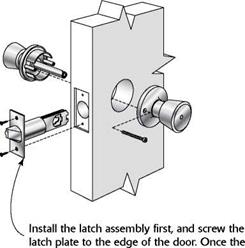
latch assembly has been installed, you can install the handles and screw them together. It’s often necessary to use a sharp chisel to deepen the mortar for latch assembly. |
For good reason, fire-safety code requires that deadbolts open with a lever (not a key) from the inside. You wouldn’t want to look for a key with fire licking at your heels. INSTALLATION DETAILS. Prehung exterior doors are drilled at the factory to receive both a lockset and a deadbolt. If you buy your doors this way, you should have an easy time installing the lockset. The installation instructions that come with each unit aren’t difficult to follow (see the illustration on the facing page). When installing locksets, I like to sit on my workbench with my tools and hardware on the shelf below. This is easier and more comfortable than kneeling or bending over (see the photo on the facing page).
The spring-loaded latch assembly and deadbolt are installed first. The factory-cut mortises for the latch and deadbolt plates, as well as those in the door jamb for the strike plates, all have rounded corners. If the plates in your hardware set aren’t rounded also, you’ll need to cut the mortised corners square with a sharp chisel to
make the plates fit. You may need to deepen the latch bolt mortise to ensure that the plate fits flush with the surface of the door edge.
Once the latch and deadbolt plates have been screwed to the door edge and the strike plates have been screwed to the jamb, you can install the knobs or handles. On exterior doors, standard practice is to orient the keyhole so that the key can be inserted with the smooth side down. Most folks find that this makes it easier to fit the key in the lock when unlocking a door in the dark.


Leave a reply