Cat’s paws and flat bars
These prying tools really come in handy during new construction and remodeling work. Your hammer’s claw will generally work fine for removing exposed nails. When a nail is buried, though, a cat’s paw is the tool to use. With a couple of hammer blows, you can sink the cat’s paw into a board, grab the head of a nail, and lever it above the surface. From there, your hammer takes over to completely remove the nail.
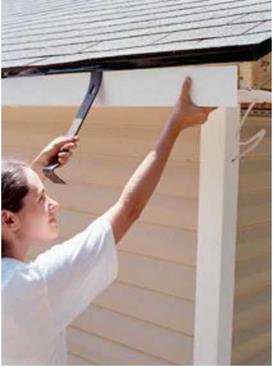
A flat bar can also be used to pull nails, or it can be used as a prybar. In new construction, I often use a flat bar to separate boards that have been temporarily nailed together and to slip aluminum or vinyl trim under a drip edge (see the photo at right).
|
|
|
A flat bar has many uses. Here, a volunteer uses a flat bar to help slip a piece of aluminum cladding under the roof’s drip edge. |
Once you have a few tools, you’ll need to carry them with you as you frame walls and install siding or shingles. It doesn’t work well to carry a measuring tape in your jeans and to fish nails from a shirt pocket. Fifty years ago, when I started working as a carpenter, we wore white carpenter’s overalls with a lot of little pockets for nails and tools. Those soon gave way to cloth aprons, which were replaced by heavy leather aprons with a wide leather belt. Today, nylon pouches seem to be taking over, and for good reason: The best versions are lighter than leather and just as durable. As with tools, the selection of tool belts, pouches, and holders can be confusing. There are good belt and pouch systems for both men and women. Inexpensive versions are available for novice and occasional builders. If you’re serious about construction work, consider some of the tool belt systems that allow you to add pouches and holders as you need them.
For larger items or for tools that are used only occasionally, the traditional carpenter’s toolbox has given way to the carpenter’s tool bucket (see the photo at left). This is just a 5-gal. bucket fitted with a bag insert that allows


Leave a reply